Reply
 
Thread Tools Search this Thread
 
Old 07 December 2011, 06:48   #1
Member
 
Country: UK - England
Town: Gloucestershire
Boat name: Osprey
Make: Osprey Vipermax
Length: 5m +
Engine: E-tec 300 G2
MMSI: TBC
Join Date: Dec 2006
Posts: 4,020
Osprey 7.0 meter Refurb

Having finally finished all the work on the trailer and getting out for one last blast before the refurb the boat is now installed in its new home and the refit begins...

There is little to do in terms of the tubes and hull other than a little bit of filling and tidying up which can wait until the end, primarily the refit is going to be focused on the console, Stripping out and replacing all the wiring and replacing all the electronics is the main work to be done.

First off the console. This is how it looked when we got the boat... His picture does not really show it but it was not well put together and most of the electronics were a:very old & b:knackered !

Also the side mount control that had been rigged looked ugly and had all the cables going through the bottom section fo the console... Very Naff.
Attached Thumbnails
Click image for larger version

Name:	Console on Klingon.jpg
Views:	443
Size:	55.4 KB
ID:	64274  
__________________
---------------------------------------------------
Chris Stevens

Born fiddler
Chris is offline   Reply With Quote
Old 07 December 2011, 06:52   #2
Member
 
Country: UK - England
Town: Gloucestershire
Boat name: Osprey
Make: Osprey Vipermax
Length: 5m +
Engine: E-tec 300 G2
MMSI: TBC
Join Date: Dec 2006
Posts: 4,020
So first evenings work...

Disconnect all the cables and remove everything !

Mike at Osprey is making a new console top so this one can be scrapped as it got more holes than a piece of swiss cheese! also new Honda Binnacle mount controls are on order as are all the other bits and pieces...

Next Job is to remove the A-Frame and strip all the wiring and electricals off that.
Attached Thumbnails
Click image for larger version

Name:	Console Bottom.jpg
Views:	368
Size:	43.2 KB
ID:	64275   Click image for larger version

Name:	Console Top.jpg
Views:	373
Size:	55.7 KB
ID:	64276  
__________________
---------------------------------------------------
Chris Stevens

Born fiddler
Chris is offline   Reply With Quote
Old 07 December 2011, 07:22   #3
Member
 
Country: UK - England
Town: Mighty Penryn
Boat name: Little Joe.
Make: Avon Searider
Length: 4m +
Engine: Honda BF50
Join Date: Aug 2005
Posts: 8,872
What is that poking out centre/rear of console base?
__________________
Mollers is offline   Reply With Quote
Old 07 December 2011, 07:52   #4
Member
 
Country: UK - England
Town: Gloucestershire
Boat name: Osprey
Make: Osprey Vipermax
Length: 5m +
Engine: E-tec 300 G2
MMSI: TBC
Join Date: Dec 2006
Posts: 4,020
Quote:
Originally Posted by Mollers View Post
What is that poking out centre/rear of console base?
That was the rubber grommet where they had fed all the cables for the side mount control box...

It will be going and a glovebox will be going there instead.
__________________
---------------------------------------------------
Chris Stevens

Born fiddler
Chris is offline   Reply With Quote
Old 07 December 2011, 08:10   #5
Member
 
Country: UK - England
Town: Mighty Penryn
Boat name: Little Joe.
Make: Avon Searider
Length: 4m +
Engine: Honda BF50
Join Date: Aug 2005
Posts: 8,872
Quote:
Originally Posted by Chris View Post
That was the rubber grommet where they had fed all the cables for the side mount control box...

It will be going and a glovebox will be going there instead.
Nice.

I have a black hatch to put a g/box in the same place on our's. Not quite gotton around to that little job yet.
__________________
Mollers is offline   Reply With Quote
Old 07 December 2011, 08:19   #6
Member
 
Country: UK - England
Town: Gloucestershire
Boat name: Osprey
Make: Osprey Vipermax
Length: 5m +
Engine: E-tec 300 G2
MMSI: TBC
Join Date: Dec 2006
Posts: 4,020
I had one of these on Time Bandit..

Nuova Rade VHF / Radio hatch with box and lock., Deck Hatches & Portlights | Mailspeed Marine

Don't think they come in grey or balck though...
__________________
---------------------------------------------------
Chris Stevens

Born fiddler
Chris is offline   Reply With Quote
Old 07 December 2011, 12:01   #7
Member
 
1978SeaRider's Avatar
 
Country: UK - Wales
Town: Anglesey
Boat name: Trixie
Make: Scorpion 8.5m
Length: 8m +
Engine: 300hp Suzuki
Join Date: Sep 2006
Posts: 282
Hi Chris,

I viewed this boat back in the summer.... I think the only way to describe it was - massive potential.

Good luck with the re-fit keep posting as you go along, it will be a fine craft once again I'm sure.
__________________
1978SeaRider is offline   Reply With Quote
Old 08 December 2011, 05:57   #8
Member
 
nugent's Avatar
 
Country: UK - England
Town: Bromsgrove
Boat name: Kick-Ass !
Make: PAC/Artic 22
Length: 6m +
Engine: 250hp Yamaha
Join Date: Nov 2003
Posts: 3,572
i have not forgot your screen Chris,
just busy mate, not that you need it yet looking at your pics lol
__________________
˜™
MY BIGGEST WORRY IS THAT MY WIFE(WHEN I"M DEAD)WILL SELL MY TOY'S FOR WHAT I SAID I PAID FOR THEM.
nugent is offline   Reply With Quote
Old 08 December 2011, 23:12   #9
Member
 
Country: UK - England
Town: Gloucestershire
Boat name: Osprey
Make: Osprey Vipermax
Length: 5m +
Engine: E-tec 300 G2
MMSI: TBC
Join Date: Dec 2006
Posts: 4,020
Got some more done tonight..

Disconnected all the cables, pipes etc from the engine so we can replace the cables with Teleflex Extremes and run new fuel line. The battery cables seem to be good and were quite recently replaced so they can stay, as can the engine wiring harness.
Attached Thumbnails
Click image for larger version

Name:	Engine.jpg
Views:	343
Size:	60.7 KB
ID:	64298  
__________________
---------------------------------------------------
Chris Stevens

Born fiddler
Chris is offline   Reply With Quote
Old 08 December 2011, 23:16   #10
Member
 
Country: UK - England
Town: Gloucestershire
Boat name: Osprey
Make: Osprey Vipermax
Length: 5m +
Engine: E-tec 300 G2
MMSI: TBC
Join Date: Dec 2006
Posts: 4,020
The Aframe did not put up much of a fight, It has been self tappered to the deck and then bolted to the transom box. The self tappers are a complete waste of time, no idea why anyone would use them for this job. I will be cutting two access holes to allow me to refit using 8mm bolts through the deck when I put it back on.
Attached Thumbnails
Click image for larger version

Name:	Aframe 1.jpg
Views:	325
Size:	45.5 KB
ID:	64299   Click image for larger version

Name:	Aframe 2.jpg
Views:	258
Size:	56.2 KB
ID:	64300   Click image for larger version

Name:	No A-frame.jpg
Views:	349
Size:	56.2 KB
ID:	64301  
__________________
---------------------------------------------------
Chris Stevens

Born fiddler
Chris is offline   Reply With Quote
Old 08 December 2011, 23:20   #11
Member
 
Country: UK - England
Town: Gloucestershire
Boat name: Osprey
Make: Osprey Vipermax
Length: 5m +
Engine: E-tec 300 G2
MMSI: TBC
Join Date: Dec 2006
Posts: 4,020
The rear of one of the transom boxes has given way a bit and there is a few millimeters of movement when you press down int he corner where it joins the transom and along the side that joins the tube carrier, mainly due to the way the frame was so poorly secured by the self tappers at the front which at some point must have allowd the frame to tilt back a bit and caused the crack.

Will probably leave this to the professionals to sort out..
Attached Thumbnails
Click image for larger version

Name:	Transom Box 1.jpg
Views:	278
Size:	64.9 KB
ID:	64302   Click image for larger version

Name:	Transom Box 2.jpg
Views:	283
Size:	71.9 KB
ID:	64303  
__________________
---------------------------------------------------
Chris Stevens

Born fiddler
Chris is offline   Reply With Quote
Old 08 December 2011, 23:22   #12
Member
 
Country: UK - England
Town: Gloucestershire
Boat name: Osprey
Make: Osprey Vipermax
Length: 5m +
Engine: E-tec 300 G2
MMSI: TBC
Join Date: Dec 2006
Posts: 4,020
Finally an example of someones handywork at some point a pair of Pad Eyes have been fittted to the deck in front of the console bench seat. Whoever fitted them either used very shit stainless screws or just used mild steel Either way I would welcome suggestions as to how to get these out as there is nothing left to get a screw driver to grab into.
Attached Thumbnails
Click image for larger version

Name:	Pad eye 1.jpg
Views:	218
Size:	76.0 KB
ID:	64304   Click image for larger version

Name:	Pad Eye2.jpg
Views:	252
Size:	61.4 KB
ID:	64305  
__________________
---------------------------------------------------
Chris Stevens

Born fiddler
Chris is offline   Reply With Quote
Old 09 December 2011, 00:05   #13
Member
 
Hightower's Avatar
 
Country: UK - England
Town: Fareham
Length: 6m +
Join Date: Sep 2003
Posts: 7,866
Quote:
Originally Posted by Chris View Post
Finally an example of someones handywork at some point a pair of Pad Eyes have been fittted to the deck in front of the console bench seat. Whoever fitted them either used very shit stainless screws or just used mild steel Either way I would welcome suggestions as to how to get these out as there is nothing left to get a screw driver to grab into.
Try using Mole grips to nip the heads and just try undoing them if that doesn't work I would suggest a center punch and carefully drill off the heads to remove the fixing (don't drill any more than you have to), I would then use a new/good mole grip pliers to hopefully grab the remains of the screw to have a go at screwing the remains out. Use a dremmel or keep using the drill to remove as much if not all the remaining screw if you are unsuccessful in removing the screw using the first and second method fails. Gel coat over the top of them to finish off.
__________________
Andy

Looks Slow but is Fast
Member of the ebay Blue RIB cover club.
Hightower is offline   Reply With Quote
Old 09 December 2011, 10:40   #14
Member
 
1978SeaRider's Avatar
 
Country: UK - Wales
Town: Anglesey
Boat name: Trixie
Make: Scorpion 8.5m
Length: 8m +
Engine: 300hp Suzuki
Join Date: Sep 2006
Posts: 282
When I went to see it, the a-frame was help on by two self tapping wood screws... unbelievable ! when we opened the bung, water poured out for 5-10mins... such a shame
__________________
1978SeaRider is offline   Reply With Quote
Old 09 December 2011, 10:47   #15
Member
 
Country: UK - Wales
Town: West Wales
Make: Vipermax 5.8, SR4.7
Length: 5m +
Engine: 150 Opti, F50EFi
Join Date: Sep 2005
Posts: 6,299
Use a grinder with a thin cutting disc to 'square off' the screw heads so that you can grip them with a mole grips to unscrew them.

If that doesn't work, then grind the heads off flush and remove the plate which will leave a bit of the shank protruding. You can make the job of removing them with a mole grips easier if you drill 3 or 4 holes around 2-3mm diameter into the deck right next to the threads of each screw. Fill the holes with epoxy afterwards and put the remnants of the mild steel screws under the tyres of whoever specified them.
__________________
Downhilldai is offline   Reply With Quote
Old 09 December 2011, 13:20   #16
Member
 
Erin's Avatar
 
Country: UK - Channel Islands
Town: A large rock
Boat name: La Frette
Make: Osprey Vipermax
Length: 6m +
Engine: 200 Suzzy
Join Date: May 2004
Posts: 2,893
Clean out the slot heads in the screws with a junior hacksaw blade. You may yet get them out with a screwdriver.
Erin is offline   Reply With Quote
Old 11 January 2012, 19:01   #17
Member
 
Country: UK - England
Town: Gloucestershire
Boat name: Osprey
Make: Osprey Vipermax
Length: 5m +
Engine: E-tec 300 G2
MMSI: TBC
Join Date: Dec 2006
Posts: 4,020
So far...

Manged to get some more stuff done over Christmas and the last week.

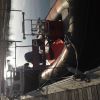
- A-frame has been removed and Polished up and came up lovely !
- Welded two tabs to the back of the aframe mounts so that we can bolt it to the transom as well with 12mm bolts.
- Filled all the holes in the transom and cut back and polished up
- Fitted twin cable gland in the back for the hydraulic steering which will mean we can seal the back trunk properly to prevent water getting into the rear box
- Re wired A-frame with marine grade cable and fitted Pacific Aerial mount and new Stainless Nav lights and top lights with LED's
- Drilled holes in the deck to allow access to the underside of where the Aframe legs attach so we can now bolt the legs to the deck rather the self tapper as it was before (muppets)
- Fitted new Teleflex Extreme Cables to the engine and pulled them up to the console
- Fitted New Console top ready for taking controls, GPS etc...
- Fitted Glove box where that huge hole used to be for the old engine control cables
- All the upholstery is being redone at Quayside by Louis in grey with dark grey piping
- Marine Fabrications have welded wingbacks to the front seats and have also stregthened the tubes where they bend as this can be a weak spot.
- Edd (nugent) has made and fitted a new screen to the old console top cheers Edd...

So now just a case of rigging the console and all the new electrics and then the big polish and clean up session !
Attached Thumbnails
Click image for larger version

Name:	IMG_0371.jpg
Views:	252
Size:	81.2 KB
ID:	64886   Click image for larger version

Name:	IMG_0370.jpg
Views:	323
Size:	73.5 KB
ID:	64887   Click image for larger version

Name:	IMG_0373.jpg
Views:	317
Size:	94.2 KB
ID:	64888   Click image for larger version

Name:	IMG_0372.JPG
Views:	319
Size:	85.4 KB
ID:	64889   Click image for larger version

Name:	IMG_0368.jpg
Views:	278
Size:	85.9 KB
ID:	64890  

__________________
---------------------------------------------------
Chris Stevens

Born fiddler
Chris is offline   Reply With Quote
Old 11 January 2012, 20:52   #18
Member
 
Maximus's Avatar
 
Country: UK - England
Town: Wild West
Boat name: No Boat
Make: No Boat
Length: under 3m
Join Date: Jan 2008
Posts: 5,304
Send a message via AIM to Maximus
Looking goood mate! Knowing you the rest won't take long.
__________________
A clever Man learns by his mistakes..
A Wise Man learns by other people's!

The Road to HELL ..is Paved with "Good inventions!"
Maximus is offline   Reply With Quote
Old 12 January 2012, 05:39   #19
Member
 
Ian M's Avatar
 
Country: UK - England
Town: New Milton
Boat name: Jianna
Make: Osprey
Length: 6m +
Engine: 200 E-TEC
MMSI: 235076954
Join Date: Sep 2004
Posts: 1,940
Good stuff, keep the pictures coming
__________________
Ian

Dust creation specialist
Ian M is offline   Reply With Quote
Old 12 January 2012, 15:48   #20
RIBnet admin team
 
Nos4r2's Avatar
 
Country: UK - England
Town: The wilds of Wiltshire
Boat name: Dominator
Make: SR5.4
Length: 7m +
Engine: Yam 85
MMSI: 235055163
Join Date: Jul 2005
Posts: 13,054
RIBase
Ref lockers, I just found this place:-

http://www.notikia.com/en/hatches-lo...de-by-osculati

Have a look at the stuff they do-I'm rather liking the look of it. Just got to figure out where to put a big locker with drawers now.
__________________
Need spares,consoles,consumables,hire,training or even a new boat?

Please click HERE and HERE and support our Trade Members.

Join up as a Trade member or Supporter HERE
Nos4r2 is offline   Reply With Quote
Reply


Posting Rules
You may not post new threads
You may not post replies
You may not post attachments
You may not edit your posts

BB code is On
Smilies are On
[IMG] code is On
HTML code is Off
Trackbacks are Off
Pingbacks are Off
Refbacks are Off


All times are GMT. The time now is 07:53.


Powered by vBulletin® Version 3.8.8 Beta 1
Copyright ©2000 - 2024, vBulletin Solutions, Inc.