|
|
 15 August 2020, 17:12
|
#81
|
|
Member
Country: UK - England
Town: Barnstaple
Length: 7m +
Join Date: Mar 2020
Posts: 390
|
So close now
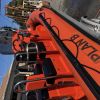
Self amalgamating tape is useful for sealing a joint, in this case the VHF connectors.

I dont really like having this joint but itll do for now

Wrapped in some electrical tape to finish

Had to run the engine to make the power steering pump run to bleed the air out and check for leaks

Dont have any muffs (been running in a tank up to now but no good for bleeding steering) so had to improvise

Wiring and pipes tidied up

Batteries mounted, might have to get a bigger battery or a smaller battery tray

No hydraulic leaks

VHF aerial mounted

It can be removed for transport

I tested everything today and all seems good. Autopilot works. Split charging works etc.
Now just got to put the seats back in and its go time
__________________
|

|

|
|
17 August 2020, 05:47
|
#82
|
|
Member
Country: UK - England
Town: Barnstaple
Length: 7m +
Join Date: Mar 2020
Posts: 390
|
Console is basically finished

There is not a lot of space in the bottom of the console but enough for some tools and spares.

Cleaned the rubber cleats

Spent hours scrubbing the splashwell, felt as if it had never been cleaned before


Still need to make the spacers to pad the hinges out for the front seat over the locker door

This is much cheaper than the genuine Mercury Verado power steering fluid...

After hours of polishing, fitted the front seats again 

__________________
|
|
|
|
|
17 August 2020, 14:29
|
#83
|
|
Member
Country: UK - England
Town: Plymouth
Boat name: HAPPY NOW
Make: Cobra
Length: 8m +
Engine: Mercury 350
Join Date: May 2014
Posts: 205
|
Loving the thread as I have two Cobras. What have you cleaned the cleats with and have you tackled the rubbing strakes yet as I cant find anything that gets/keeps them clean. Great workmanship hope you enjoy the boat.
__________________
|
|
|
|
|
17 August 2020, 16:47
|
#84
|
|
Member
Country: UK - England
Town: South East
Make: Cobra
Length: 7m +
Join Date: Sep 2018
Posts: 10
|
Quote:
Originally Posted by Sutty

Loving the thread as I have two Cobras. What have you cleaned the cleats with and have you tackled the rubbing strakes yet as I cant find anything that gets/keeps them clean. Great workmanship hope you enjoy the boat.
|
+1 would also like to know what you used to clean the rubber cleats and splash well.
The rubber cleats seem to go discoloured, I guess in part due to UV/ general muck - be good to get them light again!
__________________
|
|
|
|
|
17 August 2020, 20:49
|
#85
|
|
Member
Country: UK - England
Town: Barnstaple
Length: 7m +
Join Date: Mar 2020
Posts: 390
|
Quote:
Originally Posted by Sutty
Loving the thread as I have two Cobras. What have you cleaned the cleats with and have you tackled the rubbing strakes yet as I cant find anything that gets/keeps them clean. Great workmanship hope you enjoy the boat.
|
Thanks, how come you have two Cobras?
I cleaned them with carb cleaner which cut through the grime in one wipe but I imagine any strong solvent would have a similar effect. The rubbing strokes will come up like new as well but Id try it on a small hidden bit first to check you dont get some crazy reaction.
__________________
|
|
|
|
|
17 August 2020, 20:58
|
#86
|
|
Member
Country: UK - England
Town: Barnstaple
Length: 7m +
Join Date: Mar 2020
Posts: 390
|
Quote:
Originally Posted by Hamble Don
+1 would also like to know what you used to clean the rubber cleats and splash well.
The rubber cleats seem to go discoloured, I guess in part due to UV/ general muck - be good to get them light again!
|
As above most faded plastic can be restored with a strong solvent that almost wipes the top layer of the plastic off to reveal the new plastic beneath. I used it on the plastic locker doors as well which turned from a disgusting yellow colour back to near brilliant white.
For cleaning the splash well you just need a tub of oxalic acid and a scouring pad. Mix a spoonful of oxalic acid grains into a cup of water and the stains will literally wipe right off. You might want to wear gloves as itll burn your hands a bit.
https://www.ebay.co.uk/itm/OXALIC-AC...M/184364923726
Once you have got the stains lifted just use the heaviest grade of polish you can find and then wax it to stop it staining again.
If youve got any oil stains carb cleaner will again wipe them off and wont have any effect on the fibreglass
__________________
|
|
|
|
|
17 August 2020, 21:07
|
#87
|
|
Member
Country: UK - England
Town: Barnstaple
Length: 7m +
Join Date: Mar 2020
Posts: 390
|
Todays progress, getting a bit fed up with how long all these last little bits are taking.
I also know Ive got to rip it all out again in a few months to put the fake teak deck in
Anyway, had to make some spacers for the suicide cushion in front of the console to make space for the new locker behind it.

A bit of acrylic left over from the console was perfect thickness

Ready to bolt back on, forgot to take a photo of it fitted but you can hardly notice the locker behind it and all still fits perfectly.

Fitted the helm seats again, these things seem uncomfortable to me I think Im going to have to redesign them. Im not sealing them down as I know they have to come back out again for the decking. Also need to get a better hatch for the fuel sender access.

If the weather cooperates I think we are going to try and put it in the water tomorrow 
Any advice on launching a 7.5m boat for someone whos never launched or barely driven a boat before  I think I prefer fixing them to operating them
__________________
|
|
|
|
|
18 August 2020, 08:25
|
#88
|
|
Member
Country: UK - England
Town: Plymouth
Boat name: HAPPY NOW
Make: Cobra
Length: 8m +
Engine: Mercury 350
Join Date: May 2014
Posts: 205
|
One in the UK and one in Portugal. The seats work very well as a leaning post arrangement, protect the back when it is choppy. I never use them as a seat.
__________________
|
|
|
|
|
18 August 2020, 17:32
|
#89
|
|
Member
Country: UK - Scotland
Make: HumberOceanOffshore
Length: 8m +
Engine: Volvo KAD300/DPX
Join Date: Oct 2002
Posts: 5,596
|
I'm late to your party, if you did do a maiden voyage today I hope it went well. You've made a good thread with some very nice work, I'm not wishing to be critical but two things worry me a little; your batteries and some of your main wiring appear to be below flood level and consoles suffer from a good deal of condensation so effective vents are a good thing to keep all the connectors/connections good, not to mention controlling the mildew which will form.
Let us know how today went if you got out on the water.
__________________
JW.
|
|
|
|
|
18 August 2020, 21:34
|
#90
|
|
Member
Country: UK - England
Town: Barnstaple
Length: 7m +
Join Date: Mar 2020
Posts: 390
|
__________________
|
|
|
|
|
19 August 2020, 11:49
|
#91
|
|
Member
Country: UK - Scotland
Make: HumberOceanOffshore
Length: 8m +
Engine: Volvo KAD300/DPX
Join Date: Oct 2002
Posts: 5,596
|
Cool, well done!
__________________
JW.
|
|
|
|
|
29 August 2020, 21:39
|
#92
|
|
Member
Country: UK - England
Town: Barnstaple
Length: 7m +
Join Date: Mar 2020
Posts: 390
|
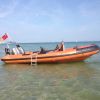
Not updated this thread for a while as I threw the rib back together and have been out and about on it having fun : )
The rebuild thread will continue in the winter as I need to rip it all out again to put the fake teak in and build some sort of canvas top to give a bit of sun shade. But that’s a winter project.
Spent a long time ummhing and aaahhing about an auxiliary engine but decided that considering the power of our tides and dangerous shorelines, a 5hp outboard was going to be as much use as a chocolate teapot if something goes catastrophically wrong with the main.
Instead I decided on a decent anchor and 110m of warp that should mean I can safely anchor almost anywhere and buy me some whilst I fix the main engine or await a tow...

Bought some cheap fenders to use as temporary protection when coming alongside a rough quay and figured they may have other uses.

There is a degree of irony in that the charplotter spends most of its time with a clock showing so we don’t overrun and run out of water as the tide goes out...

Some strawberries were enjoyed whilst hanging off the silly little folding grapple anchor that came with the boat (much easier to haul back in).


North Devon is utterly crap facilities wise for boating, but we do have some pretty lovely scenery and are normally the only boat for miles.
Gradually getting more confident and planning some longer excursions soon.


__________________
|
|
|
|
|
29 August 2020, 21:49
|
#93
|
|
Member
Country: UK - England
Town: Barnstaple
Length: 7m +
Join Date: Mar 2020
Posts: 390
|
Quote:
Originally Posted by jwalker
I'm late to your party, if you did do a maiden voyage today I hope it went well. You've made a good thread with some very nice work, I'm not wishing to be critical but two things worry me a little; your batteries and some of your main wiring appear to be below flood level and consoles suffer from a good deal of condensation so effective vents are a good thing to keep all the connectors/connections good, not to mention controlling the mildew which will form.
Let us know how today went if you got out on the water.
|
Sorry for such a slow reply.
All criticism gratefully received
Re the batteries - yes they are below flood level if you stuffed the boat spectacularly, but Im not sure what I could do about that. I think the inside of the console would stay fairly dry as I imagine it could drain into the bilge faster than water could seep through the door hatch.
Given the weight of the batteries (60 odd kg) I dont know how I could realistically elevate them. Before they were at the back of the boat at transom level which seemed far more vulnerable.
I dont think there is very much wiring below flood level (top of tubes) apart from the battery cables themselves and the cables that go under the deck.
Re a vent, Im on the fence about this. The boat is stored inside so Ive just been leaving the hatch open but it all stays pretty dry.
I thought about a vent but that seems a good way to let kids of salty spray in. What have others done?
The console is kind of vented indirectly via the bilges of the boat which are all open to air.
Did have a near miss today as nearly put it in without putting the bung in first. Luckily I noticed the auto bilge pumps firing water over the transom and realised my mistake... wont do that again but it was good to see that the bilge pumps were having no problem keeping up.
__________________
|
|
|
|
|
30 August 2020, 08:28
|
#94
|
|
Member
Country: UK - England
Town: Waterlooville
Boat name: Tickler
Make: Halmatic P22
Length: 6m +
Engine: Inboard Diesel 240HP
MMSI: 235115642
Join Date: Sep 2015
Posts: 1,777
|
Well done for getting it out and for some excellent work.
__________________
|
|
|
|
|
30 August 2020, 13:00
|
#95
|
|
Member
Country: UK - Scotland
Make: HumberOceanOffshore
Length: 8m +
Engine: Volvo KAD300/DPX
Join Date: Oct 2002
Posts: 5,596
|
Yeh, the battery thing..my concern is that you're relying on bilge pumps to empty the boat but your bilge pump electrical supply could be submerged. As you say, the water will need to sneek in through spaces to flood the batteries but than might happen faster than you imagine when you've just taken a ton or more of water onboard. Obviously it's your boat your choice but I'd have 'em up on a shelf inside the console with that big, fat wiring elevated too.
Nice pics btw. 
__________________
JW.
|
|
|
|
|
30 August 2020, 14:06
|
#96
|
|
Member
Country: UK - England
Town: Surrey
Boat name: ocean pro 6.3
Make: Humber
Length: 6m +
Engine: 140hp suzuki
Join Date: Feb 2004
Posts: 824
|
Quote:
Originally Posted by jwalker
Yeh, the battery thing..my concern is that you're relying on bilge pumps to empty the boat but your bilge pump electrical supply could be submerged. As you say, the water will need to sneek in through spaces to flood the batteries but than might happen faster than you imagine when you've just taken a ton or more of water onboard. Obviously it's your boat your choice but I'd have 'em up on a shelf inside the console with that big, fat wiring elevated too.
Nice pics btw. |
Ive been wondering the same in my renovation project (which is taking about 10x longer than this thread, massive credit due there!!!). I havent fitted the batteries yet but I cant see a way of elevating them. I am in the middle of creating and fitting a new shelf into the console, but the thought of putting so much weight in that shelf seemed a little daunting. I could try to reinforce the underside of the shelf perhaps to take the weight with added fibreglass but just not sure it would support it enough. So I had decided to put them in battery boxes inside the rear bench seat ... I guess there is a possibility in a major stuffing to see water ingress via hatches and vents ...... as per the OP I wonder how most people place their double batteries given the weight?
__________________
|
|
|
|
|
30 August 2020, 14:34
|
#97
|
|
Member
Country: UK - England
Town: Waterlooville
Boat name: Tickler
Make: Halmatic P22
Length: 6m +
Engine: Inboard Diesel 240HP
MMSI: 235115642
Join Date: Sep 2015
Posts: 1,777
|
Mine are on the deck in the console but I've got quite a lot of sheer, a relatively low transom and big freeing ports.
I think it is just one of those compromises that you make.
__________________
|
|
|
|
|
30 August 2020, 17:56
|
#98
|
|
Member
Country: UK - Scotland
Make: HumberOceanOffshore
Length: 8m +
Engine: Volvo KAD300/DPX
Join Date: Oct 2002
Posts: 5,596
|
My present Delta has a glassed in shelf right across the console about half way up height wise. The batteries are held with a ratchet strap over their centres. On my early Humber I mounted each battery, one each side, on a tray bolted through the console sides and it had one leg to deck on the unsupported corner. The batteries had mouldings each end for a clamp plate so it was only necessary to make up two plates per battery with one bolt through the plate and tray at each end to tighten down the plate as a clamp. No risk of short circuits with either method of clamping.
On a typical rib the batteries are absolutely essential so I start the rigging design by placing them first.
__________________
JW.
|
|
|
|
|
25 October 2020, 23:08
|
#99
|
|
Member
Country: Ireland
Make: Cobra
Length: 8m +
Engine: Inboard Diesel
Join Date: Oct 2020
Posts: 2
|
Would battery boxes not suffice in the console? We have been caught out in all conditions and never had a drop of water in.
Nice work with the electrics by the way. I need to do something similar.
__________________
|
|
|
|
|
26 October 2020, 21:45
|
#100
|
|
Member
Country: UK - England
Town: Barnstaple
Length: 7m +
Join Date: Mar 2020
Posts: 390
|
Quote:
Originally Posted by James8.6
Would battery boxes not suffice in the console? We have been caught out in all conditions and never had a drop of water in.
Nice work with the electrics by the way. I need to do something similar.
|
I thought about battery boxes but they all seem very crappy.
And anyway, I dont see why the batteries are going to be knackered as a result of the sea water immersion.
They are both completely sealed gel batteries and Id bet money theyd continue to work completely submersed. A complete non issue imo
__________________
|
|
|
|
|
|
 Posting Rules
|
You may not post new threads
You may not post replies
You may not post attachments
You may not edit your posts
HTML code is Off
|
|
|
|
 Recent Discussions
 |
|
|
|
|
|
|
|
|
|
|
|
|
|
|
|
|
|
|
|
|
|
|
|
|
|
|
|
|
|
|
|
|
|


 Tickler