Go Back   RIBnet Forums > RIB talk > RIB gallery
Click Here to Login

Reply
 
Thread Tools Search this Thread
 
Old 24 April 2006, 18:30   #81
Member
 
Country: UK - England
Town: I.O.W/Switzerland
Boat name: HotShot
Make: shakey
Length: 5m +
Engine: 90hp Tohatsu TLDI
Join Date: Jul 2003
Posts: 1,555
more grp work...

Right, over the weekend I managed to drag mike and james out of hibernation to help with applying CSM to the lower flange (flange that screws to the deck). As soon as I can get the angle grinder back I will clean up all the edges, then its just a case of some epoxy here and there and starting the fairing...anyone got any tips on fairing?

I have also asked for a quote for the upholstery from my local sailmaker because I can't be arsed (read: my mum doesn't think her sewing machine is hardcore enough and I was never any good at textiles in primary school ) to do my own upholstery...What colours do people think I should have? Blue to match the tubes with grey piping or grey with blue piping? Or something completely different?!

Pics:

1. The flange I was talking about a couple of posts back

2. The bench seat upside down

3. The console upside down

4. The bench seat and the console upside down!

5. A view inside the console taken from the front hatch. Note the small lengths of batton attached to the sides of the seat (upper half of pic). These are to wedge the fuel tank in to stop any movement sideways.

More pics to come after my dinner....
Attached Thumbnails
Click image for larger version

Name:	DSC_0030.jpg
Views:	289
Size:	29.3 KB
ID:	18658   Click image for larger version

Name:	DSC_0031.jpg
Views:	285
Size:	38.9 KB
ID:	18659   Click image for larger version

Name:	DSC_0035.jpg
Views:	293
Size:	48.0 KB
ID:	18660   Click image for larger version

Name:	DSC_0036.jpg
Views:	648
Size:	58.1 KB
ID:	18661   Click image for larger version

Name:	DSC_0037.jpg
Views:	333
Size:	48.4 KB
ID:	18662  

__________________
slimtim is offline   Reply With Quote
Old 24 April 2006, 18:53   #82
Member
 
Country: UK - England
Town: I.O.W/Switzerland
Boat name: HotShot
Make: shakey
Length: 5m +
Engine: 90hp Tohatsu TLDI
Join Date: Jul 2003
Posts: 1,555
and some more....

1. same as pic 5 above but in landscape! The pad on the left is where the throttle is mounted, straight in front is the dash panel and at the bottom of the pic is the self.

2. Inside of the console again but this time taken from the bottom (but the top cos the console is upside down...if you see what i mean?!). You can see how the very top panel are arranged (I will post more pics of this from the outside when I turn it back the other way).

3. Inside of the bench seat - not much to say

Right, I'm off out into the garage to sort out my seat bases.
Attached Thumbnails
Click image for larger version

Name:	DSC_0038.jpg
Views:	339
Size:	48.3 KB
ID:	18663   Click image for larger version

Name:	DSC_0039.jpg
Views:	277
Size:	45.1 KB
ID:	18664   Click image for larger version

Name:	DSC_0040.jpg
Views:	259
Size:	44.5 KB
ID:	18665  
__________________
slimtim is offline   Reply With Quote
Old 24 April 2006, 21:02   #83
RIBnet supporter
 
bogib's Avatar
 
Country: Iceland
Town: Reykjavik
Boat name: Cheesee
Make: Seaquel 600 XS
Length: 6m +
Engine: Mercury 275 Verado
Join Date: Aug 2003
Posts: 1,959
Send a message via Skype™ to bogib
Looking good...... any chance of seeing your project during RIBex ?

Bogi
__________________
RIBs and ribbing is my life
www.sjosport.is
bogib is offline   Reply With Quote
Old 25 April 2006, 00:11   #84
Member
 
Hightower's Avatar
 
Country: UK - England
Town: Fareham
Length: 6m +
Join Date: Sep 2003
Posts: 7,866
Nice to see you getting on with your project Tim....Must be the warm weather


As Bogi said, when's the launch party then?
__________________
Andy

Looks Slow but is Fast
Member of the ebay Blue RIB cover club.
Hightower is offline   Reply With Quote
Old 25 April 2006, 02:15   #85
Member
 
Country: USA
Town: Punta gorda Fl.
Boat name: War Machine
Make: Falcon U.S.A.
Length: 9m +
Engine: twin 250 Yamaha
Join Date: Jan 2006
Posts: 936
Keep it up Slimtim, we are pulling for you...
__________________
pathalla is offline   Reply With Quote
Old 28 April 2006, 21:37   #86
Member
 
Country: UK - England
Town: I.O.W/Switzerland
Boat name: HotShot
Make: shakey
Length: 5m +
Engine: 90hp Tohatsu TLDI
Join Date: Jul 2003
Posts: 1,555
Hi chaps, thanks for the comments.

Bogi, may well be able to sort out a viewing if you're interested, not sure when I'll be around at RIBex but I'm sure we'll dumb into each other.

Tonight I attacked the console and bench seat with the angle grinder to tidy it up. Tomorrow I'm hoping to fair them.

I have also half made up the seat bases ready to give to the sailmaker on tuesday. Fuel hose and connectors have also been ordered so will try and run the engine next week to check all is ok.

More pics tomorrow hopefully.

Tim
__________________
slimtim is offline   Reply With Quote
Old 01 May 2006, 19:55   #87
Member
 
Country: UK - England
Town: I.O.W/Switzerland
Boat name: HotShot
Make: shakey
Length: 5m +
Engine: 90hp Tohatsu TLDI
Join Date: Jul 2003
Posts: 1,555
Had a busy weekend on the boat.

Attempted to fair the bench seat yesterday and its not as easy as it looks! Was our first time doing it though so we now know how to do it for the console. Today we sanded the bench seat (see pics) and it came up real smooth with a few areas that needed going over again.

All the seat bases have been epoxied and are off to the sailmaker tomorrow. I think I'm going to go for light grey (to match rubbing strake) with dark blue piping. Thought that this would have less of an "ouch" factor in the sun than a dark colour.

Also getting a tow bar fitted on my golf on wednesday

Pics:
1. epoxying the bench seat base and, er, reading a book!
2. Sanding the filler with the best respiratory protection available!
3. A good use for mountain biking goggles
4. dust? dust anyone?
Attached Thumbnails
Click image for larger version

Name:	DSC_0003.jpg
Views:	338
Size:	63.7 KB
ID:	18780   Click image for larger version

Name:	DSC_0011.jpg
Views:	266
Size:	71.0 KB
ID:	18781   Click image for larger version

Name:	DSC_0012.jpg
Views:	309
Size:	67.6 KB
ID:	18782   Click image for larger version

Name:	DSC_0021.jpg
Views:	303
Size:	65.0 KB
ID:	18783  
__________________
slimtim is offline   Reply With Quote
Old 01 May 2006, 20:02   #88
Member
 
Country: UK - England
Town: I.O.W/Switzerland
Boat name: HotShot
Make: shakey
Length: 5m +
Engine: 90hp Tohatsu TLDI
Join Date: Jul 2003
Posts: 1,555
Pics:
1. The console. As you can see I have drilled to hole for the steering wheel and its now waiting to be faired.
2. the faired bench seat. tomorrow night I will sand this again with some fine paper and it should then be ready to flo-coat.

I've now got to finalise my bench seat back rest design to send off to stainless steel fabricators.

More updates soon.
Attached Thumbnails
Click image for larger version

Name:	DSC_0005.jpg
Views:	330
Size:	69.5 KB
ID:	18784   Click image for larger version

Name:	DSC_0019.jpg
Views:	303
Size:	57.3 KB
ID:	18785  
__________________
slimtim is offline   Reply With Quote
Old 10 May 2006, 21:42   #89
Member
 
Country: UK - England
Town: I.O.W/Switzerland
Boat name: HotShot
Make: shakey
Length: 5m +
Engine: 90hp Tohatsu TLDI
Join Date: Jul 2003
Posts: 1,555
Have been working on the boat everyday after work trying to get stuff done.

Bench seat has now been flo coated with a roller to give an orange peel effect. Has come out surprisingly well, if a little thin. All I have to do to the bench seat now is a little epoxy coating and fitting of the seat and backrest.

We have also faired the console and are presently busting our balls trying to sand it and get a good finish ready for the undercoat. For some strange reason, our second application of the fairing compound (poly resin + glass bubbles) has been a bugger to sand back in places. There seem to be patches that clog up the sand paper and render it useless...very irritating and difficult to get a good finish. Can anyone suggest what we may have done wrong? What puzzles me is that it has only occured whilst rubbing down the second application of filler on both the console and bench seat.

Tomorrow we will be filling holes for hopefully the last time, then more sanding before starting to apply paint at the weekend.

Can anyone see any reason why I shouldn't buy this cable for my wiring?
http://www.marine-hardware.co.uk/aca...inned__74.html

I was going to get my self tappers from these chaps as well.

I have also ordered a load of stuff from my local chanderly which should be here by the end of the week.

Pics:
1. Me sanding
2. Oh what fun one can have with lots of white dust and a hoover
3. Me still sanding....
Attached Thumbnails
Click image for larger version

Name:	image0001.jpg
Views:	302
Size:	57.8 KB
ID:	19000   Click image for larger version

Name:	image0003.jpg
Views:	289
Size:	72.7 KB
ID:	19001   Click image for larger version

Name:	image0005.jpg
Views:	313
Size:	87.7 KB
ID:	19002  
__________________
slimtim is offline   Reply With Quote
Old 11 May 2006, 02:45   #90
Member
 
Country: USA
Town: Punta gorda Fl.
Boat name: War Machine
Make: Falcon U.S.A.
Length: 9m +
Engine: twin 250 Yamaha
Join Date: Jan 2006
Posts: 936
Got to give it to you SLim Tim, that is a lot of work, keep it up, good luck!
__________________
pathalla is offline   Reply With Quote
Old 25 May 2006, 18:15   #91
Member
 
Country: UK - England
Town: I.O.W/Switzerland
Boat name: HotShot
Make: shakey
Length: 5m +
Engine: 90hp Tohatsu TLDI
Join Date: Jul 2003
Posts: 1,555
Thanks Pathalla!

Does anyone still read this thread?! Been a bit slack on the updates recently because I've been pretty busy.

A quick sumary:
Console needs one more coat of paint
Upholstery ready very soon
Getting some quotes for my stainless backrest
Away this weekend so hope to get the console and bench seat fitted next week.

A question:

Is it possible to apply a second coat of flo-coat to my bench seat? The first is a little thin. I'm aware it has wax in it so previously assumed I would not be able to apply a second coat, even if I rubbed it down. Is this assumption correct?
__________________
slimtim is offline   Reply With Quote
Old 25 May 2006, 18:26   #92
Member
 
Country: UK - Wales
Town: swansea
Boat name: Too Blue
Make: BLANK
Length: 8m +
Engine: Suzuki DT225
Join Date: Mar 2004
Posts: 12,791
Of course people still read it - well I do anyway!!! Need all the tips I can get - about to make 2x 2 man jockey seats - removable ones for the front.
__________________
codprawn is offline   Reply With Quote
Old 25 May 2006, 20:12   #93
Member
 
Country: Other
Town: Vectis Isle
Boat name: REEF
Length: 6m +
MMSI: 235064495
Join Date: Dec 2004
Posts: 353
Hi Tim
Yes in fact i was about to ask if you had your upholstery back
need my own sorted out if your chap turns in a good job
mite give him a go
Keep us posted
__________________
SOLENTER is offline   Reply With Quote
Old 25 May 2006, 20:40   #94
Member
 
Country: UK - England
Town: I.O.W/Switzerland
Boat name: HotShot
Make: shakey
Length: 5m +
Engine: 90hp Tohatsu TLDI
Join Date: Jul 2003
Posts: 1,555
Good good. I should have the upholstery tuesday or so so will update on its quality then.

In the mean time here are some piccies:

Not much to say about them really.

1. Console all painted, looking fairly good but the gloss doesn't half show up all the imperfections!

2. console from the front

3. bench seat lower flange

4. will deck scrubbing in a rather fetching jumper

5. console again.


So does anyone know about this flo-coat? JW? Pete 7.432 recurring?
Attached Thumbnails
Click image for larger version

Name:	DSC_0001.jpg
Views:	327
Size:	48.2 KB
ID:	19491   Click image for larger version

Name:	DSC_0002.jpg
Views:	304
Size:	51.0 KB
ID:	19492   Click image for larger version

Name:	DSC_0003.jpg
Views:	309
Size:	36.8 KB
ID:	19493   Click image for larger version

Name:	DSC_0004.jpg
Views:	321
Size:	41.1 KB
ID:	19494   Click image for larger version

Name:	DSC_0006.jpg
Views:	322
Size:	39.9 KB
ID:	19495  

__________________
slimtim is offline   Reply With Quote
Old 25 May 2006, 20:47   #95
Member
 
Country: UK - Scotland
Make: HumberOceanOffshore
Length: 8m +
Engine: Volvo KAD300/DPX
Join Date: Oct 2002
Posts: 5,596
Quote:
Originally Posted by slimtim
Is it possible to apply a second coat of flo-coat to my bench seat?
If you get the wax off and rough it up a bit it should be ok. You may find wiping it with lots of thinners will sticky up the surface.
__________________
JW.
jwalker is offline   Reply With Quote
Old 25 May 2006, 20:53   #96
Member
 
Country: UK - England
Town: I.O.W/Switzerland
Boat name: HotShot
Make: shakey
Length: 5m +
Engine: 90hp Tohatsu TLDI
Join Date: Jul 2003
Posts: 1,555
Jeff, many thanks.

I thought that maybe because the wax was mixed in, it would rear its ugly head on the surface no matter how hard i rubbed it?!

I think I'll give it some serious sander abuse and a good rub down with acetone then coat it again. I'm not happy with the finish at the moment.
__________________
slimtim is offline   Reply With Quote
Old 25 May 2006, 23:15   #97
Member
 
Country: USA
Town: Punta gorda Fl.
Boat name: War Machine
Make: Falcon U.S.A.
Length: 9m +
Engine: twin 250 Yamaha
Join Date: Jan 2006
Posts: 936
Does anyone still read this thread?! Been a bit slack on the updates recently because I've been pretty busy.

We were wondering what you were up to...
__________________
pathalla is offline   Reply With Quote
Old 05 June 2006, 21:33   #98
Member
 
Country: UK - England
Town: I.O.W/Switzerland
Boat name: HotShot
Make: shakey
Length: 5m +
Engine: 90hp Tohatsu TLDI
Join Date: Jul 2003
Posts: 1,555
getting there!

I really should update this more often.

Ok I've done loads since my last update.

All the cables were threaded through. Thats fuel, throttle, gear, pos and neg main feed, bilge pump, fish finder transducer, pitot tube pipe and the cables from the throttle.

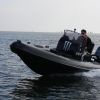
Most significantly the console is in! Bout time. Went in no problems with loads of sikaflex and self tappers (see pic). After all the holes were drilled we sat the console on its end as shown so I could sikaflex it up. It was then a case of lowering it down carefully and getting all the cables underneath then screwing it up. I used a drill with a ratchet to prevent me from over tightening the screws. After it wwas down I went round the edge with more sikaflex to give a nice clean finish and get rid of any "water traps".

As you can see all the holes are cut in the console (speedo, rev, fuel, steering, compass) and cable entry/exits.

One set back was that I managed to completely cock up an attempt to re-flocoat the bench seat by using some dodgey flocoat and a hardener that didn't seem to match (either that or I used too much ) A nasty lumpy mess is the best discription I can give! That all had to be sanded down and re-coated at extra cost It does however now look real pucker (see pic).

The upholstery has also been done. Grumpy, its pretty good really although I may have made the jockey seat a little fat! Its similar, I would imagine, to sitting on a baby elephant. Never mind, i'll ride in comfort

Pics:
1. Console on its end ready to sikaflex. Covering the tubes was a good idea!
2. Console in!
3. Not sure what this pic shows. Cables and general mess.
4. Console with throttle control
5. Inside the console from the front hatch
Attached Thumbnails
Click image for larger version

Name:	DSC_0015.jpg
Views:	308
Size:	59.2 KB
ID:	19927   Click image for larger version

Name:	DSC_0018.jpg
Views:	338
Size:	74.4 KB
ID:	19928   Click image for larger version

Name:	DSC_0019.jpg
Views:	342
Size:	58.8 KB
ID:	19929   Click image for larger version

Name:	DSC_0020.jpg
Views:	333
Size:	45.3 KB
ID:	19930   Click image for larger version

Name:	DSC_0017.jpg
Views:	345
Size:	50.4 KB
ID:	19931  

__________________
slimtim is offline   Reply With Quote
Old 05 June 2006, 21:39   #99
Member
 
Country: UK - England
Town: I.O.W/Switzerland
Boat name: HotShot
Make: shakey
Length: 5m +
Engine: 90hp Tohatsu TLDI
Join Date: Jul 2003
Posts: 1,555
Some pics of the upholstery and the "orange peel" finish on my bench seat.

Next jobs are to fit bench seat and upholstery, put the fuel tank in and connect up all the fuel line and the electrics (I'm hoping my dad will do this while i'm at the iow festival ).
Attached Thumbnails
Click image for larger version

Name:	DSC_0040.jpg
Views:	432
Size:	52.7 KB
ID:	19932   Click image for larger version

Name:	DSC_0041.jpg
Views:	358
Size:	39.2 KB
ID:	19933   Click image for larger version

Name:	DSC_0042.jpg
Views:	358
Size:	33.2 KB
ID:	19934  
__________________
slimtim is offline   Reply With Quote
Old 05 June 2006, 22:16   #100
Now back to being Mollers!
 
Country: UK - England
Town: Arundel
Boat name: Mike Bravo 1
Make: Scorp
Length: 9m +
Engine: Yanmar 300
Join Date: Oct 2005
Posts: 652
Orange peel? That's more 'Rough end of a Pineapple'!
__________________
Alice is offline   Reply With Quote
Reply


Posting Rules
You may not post new threads
You may not post replies
You may not post attachments
You may not edit your posts

BB code is On
Smilies are On
[IMG] code is On
HTML code is Off
Trackbacks are Off
Pingbacks are Off
Refbacks are Off


All times are GMT. The time now is 00:16.


Powered by vBulletin® Version 3.8.8 Beta 1
Copyright ©2000 - 2024, vBulletin Solutions, Inc.