|
|
 10 February 2013, 18:27
|
#1
|
|
Member
Country: UK - England
Boat name: Carpe Diem
Make: Ribeye 650S
Length: 5m +
Engine: Yamaha F150
Join Date: Oct 2012
Posts: 548
|
1st Rib Project a Humber 6m Destroyer
Folks,
I have been lurking on the site for some time and it looks like I have taken some inspiration from some of the project blogs as I have taken the plunge myself to go ahead with my 1st rib project. I am relatively new to boating as purchased my first boat (a bayliner - I know its a mistake) in the summer of 2012 after I had completed my PB level 2 in 05/12. Anyway that's enough of me for now here is the boats specs!
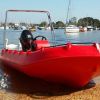
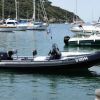
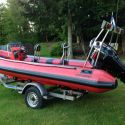
1996 6m Humber destroyer
1989 Evinrude V6 VRO 150HP (actually runs but yet to do a compression test but doesn't appear to rattle) - The plan is to sell bayliner the end of summer 2013 to pay for a replacement engine such as 150 Opti!
Running gear - very minimal as VRO not connected to engine (maybe a good thing as I may want to go down the pre-mix route), stainless steel A Frame, teleflex steering which is seized, petrol tank but no fuel lines, rev counter which doesn't work.
Centre console - Looks like its been caught in the cross fire some where and foam seat needs re-covering. I have a plan to redo layout of the boat with a different console and jockey seats.
Roller Hallmark Trailer - Mudguards need replacing, tyres don't hold air, coupling damper needs to be replaced and the wheel bearings are shot as it was long 30mph journey home listening to the droning noise of bearings about to collapse 
Anyway the post would be worthless without PICS 
__________________
|

|

|
|
10 February 2013, 18:31
|
#2
|
|
Member
Country: UK - Scotland
Town: Fort William
Make: Ribcraft 585
Length: 5m +
Engine: Yamaha F115
Join Date: Mar 2012
Posts: 2,896
|
It looks a good strong base to start from.
Best of luck with it.
__________________
There is a place on this planet for all of Gods creatures.........right next to my tatties and gravy.
|
|
|
|
|
10 February 2013, 18:32
|
#3
|
|
Member
Country: France
Town: Côte d'Azur
Boat name: Beaver Patrol
Make: Avon Searider SR4
Length: 4m +
Join Date: Jan 2004
Posts: 5,934
|
Looks like a great project! May I ask what you paid? Tubes should clean up with some TFR. I too would ditch that engine! Have fun!
__________________
|
|
|
|
|
10 February 2013, 18:37
|
#4
|
|
Member
Country: UK - England
Town: Lancs
Boat name: Beretta
Make: Ballistic
Length: 6m +
Engine: 175hp e-tec
MMSI: 235035778
Join Date: Apr 2004
Posts: 1,736
|
Looks like a good project 
|
|
|
|
|
10 February 2013, 19:03
|
#5
|
|
Member
Country: UK - England
Boat name: Carpe Diem
Make: Ribeye 650S
Length: 5m +
Engine: Yamaha F150
Join Date: Oct 2012
Posts: 548
|
I only purchased the rib this Friday so not much progress just yet. The project will be split into phases.
Phase 1 - Tubes
In the couple of spare hours I had this morning I have found that all three tube sections go flat with the following problems
1.) All A7 (x3) valves leak so I will be looking to buy 3 valve service kits
2.) Previous patch repair doesn't hold air as per picture 1. Advice needed please, I will remove the patch but what chemical do I need to remove the old glue, how do I prepare repair area (sand paper?) and can I buy a new patch which matches the humber orange from anywhere along with the Hypatholon glue?
3.) Picture 2 there are 2 leaks one at each end of the ark and the ark is roughly 20 cms long. This was done by the previous owner who dragged the boat with flat tubes and trailer with no mudguard across a field, end result is the wheel has rubbed the tube  . Advice please - Same as above really but will I get a big enough patch to cover the whole length of wheel rub rather than 2 patches at either end where the leaks are
4.) Picture 3 and 4 show the front nose (sorry don't know proper name) which needs regluing for cosmetic reasons. Ideally I don't want to completely remove as rubbing strake goes over the top and hope I can do this. Advice please - To reglue the base onto the hull what prep work/tools do I need to do and what glue should I need to use. With the top bit should I pull it off the tube upto the rubbing strake and then prep and reglue. If yes what prep/tools and glue can I use?
5.) Picture 5 shows the underside of the rear cone which isn't leaking but again needs regluing. Similar question to item 4 above do I just pull back rubber patch until I get good glue bond, prep and then reglue?
As I have no manual please can somebody tell me what pressure should I inflate the tubes to as I don't want to pop them next time I inflate them 
__________________
|
|
|
|
|
10 February 2013, 19:15
|
#6
|
|
Member
Country: UK - England
Town: Bromsgrove
Boat name: Kick-Ass !
Make: PAC/Artic 22
Length: 6m +
Engine: 250hp Yamaha
Join Date: Nov 2003
Posts: 3,572
|
Woody it's an early 5.8 same as my latest quest transom gives it away
__________________
MY BIGGEST WORRY IS THAT MY WIFE(WHEN I"M DEAD)WILL SELL MY TOY'S FOR WHAT I SAID I PAID FOR THEM.
|
|
|
|
|
10 February 2013, 20:16
|
#7
|
|
Member
Country: UK - England
Boat name: Carpe Diem
Make: Ribeye 650S
Length: 5m +
Engine: Yamaha F150
Join Date: Oct 2012
Posts: 548
|
Quote:
Originally Posted by nugent

Woody it's an early 5.8 same as my latest quest transom gives it away
|
Yo Ed, I took the 4 digit number from the transom ID plate and phoned up Humber to ask them what boat it was and was told it was a 6m 1996 destroyer. Is there another number somewhere else on the boat I should have given humber to identify it?
Cheers Woody
__________________
|
|
|
|
|
11 February 2013, 02:08
|
#9
|
|
RIBnet admin team
Country: UK - England
Town: The wilds of Wiltshire
Boat name: Dominator
Make: SR5.4
Length: 7m +
Engine: Yam 85
MMSI: 235055163
Join Date: Jul 2005
Posts: 13,054
|
Use a Scotchbrite wheel on a drill to clean the old glue off. Do it lightly. It'll key the tube nicely as you do it.
__________________
Need spares,consoles,consumables,hire,training or even a new boat?
Please click HERE and HERE and support our Trade Members.
Join up as a Trade member or Supporter HERE
|
|
|
|
|
11 February 2013, 07:14
|
#10
|
|
Member
Country: UK - England
Town: Cheshire
Boat name: Gollione
Make: Avon Searider 5.4
Length: 5m +
Engine: 90hp
Join Date: Jun 2010
Posts: 347
|
Looks like it will make a decent rib, good luck with the repairs.
As previously mentioned Dave at Northwest ribs should be able to get you some orange patches or even do the job for you. Round off any square corners on the patches as they tend to lift first and don't bother re-glueing old ones, replace them. An 80s grit flap wheel will prepare the surfaces but be careful with old previously repaired areas as they will already have been worked quite hard already.
Only 3 x A7 valves on a 6m, (3 chambers)? That wouldn't meet current standards so perhaps it would help confirm the year?
__________________
|
|
|
|
|
11 February 2013, 17:04
|
#11
|
|
Member
Country: UK - England
Town: Bromsgrove
Boat name: Kick-Ass !
Make: PAC/Artic 22
Length: 6m +
Engine: 250hp Yamaha
Join Date: Nov 2003
Posts: 3,572
|
If humber state it's a 6 mtr it will be, I was under the impression the extra build up on transom as yours was on the 5.8 early 90's hull
__________________
MY BIGGEST WORRY IS THAT MY WIFE(WHEN I"M DEAD)WILL SELL MY TOY'S FOR WHAT I SAID I PAID FOR THEM.
|
|
|
|
|
12 February 2013, 18:22
|
#12
|
|
Member
Country: UK - England
Boat name: Carpe Diem
Make: Ribeye 650S
Length: 5m +
Engine: Yamaha F150
Join Date: Oct 2012
Posts: 548
|
Thanks everyone for your support and advice so far as I do appreciate it. I now have plans to tackle the punctures and dodgy valves at the weekend.
Thinking ahead a little bit - Does anybody know where I can get a manual for the outboard engine (1989 Evinrude VRO 150Hp) as I wouldn't mind trying to get a going for a short while. I have looked on the web and have not found anything so far
__________________
|
|
|
|
|
10 March 2013, 21:51
|
#13
|
|
Member
Country: UK - England
Boat name: Carpe Diem
Make: Ribeye 650S
Length: 5m +
Engine: Yamaha F150
Join Date: Oct 2012
Posts: 548
|
Right its time for an update folks but don't have a photo of everything unfortunately!!
Tubes are up and stay up!
1.) A7 Valve leaks (x3) fixed with service kit (diaphragms replaced)
2.) 2 Punctures fixed with small patch followed by large overpatched bits sourced from North West Ribs
3.) Bow strake and rear cones reglued!!!
[B][U]Trailer[U][B]
1.) Bent handbrake now straightened and rebuilt
2.) All wheels bearings were shot and have now been replaced with new wheel bearings
3.) New backplate welded to axle stud as other one badly corroded
4.) New brake shoes and springs fitted to both wheels thanks for the bits supplied by Port sunlight trailers
Consoles and fuel tanks
1.) Centre console now removed from deck and sikaflex removed
2.) Double console with suicide seat and 2 x jockey seats now ordered but will need to wait 7-8 weeks
3.) Main fuel tank removed (its a big un - see for sale section as I am replacing with a plastic tank)
Whats the next job!
1.) Sell engine / remove from transom
2.) At Easter the plan is to prep, fill, glass in anchor storage and flowcoat deck / transom
3.) Do trailer brake cabling
4.) At Easter gelcoat scrapes in hull
5.) Order fuel lines, vhf radio / hardware, underfloor trunking, deck / nav lghts, chart plotter and sonar
6.) Have another go at cleaning these bloody tubes!!!!
__________________
|
|
|
|
|
04 April 2013, 21:46
|
#14
|
|
Member
Country: UK - England
Boat name: Carpe Diem
Make: Ribeye 650S
Length: 5m +
Engine: Yamaha F150
Join Date: Oct 2012
Posts: 548
|
Been busy but time for an update folks!!!
1.) Engine has been removed and there is holes everywhere (1st photo) Don't ask how we got the big old beast off as that's another story.
2.) Transom holes all filled with wooden dowels and chopped strand. Transom then ground and smoothed out flat.
3.) Deck ground out with grinder and all holes sifllexed in and fibreglassed over to ensure a good seal (photo 2). The grinding was a dirty job as there was dust everywhere and took 3 of us 3 hours to clean up. Next time I will be grinding outside!!
4.) Bow / anchor storage cut and fibre glassed onto deck (sorry Ed stole another one of your ideas!!) (photo 3)
5.) Bow, transom and deck sides flow coated (photos 4 and 5). This was difficult and a bit disheartening as the finish close up is not that great. Looks like I will be repainting in some localised areas to get a better finish!!
Back to work tomorrow but not bad for a weeks work!!
__________________
|
|
|
|
|
04 April 2013, 21:48
|
#15
|
|
Member
Country: UK - England
Boat name: Carpe Diem
Make: Ribeye 650S
Length: 5m +
Engine: Yamaha F150
Join Date: Oct 2012
Posts: 548
|
Next up jobs
1.) Paint deck floor in the next week with black non-slip paint. Looking at the last photo there is spillage of my flow coat on the deck area will this need to be ground down or will the non-slip paint hide this? (photo 1)
2.) Turn boat upside down on grass to polish (G3) and acetone hull and then fill and paint scratches / gouges
3.) With boat off the trailer, service rollers on trailer
4.) Put boat in the water to test for leaks
5.) Look for an engine and running gear
Thanks
Gareth
__________________
|
|
|
|
|
05 April 2013, 05:44
|
#16
|
|
Member
Country: UK - England
Town: Bromsgrove
Boat name: Kick-Ass !
Make: PAC/Artic 22
Length: 6m +
Engine: 250hp Yamaha
Join Date: Nov 2003
Posts: 3,572
|
looking good,keep up the good work,,,
__________________
MY BIGGEST WORRY IS THAT MY WIFE(WHEN I"M DEAD)WILL SELL MY TOY'S FOR WHAT I SAID I PAID FOR THEM.
|
|
|
|
|
05 April 2013, 05:48
|
#17
|
|
Member
Country: UK - England
Town: Southampton
Boat name: Hissing Sid
Make: Ross Smith Cobra
Length: 6m +
Engine: 200HP Optimax
MMSI: 235038046
Join Date: Jun 2002
Posts: 3,804
|
Nice job, well worth flipping it over if you can.
|
|
|
|
|
05 April 2013, 06:33
|
#18
|
|
Member
Country: UK - England
Town: Bromsgrove
Boat name: Kick-Ass !
Make: PAC/Artic 22
Length: 6m +
Engine: 250hp Yamaha
Join Date: Nov 2003
Posts: 3,572
|
grinding drips and spillage,
depends on finish your after with non slip, i had drips ever where, messy worker i am,,,,, and went over the top it looks fine to me 
even better now that i have masked up the base of seat pods and tidy'd it up some what, i intend to complete mine this weekend,
keep up the good work can not beat doing it your self,
__________________
MY BIGGEST WORRY IS THAT MY WIFE(WHEN I"M DEAD)WILL SELL MY TOY'S FOR WHAT I SAID I PAID FOR THEM.
|
|
|
|
|
07 April 2013, 17:31
|
#19
|
|
Member
Country: UK - England
Boat name: Carpe Diem
Make: Ribeye 650S
Length: 5m +
Engine: Yamaha F150
Join Date: Oct 2012
Posts: 548
|
Foundations nearly complete
Quote:
Originally Posted by whackywoody
Next up jobs
1.) Paint deck floor in the next week with black non-slip paint. Looking at the last photo there is spillage of my flow coat on the deck area will this need to be ground down or will the non-slip paint hide this? (photo 1)
2.) Turn boat upside down on grass to polish (G3) and acetone hull and then fill and paint scratches / gouges
3.) With boat off the trailer, service rollers on trailer
4.) Put boat in the water to test for leaks
5.) Look for an engine and running gear
Thanks
Gareth
|
Just another update to bore you all!! 
Deck now done with non-slip paint and now not far off starting the technical stuff!
Have a big decision to make regarding what engine to go for??
__________________
|
|
|
|
|
22 April 2013, 20:42
|
#20
|
|
Member
Country: UK - England
Boat name: Carpe Diem
Make: Ribeye 650S
Length: 5m +
Engine: Yamaha F150
Join Date: Oct 2012
Posts: 548
|
Ok, another update for you all with the last 2 weeks work
Boat was removed from trailer and was flipped upside down to find various scratches / gouges, poor previous repairs and black rubber roller marks
To tackle this the following was carried out!
1.) Hull wiped cleaned with acetone
2.) Hull polished using G3 rubbing compound and buffer
3.) Bad gouges through gel coat and poor previous repairs prepared and then filled
4.) Repair areas then masked and painted with a close paint match (not repainting the whole hull as I know I just won't get a satisfactory finish)
5.) Last photo shows afterwards
__________________
|
|
|
|
|
|
 Posting Rules
|
You may not post new threads
You may not post replies
You may not post attachments
You may not edit your posts
HTML code is Off
|
|
|
|
 Recent Discussions
 |
|
|
|
|
|
|
|
|
|
|
|
|
|
|
|
|
|
|
|
|
|
|
|
|
|
|
|
|
|
|
|
|
|


 Red Mist
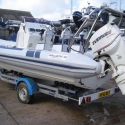 Beretta
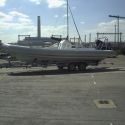 White Noise
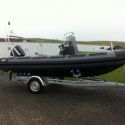 Golliwog