|
|
 27 May 2011, 08:44
|
#1
|
|
Member
Country: UK - England
Length: 4m +
Join Date: Aug 2006
Posts: 196
|
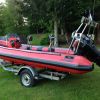
Searider rebuild project
Searider project to bring life back to an old boat built in 1986 by my estimation.
The boat has been owned the sailing club I work for on more than one occasion, being sold to members and bought back on more than one occasion (including for a whole pound on one occasion!) with various different engines and paint jobs over the years.
The transom is totally rotted out and needs replacing and the deck needs some attention with some rot around the console fittings and at least 3 different coats of paint on the inside and a nice red coat on the outside to smarten up.
Bit of work to do here!
Sent from my iPhone using Rib.net
__________________
Freelance skipper, RYA Powerboat Trainer and Advanced Examiner
|

|

|
|
27 May 2011, 08:51
|
#2
|
|
Member
Country: UK - England
Length: 4m +
Join Date: Aug 2006
Posts: 196
|
After removing the wood that had been glued to the floor to sit the console on I found the deck was a bit softer than first thought.
Out it comes then. Best order a bit more ply and resin supply!
Sent from my iPhone using Rib.net
__________________
Freelance skipper, RYA Powerboat Trainer and Advanced Examiner
|
|
|
|
|
27 May 2011, 09:01
|
#3
|
|
Member
Country: UK - England
Length: 4m +
Join Date: Aug 2006
Posts: 196
|
Next for the transom.
A bit of careful grinding to take out the inside laminate and the a bit of work with a chisel and hammer to remove therotten ply. It was far more rotten than I thought. It came off in bit that looked just like chocolate flakes in the bottom of the boat! there were tiny bits of dry wood remaining at the very bottom and corners of the transom but the rest was just completely wet and rotten
The plan is to build a new timber laminate using the inside face I cut off as a template and the epoxy this to the outside face left in place. Then I'll work out how to fit the deck.
99% certain at this point I'm going to block the hull off. Why replace rotten wood and then have water sloshing around under the deck getting it wet again.
Also the boats are used as safety boats on a 60 acre lake so spend a lit of time going on and off the plane getting to incidents so we burn a lot of fuel just off loading water ballast all the time.
Sent from my iPhone using Rib.net
__________________
Freelance skipper, RYA Powerboat Trainer and Advanced Examiner
|
|
|
|
|
27 May 2011, 09:38
|
#4
|
|
Member
Country: UK - England
Town: Bristol
Make: Ribcraft
Length: 5m +
Engine: Yamaha
Join Date: May 2006
Posts: 4,299
|
looks a great rebuild Hamster.
Looking forward to seeing the build. 
__________________
|
|
|
|
|
27 May 2011, 12:31
|
#5
|
|
Member
Country: UK - England
Town: PORTSMOUTH
Make: Avon 5.4, Avon 3.4,
Length: 5m +
Engine: Yamaha 90, Merc 30
Join Date: Sep 2003
Posts: 1,976
|
great work, ive just done something very similar on my 4metre at present
__________________
|
|
|
|
|
28 May 2011, 11:44
|
#6
|
|
Member
Country: UK - England
Town: Bucks
Boat name: Blue & Ding Dong
Make: Ribeye,SR4 & Bombard
Length: 6m +
Engine: 115,50 & 15Hp Yams
Join Date: Feb 2004
Posts: 3,252
|
Interesting to see under the deck as when I look up inside my hull you can see 2 boxes taking up room ether side, I think it is so it takes on less water!
__________________
Member of the Ribeye supporters club!!!
Member of Bombard 380 Aerotec club
Member of SR4 club
|
|
|
|
|
29 May 2011, 06:00
|
#7
|
|
RIBnet admin team
Country: UK - England
Town: The wilds of Wiltshire
Boat name: Dominator
Make: SR5.4
Length: 7m +
Engine: Yam 85
MMSI: 235055163
Join Date: Jul 2005
Posts: 13,054
|
Quote:
Originally Posted by Nick Hearne

Interesting to see under the deck as when I look up inside my hull you can see 2 boxes taking up room ether side, I think it is so it takes on less water!
|
Yes, it's to limit the amount of ballast water it takes on at the stern. I suspect you'd have problems shipping water over the transom if you had a heavy engine on there and the flooding hull open without the boxes being present.
__________________
Need spares,consoles,consumables,hire,training or even a new boat?
Please click HERE and HERE and support our Trade Members.
Join up as a Trade member or Supporter HERE
|
|
|
|
|
29 May 2011, 21:36
|
#8
|
|
Member
Country: UK - England
Length: 4m +
Join Date: Aug 2006
Posts: 196
|
Yes the tanks at the back fitted to the underside of the deck mean theres still some buoyancy at the stern to support the weight of the engine without the stern sitting too low in the water. I've still got the remains of the deck at work so I'll post some pictures of the underside next week so you can see the size of the tanks.
Next job after stripping out the rotten wood was to clean up the inside face of the transom and fill in all the holes so I have something solid to laminate the new wood on to.
All the holes in the transom suggest the boat has had at least 4 different engines on it over the years as well as various other fittings that have been removed leaving holes that have just been filled with a bit of silicone. The transom has more holes in it than a used pub dart board, no wonder the wood was so rotten. When I held a straight edge across the width of the transom before taking it out the middle had bowed by around 35mm from the weight of the engine hanging on it. I'm surprised it hadn't fallen off.
Holes were taped over and then filled with glass body filler. The outside will be flow coated later to make it look better and the inside laminated to the ply to give strength.
Sent from my iPhone using Rib.net
__________________
Freelance skipper, RYA Powerboat Trainer and Advanced Examiner
|
|
|
|
|
29 May 2011, 22:05
|
#9
|
|
Member
Country: UK - England
Length: 4m +
Join Date: Aug 2006
Posts: 196
|
Now we have a flattish surface to work too it's time to make the new ply laminate
The old inside face cut out carefully to be preserved for future use was used to make up a cardboard template to mark out the shape for the new wood laminate. I decided as I wasn't going to be flooding the hull anymore then I'd take the ply down the full height of the transom rather than just down to deck level as it was before in order to give more rigidity.
Once the I had a template mk3 that was a good fit I marked out the ply and set loose with a jigsaw and circular saw.
I cut out the new transom from a sheet of 3/4" marine ply and another from 1/2" ply which I then laminated together using epoxy and two layers of 300gsm chopped strand Matt with lots of g clamps and 8 large bolts to hold it all together while it set.
The new 1 1/4" of ply should give a lot more strength than the 3/4" that was in there before.
Sent from my iPhone using Rib.net
__________________
Freelance skipper, RYA Powerboat Trainer and Advanced Examiner
|
|
|
|
|
29 May 2011, 23:05
|
#10
|
|
Member
Country: UK - England
Length: 4m +
Join Date: Aug 2006
Posts: 196
|
Once the epoxy is set the new transom is sanded and shaped to fit around the edges and shape the bottom edge to match the hull/transom angle to ensure a tight fit and minimum gaps around to fill later.
Next job before gluing everything in is to make up the new deck.
Again cardboard is used to make a full size template to use to cut the ply. I had a box which a 30hp yamaha for another rib was delivered in a few weeks previously that was big enough when I cut it open to make template for the whole deck in one piece.
When I cut out the old deck I left 2 to 3 inches of it in place around the edge to give me a good surface to fix the new deck down to. This made cutting the template easy to do as u just lined up one side along the edge of the new position and ran a Stanley knife around the other side after pushing it into the edge where the ply will sit.
The new deck was then cut from 1/2" marine ply and then trimmed and sanded to fit. Unfortunately an 8' sheet isn't quite long enough for the whole deck so it had to be done in two pieces.
Once sanded to fit snuggly the deck was turned over and a coat of epoxy applied to help protect from any water that may get below deck. At the same time 6 x m10 bolts were fitted through the deck to attach the console to. The heads of the bolts were set in epoxy to hold them in place and hopefully prevent any water leaking through these fittings from above the deck.
Sent from my iPhone using Rib.net
__________________
Freelance skipper, RYA Powerboat Trainer and Advanced Examiner
|
|
|
|
|
29 May 2011, 23:18
|
#11
|
|
Member
Country: UK - England
Town: EXmouth
Boat name: Apache
Make: Avon Searider 5.4M
Length: 5m +
Engine: outboard petrol 140
Join Date: May 2011
Posts: 10
|
wow thats going to look great when its finished i now know where to come if my transom is shot. :-)
__________________
|
|
|
|
|
29 May 2011, 23:48
|
#12
|
|
Member
Country: UK - England
Length: 4m +
Join Date: Aug 2006
Posts: 196
|
After epoxying the deck and checking everything fits I decided to cut the deck into three pieces so it fits the fore and aft curve of the hull better with out straining the wood permanently.
Before putting the deck and new transom in I decide to investigate a small damp patch in the bottom of the hull around the keel strengthening tube structure. As soon as I go near it with a grinder floods of water come out followed by gravel and sand that has been dredged up when the boat has been beached so many times that the front of the keel has been ground away leaving a 10 inch hole that has been filled in at some point, trapping all the water and gravel in there.
I ended up grinding the whole of the keel structure away to get all the damp foam out of there which now left me with nothing providing any strength or rigidity along the length of the hull apart from the deck.
To over come this I decide to make up some stingers and cross strengthening to support the deck below the console and strengthen the hull.
I made this from 3/4 inch ply and laminate it into the hull using epoxy and 300gsm can and woven roving. This should give me something to screw the deck down to as well as gluing it in.
Sent from my iPhone using Rib.net
__________________
Freelance skipper, RYA Powerboat Trainer and Advanced Examiner
|
|
|
|
|
30 May 2011, 00:01
|
#13
|
|
Member
Country: UK - England
Length: 4m +
Join Date: Aug 2006
Posts: 196
|
At the same time I make up the walls for well I'm putting in at the stern for the bilge pump and auto drain device. Also I put in a hole for a screw bung to drain any water that gets under the deck into the well.
Sent from my iPhone using Rib.net
__________________
Freelance skipper, RYA Powerboat Trainer and Advanced Examiner
|
|
|
|
|
30 May 2011, 10:39
|
#14
|
|
Member
Country: UK - England
Town: PORTSMOUTH
Make: Avon 5.4, Avon 3.4,
Length: 5m +
Engine: Yamaha 90, Merc 30
Join Date: Sep 2003
Posts: 1,976
|
great work
__________________
|
|
|
|
|
30 May 2011, 18:31
|
#15
|
|
Member
Country: UK - England
Length: 4m +
Join Date: Aug 2006
Posts: 196
|
Next job is gluing the transom in.
In order to get the old outside face of the transom to come flat and straight again I decided that when I glued it all together everything would need pulling into place while the epoxy set. To do this I used a dozen m8 bolts holding stainless area on either side and lots of G clamps to hold everything in place. I predrilled the ply and outside face to get everything ready before finally mixing lots of epoxy, putting it all together and crossing my fingers that all would go to plan!
After it had all gone off I removed all the clamps and bolts and plates and all stayed stuck where I wanted it too! The holes that the fixing bolts had been through were then filled with epoxy to give a nice flat surface to carry on working with and the corners around the transom/hull filleted to get rid of any voids where water could hid and roy things of it got in.
Sent from my iPhone using Rib.net
__________________
Freelance skipper, RYA Powerboat Trainer and Advanced Examiner
|
|
|
|
|
30 May 2011, 20:10
|
#16
|
|
Member
Country: UK - England
Length: 4m +
Join Date: Aug 2006
Posts: 196
|
Next job was to fit the new deck.
After a few hours removing old paint from around the inside areas and preparing the 3" surround that remained of the old deck everything was ready for gluing down. I decided to put the deck down in three sections to cope with the fore and aft curve it has and also to make it easier rather than one big piece.
I then glued the deck down with lots of epoxy and screwed it dorm the the new stringers and well surround. I left it over night with 15 bags of cement and gravel holding it all in place hoping it would go off and hold in place.
The next morning all had gone to plan. Before laminating over the new deck I filled any gaps with epoxy filler and then sanded off any traces of epoxy from all timber surfaces so that the polyester resin and gelcoat would stick.
I then set about laminating over the entire deck and transom before gel and flowcoat could be applied.
All joints and corners got a 9" layer of 300g csm followed by 300g woven cloth. The whole lot then got a layer of 300g csm followed by 450g woven cloth. On the transom I took this over the top and 6" down the outside and around the sides to remake the flanges to attach the tubes on to.
Sent from my iPhone using Rib.net
__________________
Freelance skipper, RYA Powerboat Trainer and Advanced Examiner
|
|
|
|
|
14 June 2011, 07:10
|
#17
|
|
Member
Country: UK - England
Length: 4m +
Join Date: Aug 2006
Posts: 196
|
Here's the tanks that live under the deck towards the back of the boat to provide buoyancy at the stern to support the weight if the engine etc.
They are bigger than I thought they'd be so must provide a fair amount of buoyancy.
Sent from my iPhone using Rib.net
__________________
Freelance skipper, RYA Powerboat Trainer and Advanced Examiner
|
|
|
|
|
14 June 2011, 07:21
|
#18
|
|
Member
Country: UK - England
Length: 4m +
Join Date: Aug 2006
Posts: 196
|
After the deck and transom are glassed in I spent a few hours with the grinder and sander getting everything nice and smooth ready for top coating, paying particular attention to any corners and areas of high wear.
I then applied a couple of coats of orange gel followed by a final coat of flowcoat.
Once that had gone off properly I applied a couple of coats of grey gelcoat with nonslip additive followed by a coat of flowcoat, again with non slip added.
I applied all coats with a brush and then rolled out to get a smooth finish as I couldn't get it on as thick as I wanted with just a roller. Just as the grey was about to go off and was tacky I went over it with a wooly roller to give a stipled surface to it to give more grip under foot.
I also applied gel and flowcoat to the outside of the transom which will be sanded and polished later.
Sent from my iPhone using Rib.net
__________________
Freelance skipper, RYA Powerboat Trainer and Advanced Examiner
|
|
|
|
|
14 June 2011, 07:29
|
#19
|
|
Member
Country: UK - England
Length: 4m +
Join Date: Aug 2006
Posts: 196
|
Final finish to the inside. It all looks as good as I wanted it to apart from the grey deck, seems I didn't roll it at quite the right time to get the stippled effect I wanted. There's about a 10 second gap to do it between it not having gone off and just running flat again to it going off and being to stiff to push a roller through it.
It's still satisfactory though and should provide plenty of grip under foot.
Sent from my iPhone using Rib.net
__________________
Freelance skipper, RYA Powerboat Trainer and Advanced Examiner
|
|
|
|
|
14 June 2011, 07:38
|
#20
|
|
Member
Country: UK - England
Length: 4m +
Join Date: Aug 2006
Posts: 196
|
After a few hours sanding and polishing the transom it time to start pitting it all back together.
First i reattached the tubes and then set about refitting the engine. And other fittings to the transom.
I decided to reuse the 3mm stainless reinforcing plate I'd had made previously to support the old transom just to provide additional support.
Instead of a drain trunk I'm using a cup and ball type device which works automatically rather than rely on people remembering to pull the trunk up and not leave the boat to flood when left on it's mooring.
Sent from my iPhone using Rib.net
__________________
Freelance skipper, RYA Powerboat Trainer and Advanced Examiner
|
|
|
|
|
|
 Posting Rules
|
You may not post new threads
You may not post replies
You may not post attachments
You may not edit your posts
HTML code is Off
|
|
|
|
 Recent Discussions
 |
|
|
|
|
|
|
|
|
|
|
|
|
|
|
|
|
|
|
|
|
|
|
|
|
|
|
|
|
|
|
|
|
|


 White Noise