|
|
 16 March 2015, 03:52
|
#61
|
|
Member
Country: USA
Town: Mountain View, CA
Boat name: Six Park
Make: True Kit
Length: 3m +
Engine: Suzuki 6
Join Date: Dec 2014
Posts: 236
|
Quote:
Originally Posted by ShinyShoe

I may be wrong but do people not usually bolt from outside to inside. Assume to reduce crud on the thread when time comes to remove?
Are they stainless? Look like zinc dipped? Should there be a large washer to spread the load properly...?
Is the other side also not flush or is the transoms cross section not a parallelogram but a trapezoid?
|
The bolt comes with a large washer. Both seem to be some sort of hard aluminum alloy (does not attract to magnet).
The other side of the transom is not flushed. It has a piece of plastic that's thicker at the top and thinner at the bottom. Does anyone know what the purpose is?

Anyway, I've seen dealers that bolt the engine directly on top of this plastic piece (with the exact same boat), so I'm doing the same.
I think Mercury recommends bolting from outside to inside (nut inside the transom). This seems to be a better arrangement to stop water coming from the outside into the transom core.
However, my Suzuki manual has the nut outside of the transom, so I'll do the same. Not sure if there's a reason for Suzuki to do that. Anyway, since I have that plastic piece, it seems bolting either way won't have much difference in terms of sealing effectiveness.
__________________
|

|

|
|
16 March 2015, 03:53
|
#62
|
|
Member
Country: USA
Town: Mountain View, CA
Boat name: Six Park
Make: True Kit
Length: 3m +
Engine: Suzuki 6
Join Date: Dec 2014
Posts: 236
|
Quote:
Originally Posted by ShinyShoe
Good chance they are A2 stainless rather than A4 (316). Still stainless but may rust in salty water especially if surface gets damaged during install...
|
Thanks for bringing this up. It's a good thing I keep receipts. It's a double good thing that my progress is so slow so I haven't bolted anything permanently yet.
I will visit West Marine tomorrow and see if they have 316 stainless fasteners. Maybe that's why they are more expensive.
__________________
|
|
|
|
|
16 March 2015, 04:03
|
#63
|
|
Member
Country: USA
Town: California
Make: Avon 5.4m Searider
Length: 5m +
Engine: Yamaha 90
Join Date: Aug 2011
Posts: 1,260
|
Quote:
Originally Posted by ba_fisher
I will visit West Marine tomorrow and see if they have 316 stainless fasteners. Maybe that's why they are more expensive.
|
I think most of West Marine hardware is labeled 8-18 and is from Fastco. 8-18 is 304 is A2. 316/A4, aka the good stuff, is hard to find.
__________________
|
|
|
|
|
16 March 2015, 04:58
|
#64
|
|
Member
Country: USA
Town: Mountain View, CA
Boat name: Six Park
Make: True Kit
Length: 3m +
Engine: Suzuki 6
Join Date: Dec 2014
Posts: 236
|
I heard that 316 is necessary only if the part is constantly touching salt water. If I just use 304 for things like console and seat, would that be OK?
__________________
|
|
|
|
|
16 March 2015, 05:39
|
#65
|
|
Member
Country: USA
Town: Mountain View, CA
Boat name: Six Park
Make: True Kit
Length: 3m +
Engine: Suzuki 6
Join Date: Dec 2014
Posts: 236
|
Amazon to the rescue:
316 Stainless Steel Hex Bolt, Plain Finish, Hex Head, External Hex Drive, Meets ASME B18.2.1, 1-3/4" Length, Partially Threaded, 1/4"-20 UNC Threads (Pack of 25): Cap Screws And Hex Bolts: Amazon.com: Industrial & Scientific
This is the exact length I need. Most shops have either 1.5 or 2.0 inches, and they are partially threaded (only 0.75 inches of threads). The 1.5 inch is too short and the 2.0 inch is too long. It's good that Amazon carries the 1.75 inch!
__________________
|
|
|
|
|
16 March 2015, 05:45
|
#66
|
|
Member
Country: USA
Town: Mountain View, CA
Boat name: Six Park
Make: True Kit
Length: 3m +
Engine: Suzuki 6
Join Date: Dec 2014
Posts: 236
|
__________________
|
|
|
|
|
26 March 2015, 04:47
|
#67
|
|
Member
Country: USA
Town: Mountain View, CA
Boat name: Six Park
Make: True Kit
Length: 3m +
Engine: Suzuki 6
Join Date: Dec 2014
Posts: 236
|
Not too much to report, but got into an interesting situation today.
I need to relocate the handle of the motor control box from port to starboard, and from the manual it seemed to be an easy job.
Step 1: remove some screws and a cover. Easy enough, done.
Step 2: remove some more screws and strip one of them. That was easy too.
The manual says this screw need to be tightened with 2.9lbft torque. Maybe the screw had a lot of thread locker glue on it, in any case, it was much much more than 2.9lb. Suzuki compounded the problem by using very cheap soft screws. I was able to remove one of these screws very carefully, but ended up stripping the other one.
I finally gave up and drilled away the screw head. It's lucky I have a drill press, as I could have never done that with a hand drill without damaging the surrounding plastic.
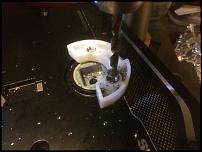
Now only the stump is left. I tried flattening it with a dremel tool and twisting it with a large spanner, but this bugger just won't budge.
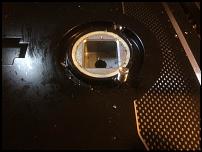

I'll soak it with wd40 overnight and see if it becomes loose tomorrow. If that won't work I'll just cut the stem away. Hopefully I won't need to relocate the handle back to the port side.
__________________
|
|
|
|
|
29 March 2015, 04:04
|
#68
|
|
Member
Country: USA
Town: San Francisco Bay
Boat name: SRMN 600
Make: Zodiac
Length: 6m +
Engine: Honda 90
Join Date: Mar 2013
Posts: 478
|
How did it go?
__________________
|
|
|
|
|
29 March 2015, 05:08
|
#69
|
|
Member
Country: USA
Town: Mountain View, CA
Boat name: Six Park
Make: True Kit
Length: 3m +
Engine: Suzuki 6
Join Date: Dec 2014
Posts: 236
|
The WD40 did nothing. Probably the screw was further tightened when I drilled the head off. So I cut it.
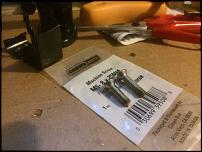
The screws are metric and Home Depot doesn't have them. I bought two replacements from OSH for $2.69 apiece. Ouch.
And they are the wrong length so I had to cut them with an angle grinder and the carefully restore the threads at the tip.
This is how it looked after being relocated to the other side.
__________________
|
|
|
|
|
30 March 2015, 00:48
|
#70
|
|
Member
Country: USA
Town: Mountain View, CA
Boat name: Six Park
Make: True Kit
Length: 3m +
Engine: Suzuki 6
Join Date: Dec 2014
Posts: 236
|
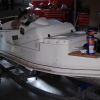
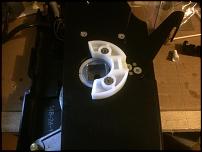
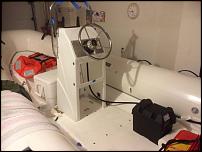
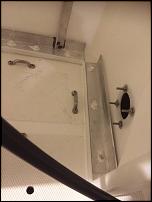
The console is installed, and I added an aluminum plate to reinforce the steering helm. I thought about using it as a backing plate, but putting it on top of the plastic seems to be stronger.
So I spent 2 hours polishing it to give it a brushed aluminum look. It probably is meaningless, and get scratched/oxidized soon, but for today it looks great!
I also bought a steering cable with the correct length (9ft). I bought a 10ft one before and it was sticking all outside of the tube. It's too much trouble to return, so I'll try to sell it on eBay instead.
__________________
|
|
|
|
|
30 March 2015, 00:53
|
#71
|
|
Member
Country: USA
Town: Mountain View, CA
Boat name: Six Park
Make: True Kit
Length: 3m +
Engine: Suzuki 6
Join Date: Dec 2014
Posts: 236
|
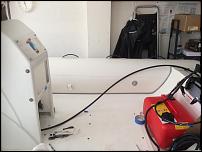
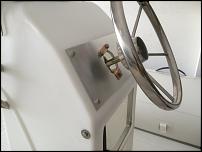
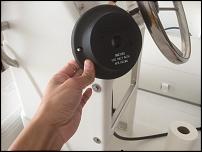
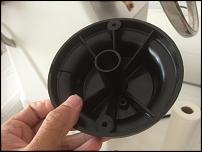
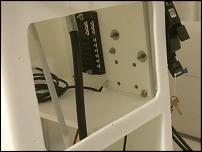
That's the look before being polished.
Also notice that the control box is mounted too low. I should have done more testing before mounting it. Anyway, I'll move it up, and fill the old hole with hex bolts ....
__________________
|
|
|
|
|
30 March 2015, 05:57
|
#72
|
|
Member
Country: USA
Town: Mountain View, CA
Boat name: Six Park
Make: True Kit
Length: 3m +
Engine: Suzuki 6
Join Date: Dec 2014
Posts: 236
|
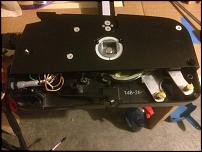
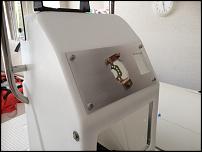
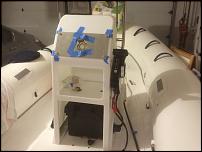
Installed the steering helm and cable
You can see the aluminum angles inside the console to support a shelf
The console is bolted onto the deck with togglers and aluminum angles.
I also screwed 4 footman's loops to anchor the battery. The screws are reinforced with epoxy resin.
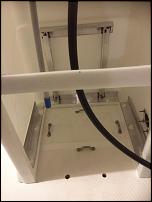
One thing is the steering cable is slightly pressing onto the tube. Is this going to be a problem?

__________________
|
|
|
|
|
30 March 2015, 18:01
|
#73
|
|
Member
Country: USA
Town: San Francisco Bay
Boat name: SRMN 600
Make: Zodiac
Length: 6m +
Engine: Honda 90
Join Date: Mar 2013
Posts: 478
|
Looking good. I like what you did to reinforce the console. The steering cable should be fine. The last two steering cable setups I had, the steering cable pressed up and rubbed against the tube. No harm done.
__________________
|
|
|
|
|
30 March 2015, 22:01
|
#74
|
|
Member
Country: USA
Town: California
Make: Avon 5.4m Searider
Length: 5m +
Engine: Yamaha 90
Join Date: Aug 2011
Posts: 1,260
|
The cable doesn't move so it shouldn't rub.
__________________
|
|
|
|
|
02 April 2015, 04:02
|
#75
|
|
Member
Country: USA
Town: Mountain View, CA
Boat name: Six Park
Make: True Kit
Length: 3m +
Engine: Suzuki 6
Join Date: Dec 2014
Posts: 236
|
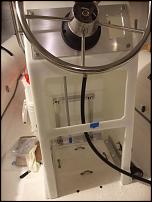
Installed the steering linkage
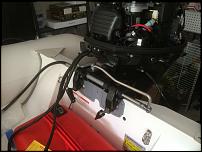
By the way, how should I weather proof the helm? The helm is a piece of hard plastic. I guess I could put 3m 5200 around the base, but it would smear and make the aluminum plate look dirty.
Is it possible to find a rubber ring washer of the correct size, or cut one myself?
__________________
|
|
|
|
|
04 April 2015, 00:55
|
#76
|
|
Member
Country: USA
Town: Mountain View, CA
Boat name: Six Park
Make: True Kit
Length: 3m +
Engine: Suzuki 6
Join Date: Dec 2014
Posts: 236
|
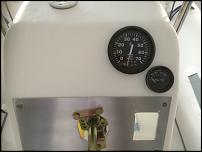
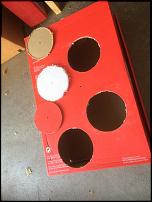
Cut holes on the console for the tachometer and voltmeter. For other engine info I'll use the display inside the fish finder.
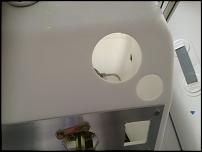
I cut the smaller hole using a hole saw, and the bigger hole using the dremel hole cutter.
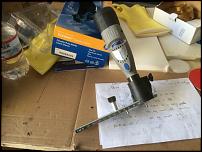
Did a few practice runs on a shoebox to make sure I set the cutter correctly.
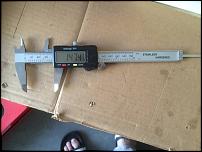
I've found that a good digital caliper is indispensable for a project like this. I've used it to measure many things, like the size of screws, holes, wires, thickness of boards, etc. A very good investment for $10 at Amazon.
__________________
|
|
|
|
|
05 April 2015, 02:44
|
#77
|
|
Member
Country: USA
Town: Mountain View, CA
Boat name: Six Park
Make: True Kit
Length: 3m +
Engine: Suzuki 6
Join Date: Dec 2014
Posts: 236
|
__________________
|
|
|
|
|
05 April 2015, 02:44
|
#78
|
|
Member
Country: USA
Town: Mountain View, CA
Boat name: Six Park
Make: True Kit
Length: 3m +
Engine: Suzuki 6
Join Date: Dec 2014
Posts: 236
|
The NMEA 2000 cable is also too long, and will be coiled up the same way. I also installed a fuse box with 12 fuses. I probably won't use more than half of them, but better safe than sorry :-)
__________________
|
|
|
|
|
05 April 2015, 08:45
|
#79
|
|
Member
Country: UK - England
Town: New Milton
Boat name: Jianna
Make: Osprey
Length: 6m +
Engine: 200 E-TEC
MMSI: 235076954
Join Date: Sep 2004
Posts: 1,940
|
Good write up. Nice to see someone doing good work. Keep the pictures coming 
Would not want that wheel in the UK though 
__________________
Ian
Dust creation specialist
|
|
|
|
|
08 April 2015, 07:10
|
#80
|
|
Member
Country: USA
Town: Mountain View, CA
Boat name: Six Park
Make: True Kit
Length: 3m +
Engine: Suzuki 6
Join Date: Dec 2014
Posts: 236
|
Quote:
Originally Posted by Ian M
Would not want that wheel in the UK though |
What's wrong with the UK? Cold fingers? :-)
__________________
|
|
|
|
|
|
 Posting Rules
|
You may not post new threads
You may not post replies
You may not post attachments
You may not edit your posts
HTML code is Off
|
|
|
|
 Recent Discussions
 |
|
|
|
|
|
|
|
|
|
|
|
|
|
|
|
|
|
|
|
|
|
|
|
|
|
|
|
|
|
|
|
|
|