|
|
 16 September 2018, 15:07
|
#1
|
|
Member
Country: UK - England
Town: plymouth
Make: Humber
Length: 4m +
Engine: outboard
Join Date: Sep 2018
Posts: 12
|
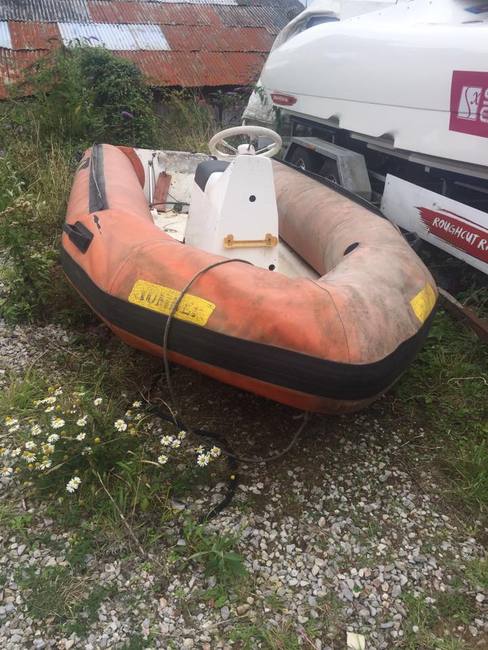
4M Humber Rib Project
Hey guys,
We are new to the RIB scene and decided to take a project on,
We are hoping to get the boat on the water in month 
The boat has cost 325 so far
75 for boat
75 for Engine (Honda 15hp 4stroke) was spairs and repair but fixed it 
175 for trailer
we are trying to do the whole project for under 500
(Fingers crossed)
Pictures added below 
__________________
|

|

|
|
16 September 2018, 15:09
|
#2
|
|
Member
Country: UK - England
Town: plymouth
Make: Humber
Length: 4m +
Engine: outboard
Join Date: Sep 2018
Posts: 12
|
__________________
|
|
|
|
|
16 September 2018, 15:53
|
#3
|
|
Member
Join Date: Jun 2010
Posts: 2,934
|
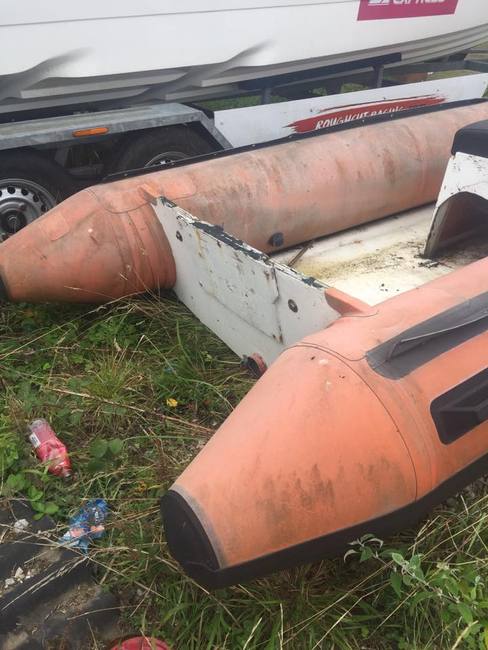
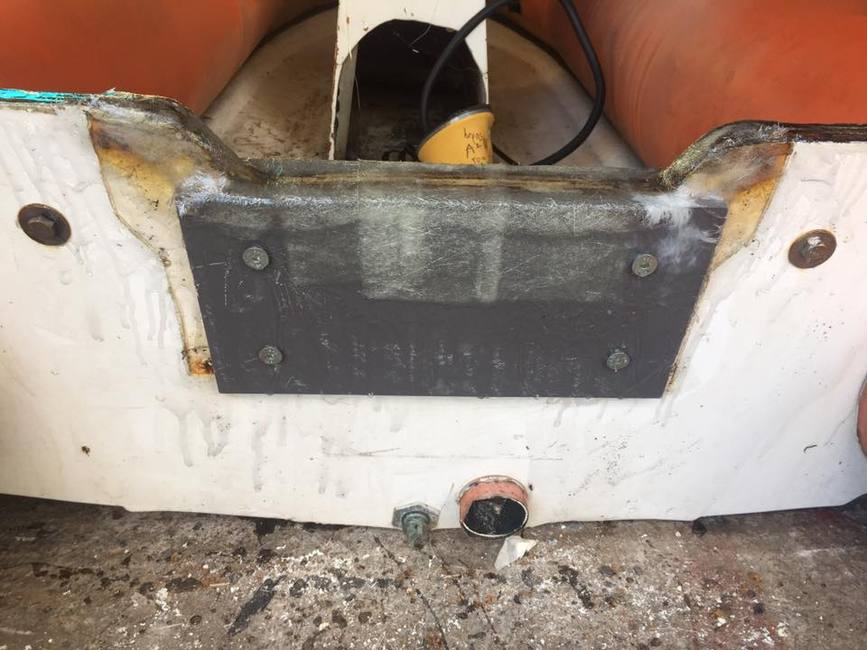
Good luck with it, looks like the transom is shot, you planning to replace it?
__________________
|
|
|
|
|
16 September 2018, 16:25
|
#4
|
|
Member
Country: UK - England
Town: plymouth
Make: Humber
Length: 4m +
Engine: outboard
Join Date: Sep 2018
Posts: 12
|
Quote:
Originally Posted by Xk59D

Good luck with it, looks like the transom is shot, you planning to replace it?
|
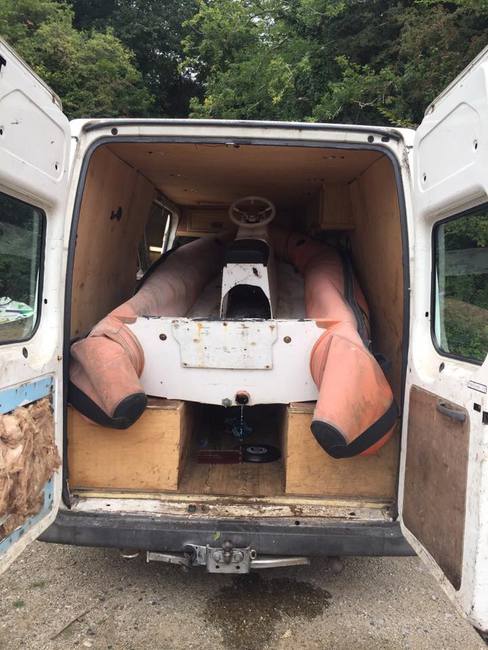
i have reinforced the transom with fiberglass 12mm plate on both sides and covered with Chopped strand matt, i drilled 20mm down and the wood is still dry , i hope this is strong enough , its was damp near the top though
__________________
|
|
|
|
|
16 September 2018, 16:28
|
#5
|
|
Member
Country: UK - England
Town: plymouth
Make: Humber
Length: 4m +
Engine: outboard
Join Date: Sep 2018
Posts: 12
|
Quote:
Originally Posted by Xk59D
Good luck with it, looks like the transom is shot, you planning to replace it?
|
i also put 4 studs in to hold it all together!

__________________
|
|
|
|
|
16 September 2018, 16:28
|
#6
|
|
Member
Country: UK - England
Town: plymouth
Make: Humber
Length: 4m +
Engine: outboard
Join Date: Sep 2018
Posts: 12
|
__________________
|
|
|
|
|
16 September 2018, 17:06
|
#7
|
|
Member
Join Date: Jun 2010
Posts: 2,934
|
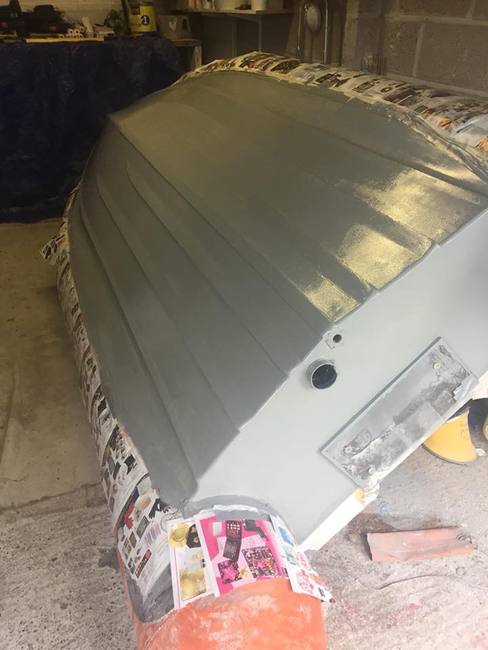
You appear to have glassed over dirty gel coat, pretty much a pointless exercise.
I appreciate you want to get on the water but this may not be the way to go about it.
__________________
|
|
|
|
|
16 September 2018, 17:11
|
#8
|
|
Member
Country: UK - England
Town: plymouth
Make: Humber
Length: 4m +
Engine: outboard
Join Date: Sep 2018
Posts: 12
|
Quote:
Originally Posted by Xk59D
You appear to have glassed over dirty gel coat, pretty much a pointless exercise.
I appreciate you want to get on the water but this may not be the way to go about it.
|
first time doing this type of thing :S , the lamination looks / feels solid, no air bubbles or lifting
__________________
|
|
|
|
|
16 September 2018, 17:37
|
#9
|
|
Member
Join Date: Jun 2010
Posts: 2,934
|
Without getting into a long explanation that can easily be found on Google, it will depend on what type of fibreglass resin was used, most boats and most fibreglass repair kits contain polyester resin, and most gelcoat is the same.
Whilst it is good practice to grind the gelcoat off to get back to the bare fibreglass to get the best adhesion, you can get away with good surface prep if both surfaces are polyester based due to how polyester bonds. I would always grind gelcoat off personally though, especially on a transom.
It may be okay in your shed but when 50kg of outboard is bouncing about on an unprepped surface, who can say?
Just be careful and enjoy your new boat safely
__________________
|
|
|
|
|
16 September 2018, 21:03
|
#10
|
|
Member
Country: UK - Scotland
Town: denny
Boat name: breezy
Make: northcraft
Length: 6m +
Engine: honda 150
Join Date: May 2016
Posts: 888
|
Quote:
Originally Posted by Xk59D
Without getting into a long explanation that can easily be found on Google, it will depend on what type of fibreglass resin was used, most boats and most fibreglass repair kits contain polyester resin, and most gelcoat is the same.
Whilst it is good practice to grind the gelcoat off to get back to the bare fibreglass to get the best adhesion, you can get away with good surface prep if both surfaces are polyester based due to how polyester bonds. I would always grind gelcoat off personally though, especially on a transom.
It may be okay in your shed but when 50kg of outboard is bouncing about on an unprepped surface, who can say?
Just be careful and enjoy your new boat safely |
I ground the gelcoat off the deck on mines yesterday to get the new seats on half the street has a coating of yellow now used a 40 grit flap disc to get quite good results
__________________
|
|
|
|
|
17 September 2018, 19:31
|
#11
|
|
Member
Country: UK - England
Town: southampton
Boat name: TOP CAT 2
Make: Scorpion 8.1
Length: 8m +
Engine: 250hp HO
Join Date: Aug 2003
Posts: 1,806
|
Hi Curtis. What is that plate you put on transom?
__________________
|
|
|
|
|
18 September 2018, 10:14
|
#12
|
|
Member
Country: UK - England
Town: Bromsgrove
Boat name: Kick-Ass !
Make: PAC/Artic 22
Length: 6m +
Engine: 250hp Yamaha
Join Date: Nov 2003
Posts: 3,572
|
That plate tells me it should not be having an engine strapped to it
__________________
MY BIGGEST WORRY IS THAT MY WIFE(WHEN I"M DEAD)WILL SELL MY TOY'S FOR WHAT I SAID I PAID FOR THEM.
|
|
|
|
|
18 September 2018, 10:29
|
#13
|
|
Member
Country: UK - England
Town: plymouth
Make: Humber
Length: 4m +
Engine: outboard
Join Date: Sep 2018
Posts: 12
|
The plate is extren 525 plate, 12mm thick, its strong as f.. I have orientated the fiber direction too when cutting to give more strength in different directions
__________________
|
|
|
|
|
18 September 2018, 19:46
|
#14
|
|
Member
Country: UK - England
Make: Ribcraft
Length: 5m +
Engine: Yamaha
Join Date: Feb 2006
Posts: 309
|
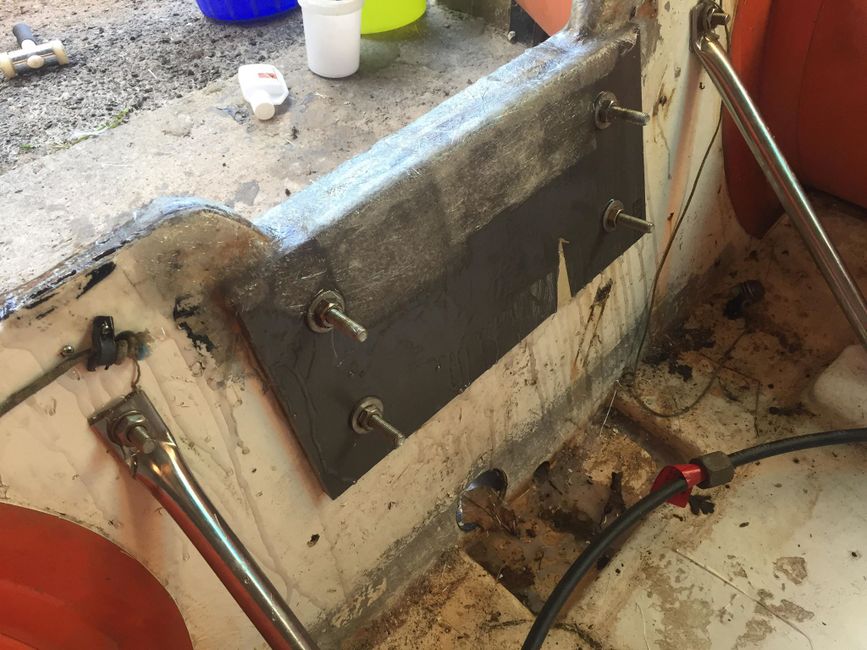
At the very least you should’ve extended the plate across the transom to pick up the stainless supports.
__________________
|
|
|
|
|
18 September 2018, 20:11
|
#15
|
|
Member
Country: UK - England
Town: southampton
Boat name: TOP CAT 2
Make: Scorpion 8.1
Length: 8m +
Engine: 250hp HO
Join Date: Aug 2003
Posts: 1,806
|
If a transom is wet at the top. Gravity says its most likely wet at the bottom. Any fix that doesnt remove the wood is probably a bodge. If it was me I would have removed inside skin of transom and fitted a new sheet of ply or ur grp board. Then 4-5 layers of 450 csm. However.
Lets be realistic. Its a £500 boat and I doubt your gonna hang a 350hp off the back.
In an ideal world your repair, you would have ground back to bare grp, and then cleaned the area with acetone, then mixed resin with cabosil to create a thickened resin bog, to create a fillet between your board and transom. This big could be used to glue the board to the transom too.
(Alternatively you could have ground a taper on the board). Then either way you would have covered the whole transom area with csm to tie the board to the boat. Each layer of csm should get bigger and cover more area with poly resins, so you could have a clean up and carry on with this theme tbh
Another way would have been full width board so the stainless stringers bolted through the board. But you would have less original transom to tie the csm into.
Do you know if you have used polyester or vinylester or epoxy resin?
__________________
|
|
|
|
|
18 September 2018, 22:24
|
#16
|
|
Member
Country: UK - England
Town: Nottinghamshire
Make: Ranieri 15
Length: 4m +
Engine: Suzuki DF50
Join Date: Jul 2016
Posts: 1,279
|
Loving this thread please keep the pics and info coming!
__________________
|
|
|
|
|
19 September 2018, 09:43
|
#17
|
|
Member
Country: Ireland
Boat name: TLC
Make: Halmatic A22
Length: 7m +
Engine: 2x70hp= not enuff
Join Date: Oct 2016
Posts: 6
|
I like your thinking- get it on the water for a small investment and if you are enjoying it then comeback and tackle the transom again if need be. just tie the outboard onto the console just in case but the added safety of a rib is.....it should still float?
Maybe a cheap improvement may be to get some 18mm ply and replace the inner plate with one that goes all the way to the floor and then just laminate it to the floor and use your existing bolts as well. the first time you use it just get someone to watch the transom for obvious movement.
You could also take a 30-40mm hole saw to the centre of the transom and this will let you take a small core sample for inspection I guess somewhere on the centre line in half way/bottom third where it can be re-plugged and covered by the plywood.
Good luck with it and looking forward to seeing it go!
__________________
|
|
|
|
|
24 September 2018, 18:02
|
#18
|
|
Member
Country: UK - England
Town: plymouth
Make: Humber
Length: 4m +
Engine: outboard
Join Date: Sep 2018
Posts: 12
|
Quote:
Originally Posted by gtflash
If a transom is wet at the top. Gravity says its most likely wet at the bottom. Any fix that doesnt remove the wood is probably a bodge. If it was me I would have removed inside skin of transom and fitted a new sheet of ply or ur grp board. Then 4-5 layers of 450 csm. However.
Lets be realistic. Its a £500 boat and I doubt your gonna hang a 350hp off the back.
In an ideal world your repair, you would have ground back to bare grp, and then cleaned the area with acetone, then mixed resin with cabosil to create a thickened resin bog, to create a fillet between your board and transom. This big could be used to glue the board to the transom too.
(Alternatively you could have ground a taper on the board). Then either way you would have covered the whole transom area with csm to tie the board to the boat. Each layer of csm should get bigger and cover more area with poly resins, so you could have a clean up and carry on with this theme tbh
Another way would have been full width board so the stainless stringers bolted through the board. But you would have less original transom to tie the csm into.
Do you know if you have used polyester or vinylester or epoxy resin?
|
i have used polyester resin, and Aradite 2015 to bond plate to transom
__________________
|
|
|
|
|
24 September 2018, 18:04
|
#19
|
|
Member
Country: UK - England
Town: plymouth
Make: Humber
Length: 4m +
Engine: outboard
Join Date: Sep 2018
Posts: 12
|
update time,
Trailer has arrived at last , i need to adjust some of the rollers, trailer feels solid !
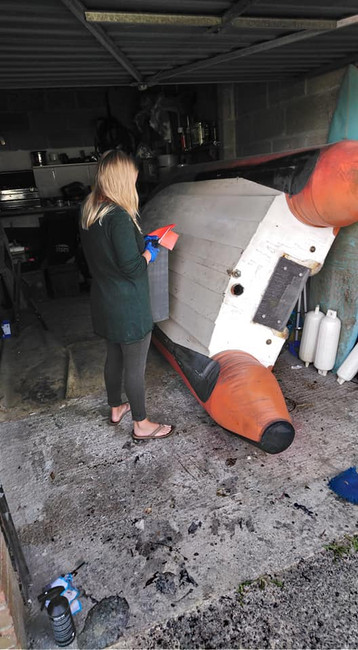
i am currently cleaning the tubes, its taking along time but we are slowly getting there!

__________________
|
|
|
|
|
24 September 2018, 18:08
|
#20
|
|
Member
Country: UK - England
Town: plymouth
Make: Humber
Length: 4m +
Engine: outboard
Join Date: Sep 2018
Posts: 12
|
Quote:
Originally Posted by IRGW
I like your thinking- get it on the water for a small investment and if you are enjoying it then comeback and tackle the transom again if need be. just tie the outboard onto the console just in case but the added safety of a rib is.....it should still float?
Maybe a cheap improvement may be to get some 18mm ply and replace the inner plate with one that goes all the way to the floor and then just laminate it to the floor and use your existing bolts as well. the first time you use it just get someone to watch the transom for obvious movement.
You could also take a 30-40mm hole saw to the centre of the transom and this will let you take a small core sample for inspection I guess somewhere on the centre line in half way/bottom third where it can be re-plugged and covered by the plywood.
Good luck with it and looking forward to seeing it go!
|
hey thanks for the reply, i dug out all the rotten wood i found, i then filled the gap with CSM and polyester , it feels solid
__________________
|
|
|
|
|
|
 Posting Rules
|
You may not post new threads
You may not post replies
You may not post attachments
You may not edit your posts
HTML code is Off
|
|
|
|
 Recent Discussions
 |
|
|
|
|
|
|
|
|
|
|
|
|
|
|
|
|
|
|
|
|
|
|
|
|
|
|
|
|
|
|
|
|
|


 breezy