|
 13 August 2013, 09:50
|
#1
|
|
Member
Country: UK - Wales
Town: North wales
Make: Europa Sport
Length: 3m +
Engine: Johnson 25
Join Date: Jul 2013
Posts: 245
|
split pin/cotter pins
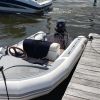
Just a quick question always wondered which way/how should a split pin be put in.
Am I doing it the right way?
__________________
|

|

|
|
13 August 2013, 09:51
|
#2
|
|
Member
Country: UK - Wales
Town: North wales
Make: Europa Sport
Length: 3m +
Engine: Johnson 25
Join Date: Jul 2013
Posts: 245
|
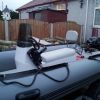
Ok pictures don't seem to be uploading second try
__________________
|
|
|
|
|
13 August 2013, 10:02
|
#3
|
|
Member
Country: UK - Scotland
Town: St Andrew's
Boat name: Wee Boaby
Make: Avon searider
Length: 4m +
Engine: Honda 50 (four)
MMSI: 235907817
Join Date: Apr 2012
Posts: 153
|
Quote:
Originally Posted by rossymtb

Ok pictures don't seem to be uploading second try
|
That's Fine. It's holding the nut from turning, it's neat and out the way of the cap. And it can be easily straightened to remove it again.
__________________
|
|
|
|
|
13 August 2013, 10:10
|
#4
|
|
Member
Country: UK - Wales
Town: North wales
Make: Europa Sport
Length: 3m +
Engine: Johnson 25
Join Date: Jul 2013
Posts: 245
|
Sorted thanks. Trailers ready to go just waiting for my boat floor to be repaired then I can hit the water once again
__________________
|
|
|
|
|
13 August 2013, 10:48
|
#5
|
|
RIBnet supporter
Country: UK - England
Town: Warwickshire
Boat name: Impulse
Make: Ribcraft
Length: 5m +
Engine: Suzuki 140
Join Date: Sep 2011
Posts: 1,020
|
It's hard too tell from the angle of the picture but it looks like you may have tightened the castle nut too much the split pin should sit nicely between the notches on the nut
__________________
|
|
|
|
|
13 August 2013, 10:52
|
#6
|
|
RIBnet supporter
Country: UK - England
Town: Warwickshire
Boat name: Impulse
Make: Ribcraft
Length: 5m +
Engine: Suzuki 140
Join Date: Sep 2011
Posts: 1,020
|
Also if its your first time using a torque wrench and now how much torque is needed helps so you get it right.
__________________
|
|
|
|
|
13 August 2013, 11:05
|
#7
|
|
RIBnet admin team
Country: UK - England
Town: The wilds of Wiltshire
Boat name: Dominator
Make: SR5.4
Length: 7m +
Engine: Yam 85
MMSI: 235055163
Join Date: Jul 2005
Posts: 13,054
|
Quote:
Originally Posted by AJ.
Also if its your first time using a torque wrench and now how much torque is needed helps so you get it right.
|
If you're using a torque wrench on a taper roller hub nut, you're doing them up too tight. Make sure there's nothing on the thread that'll make it snatch then do it up fingertight, til there's no movement. Sometimes it'll mean that it looks odd and like the nut's gone too far as in the pic. It's more abou the nut not being tall enough.
Even my 3/8 bike torque wrench that gets used for torquing down M6 bolts to 6lb/ft into aluminium threads doesnt go down low enough for that.
__________________
Need spares,consoles,consumables,hire,training or even a new boat?
Please click HERE and HERE and support our Trade Members.
Join up as a Trade member or Supporter HERE
|
|
|
|
|
13 August 2013, 11:11
|
#8
|
|
RIBnet supporter
Country: UK - England
Town: Warwickshire
Boat name: Impulse
Make: Ribcraft
Length: 5m +
Engine: Suzuki 140
Join Date: Sep 2011
Posts: 1,020
|
Hi NOS,
Yes mine are done finger tight, but was trying to come up with a fail safe way for someone new to changing bearings or whatever could get it right and have the confidence it is right. i just tighten the castle nut until I can see the split pin hole through the castle nut notch and can get the split pin in.
Didn't know that torque wrenches couldn't go that low, every day is a school day!
__________________
|
|
|
|
|
13 August 2013, 11:17
|
#9
|
|
Member
Country: UK - England
Town: Sticks, N.Yorks
Boat name: Tamanco
Make: Honwave 3.5AE
Length: 3m +
Engine: Tohatsu Outboard
Join Date: May 2012
Posts: 1,168
|
Have to agree with Nos on this one. Finger tight then a GENTLE tighten with a spanner then back off to line up the holes with the castle nut ! Should spin freely with no wobble in the hub & silently if your bearings aren't shot. 
__________________
|
|
|
|
|
13 August 2013, 11:25
|
#10
|
|
RIBnet admin team
Country: UK - England
Town: The wilds of Wiltshire
Boat name: Dominator
Make: SR5.4
Length: 7m +
Engine: Yam 85
MMSI: 235055163
Join Date: Jul 2005
Posts: 13,054
|
Quote:
Originally Posted by AJ.
Didn't know that torque wrenches couldn't go that low, every day is a school day!
|
Hi AJ 
The cheap deflection type of torque wrenches are so innacurate they can be anything up to 200% out at low settings. I won't even use them except as a breaker bar if there's one lying around. I certainly wouldn't put a motor back together with one.
__________________
Need spares,consoles,consumables,hire,training or even a new boat?
Please click HERE and HERE and support our Trade Members.
Join up as a Trade member or Supporter HERE
|
|
|
|
|
13 August 2013, 11:46
|
#11
|
|
Member
Country: UK - Wales
Town: North wales
Make: Europa Sport
Length: 3m +
Engine: Johnson 25
Join Date: Jul 2013
Posts: 245
|
They are the tapered type of bearings.
Done them up a pinch tighter than hand tight just so it aligns up with the hole for split pin. Seem smooth enough and no play but obviously won't last with the salt.
When I need new bearings where and what should I be looking for? Suppose I could look at the numbers on the bearings them self's and order more as spares but that means taking it back apart.
__________________
|
|
|
|
|
14 August 2013, 08:06
|
#12
|
|
Member
Country: UK - Scotland
Town: Aberdeenshire
Boat name: Sula
Make: Ribcraft 4.8m
Length: 4m +
Engine: Tohatsu 70hp + aux
MMSI: 235087213
Join Date: Jun 2007
Posts: 4,534
|
Quote:
Originally Posted by rossymtb
When I need new bearings where and what should I be looking for? Suppose I could look at the numbers on the bearings them self's and order more as spares but that means taking it back apart.
|
Yes, use serial number on bearings to identify new ones. If you've just done them - they should be fine until the end of the season. Always fit a new stainless steel split pin if you decide to remove. 
__________________
Is that with or without VAT?
|
|
|
|
|
14 August 2013, 08:29
|
#13
|
|
Member
Country: UK - Scotland
Town: Aberdeen
Length: 5m +
Engine: Outboard Tohatsu
Join Date: Jul 2011
Posts: 20
|
Taper Bearing Axial Float
Hi, to add my bit:
Taper Bearing sets need axial float so that as the bearing warms in service, it does not fail due to the high thermally induced loads.
This is normally achieved by tightening the nut until the bearing is fully seated and there is just some discernable bearing drag, then backing off by the manufacturer's specified amount (may be one or two notches on the castle nut). Read the Knott-Avonride maintenance instructions, downloadable from the web as an example.
You may find that there is a barely discernable amount of free play when rocking the wheel at 12 Oclock / 6 O clock. That's good.
The nut itself should not be tight, there is no place for a torque wrench when setting a taper bearing set.
Here are the generic instructions from the SKF website.
Wheel bearing
Single adjusting nut
While rotating the wheel, tighten the adjusting nut until there is a slight
bind and all bearing surfaces are in contact. Then back off the adjusting
nut 1/6 to 1/4 turn to the nearest locking hole, until the wheel rotates freely
with .001˝ to .010˝ end play, or clearance. Lock the nut at this position
(fig. 2).
__________________
|
|
|
|
|
 Posting Rules
|
You may not post new threads
You may not post replies
You may not post attachments
You may not edit your posts
HTML code is Off
|
|
|
|
 Recent Discussions
 |
|
|
|
|
|
|
|
|
|
|
|
|
|
|
|
|
|
|
|
|
|
|
|
|
|
|
|
|
|
|
|
|
|


 White Noise
 Sula
Sula