|
|
 18 November 2018, 16:51
|
#1
|
|
Member
Country: UK - England
Town: Surrey
Boat name: ocean pro 6.3
Make: Humber
Length: 6m +
Engine: 140hp suzuki
Join Date: Feb 2004
Posts: 824
|
Suggestions for repair...
Hi all, looking for your collective wisdom please!
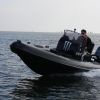
Im swapping engine, sold mine and the new one (from a fellow forum member) is going on next weekend. With a few days before the replacement engine arrives, I have the opportunity to correct some things on the transom. Firstly, there is some cracking in the gelcoat to the top of the transom, secondly, thoughts on the position of my current transducer?
For the cracking I was just going to cut out a v shape groove (very small one) along the cracking and full with fresh gelcoat, sand, Polish etc etc. I was told my a marine workshop its nothing to worry about ... do you agree - could it be water in the transom and the core expanding a bit? Should I consider a metal brace? Or is it simply just some innocent gelcoat surface cracking from a 13 year old hull?
Ps boat since had a clean .. [emoji16]
Thanks all! 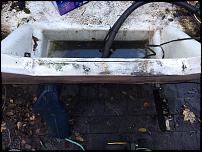 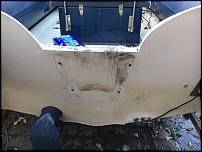 
__________________
|

|

|
|
18 November 2018, 17:18
|
#2
|
|
Member
Country: UK - England
Town: Winchester
Boat name: The Rubber Duck
Make: Avon 3.10
Length: 3m +
Engine: Tohatsu 9.8
Join Date: May 2009
Posts: 702
|
I'd be a bit concerned about that, my view is it's more than just in the gelcoat.
Does it live inside a building? At the very least I would want to get that bone dry and then get it filled with something flexible to stop water getting in there. I don't think it's currently terminal, but it will go that way if left.
Just my opinion based on those photos.
I wouldn't use gelcoat on that, as when you tighten up the bolts holding the engine on, it will crack again then letting in more water to damage it further. Make sure you get a good seal on the engine bolts as, its important water can't get inside the transom from here as well.
Let's wait and see if anyone else agrees with me.
Good luck with it.
__________________
|
|
|
|
|
18 November 2018, 17:46
|
#3
|
|
Member
Country: UK - England
Town: Surrey
Boat name: ocean pro 6.3
Make: Humber
Length: 6m +
Engine: 140hp suzuki
Join Date: Feb 2004
Posts: 824
|
Quote:
Originally Posted by Ribtecer

I'd be a bit concerned about that, my view is it's more than just in the gelcoat.
Does it live inside a building? At the very least I would want to get that bone dry and then get it filled with something flexible to stop water getting in there. I don't think it's currently terminal, but it will go that way if left.
Just my opinion based on those photos.
I wouldn't use gelcoat on that, as when you tighten up the bolts holding the engine on, it will crack again then letting in more water to damage it further. Make sure you get a good seal on the engine bolts as, its important water can't get inside the transom from here as well.
Let's wait and see if anyone else agrees with me.
Good luck with it.
|
Thanks Ribtecer, so perhaps use something like marine adhesive/sealant, like sikaflex?
It lives outside so limited opportunity to get it dry, but could cover the crack for a few days to let it dry out before applying sealant...
__________________
|
|
|
|
|
18 November 2018, 18:25
|
#4
|
|
Member
Country: UK - England
Town: southampton
Make: Island RIBS / custom
Length: 7m +
Engine: inboard diesel
Join Date: Jul 2003
Posts: 301
|
To me it looks like the transom is not capped. That is when the top cut edge of the transom has glass fibre cloth joining the inside to the outside lapping the exposed ply core. This should be done during the build process.
Best thing is to do this before new eng8ne is fitted. Doing an isolated repair will n9t be helpful in the long run and more problems will develop. Capping with 3 layers of 450g cam over lapping front and back of transom by at least 50mm should work. Before this is done all gel coat and flow coat should be removed some the new laminate in on top of old laminate. Gel coat does not help the adhesion.
If you want more help please contact me as I am only down the road in Southampton.
Is there an issue with the current transducer location?
__________________
|
|
|
|
|
18 November 2018, 19:09
|
#5
|
|
Member
Country: UK - England
Town: Wild West
Boat name: No Boat
Make: No Boat
Length: under 3m
Join Date: Jan 2008
Posts: 5,304
|
Like others I think that is more of a problem than Gelcoat stress/cracking..Looks from the photos the Ply is delaminated through getting wet!... by changing the engine you may have just dodged a (large Calibre!) Bullet! 
If it were MINE ..I'd get it as dry as poss as said..and cover completely (over sized) with a SS jacket/re-forcing plate slid over Transum sikaflexed and bolted through both sides...into fresh wood.
I've done this twice for friends Boats in the past ...and it works!....not the cheapest solution but compared to the rest...The Best.
PM me if you'd like me to put you in touch with my Guy.
__________________
A clever Man learns by his mistakes..
A Wise Man learns by other people's!
The Road to HELL ..is Paved with "Good inventions!"
|
|
|
|
|
18 November 2018, 19:39
|
#6
|
|
Member
Country: UK - England
Town: Waterlooville
Boat name: Tickler
Make: Halmatic P22
Length: 6m +
Engine: Inboard Diesel 240HP
MMSI: 235115642
Join Date: Sep 2015
Posts: 1,777
|
+1 with the comments above although I'm not a fan of the stainless steel re-inforcement.
Whilst I wouldn't fill with gelcoat, you could consider making a vee as you suggest and then filling with epoxy and microfibres.
If you expose the core, you'll be able to see whether it is wet - hopefully not.
Transducer - it's on the correct side for a normal rotation propeller and it looks about the right height. You could ensure the holes are sealed but other than that it seems OK.
Good luck and well done to Butty for offering help.
__________________
|
|
|
|
|
18 November 2018, 19:44
|
#7
|
|
Member
Country: UK - England
Town: Winchester
Boat name: The Rubber Duck
Make: Avon 3.10
Length: 3m +
Engine: Tohatsu 9.8
Join Date: May 2009
Posts: 702
|
Quote:
Originally Posted by Maximus
Like others I think that is more of a problem than Gelcoat stress/cracking..Looks from the photos the Ply is delaminated through getting wet!... by changing the engine you may have just dodged a (large Calibre!) Bullet!
If it were MINE ..I'd get it as dry as poss as said..and cover completely (over sized) with a SS jacket/re-forcing plate slid over Transum sikaflexed and bolted through both sides...into fresh wood.
I've done this twice for friends Boats in the past ...and it works!....not the cheapest solution but compared to the rest...The Best.
PM me if you'd like me to put you in touch with my Guy. |
I think that's good advice - l'd not thought of the stainless option. Also, as many engines are stolen with a chainsaw, this solution would slow them down as well.
A few days won't help drying it out, it wants weeks if not months of warm dry air over it - sorry, but its a fact. You'll end up trapping the moisture in there, which you don't want to do.
__________________
|
|
|
|
|
18 November 2018, 21:57
|
#8
|
|
Member
Country: UK - Wales
Town: Cardiff
Length: no boat
Join Date: Aug 2014
Posts: 2,018
|
Quote:
Originally Posted by Ribtecer
I think that's good advice - l'd not thought of the stainless option. Also, as many engines are stolen with a chainsaw, this solution would slow them down as well.
|
Or just result in a larger section being cut out.....
Why manufacturers dont put a couple of strips of 2 wide stainless or similar or layer it into the ply core along the transom under the gel coat at manufacture which wouldnt cost anything but minor material costs would certainly make life more difficult for this type of theft.
__________________
|
|
|
|
|
18 November 2018, 22:15
|
#9
|
|
Member
Country: UK - Scotland
Make: Destroyer 5.5/Ring18
Length: 3m +
Engine: Yam 90HP/Yam200HP
Join Date: Jul 2009
Posts: 963
|
Quote:
Originally Posted by Maximus
Like others I think that is more of a problem than Gelcoat stress/cracking..Looks from the photos the Ply is delaminated through getting wet!... by changing the engine you may have just dodged a (large Calibre!) Bullet!
If it were MINE ..I'd get it as dry as poss as said..and cover completely (over sized) with a SS jacket/re-forcing plate slid over Transum sikaflexed and bolted through both sides...into fresh wood.
I've done this twice for friends Boats in the past ...and it works!....not the cheapest solution but compared to the rest...The Best.
PM me if you'd like me to put you in touch with my Guy. |
Max
What about getting it professionally fixed then get the ST steel plate on it. Belt and braces
__________________
|
|
|
|
|
19 November 2018, 08:30
|
#10
|
|
Member
Country: UK - England
Town: Surrey
Boat name: ocean pro 6.3
Make: Humber
Length: 6m +
Engine: 140hp suzuki
Join Date: Feb 2004
Posts: 824
|
Quote:
Originally Posted by butty
To me it looks like the transom is not capped. That is when the top cut edge of the transom has glass fibre cloth joining the inside to the outside lapping the exposed ply core. This should be done during the build process.
Best thing is to do this before new eng8ne is fitted. Doing an isolated repair will n9t be helpful in the long run and more problems will develop. Capping with 3 layers of 450g cam over lapping front and back of transom by at least 50mm should work. Before this is done all gel coat and flow coat should be removed some the new laminate in on top of old laminate. Gel coat does not help the adhesion.
If you want more help please contact me as I am only down the road in Southampton.
Is there an issue with the current transducer location?
|
Thanks Butty, will send you a PM. Thanks for your kind offer! Humber have also confirmed it needs a professional repair, they suggested not filling or using a flexible filler. Looks like its a good job Ive caught this now!
__________________
|
|
|
|
|
19 November 2018, 08:32
|
#11
|
|
Member
Country: UK - England
Town: Surrey
Boat name: ocean pro 6.3
Make: Humber
Length: 6m +
Engine: 140hp suzuki
Join Date: Feb 2004
Posts: 824
|
Thanks all for replies, I think its worth getting it done properly so will make some investigations on where I can have this done.
__________________
|
|
|
|
|
19 November 2018, 08:33
|
#12
|
|
Member
Country: UK - England
Town: Surrey
Boat name: ocean pro 6.3
Make: Humber
Length: 6m +
Engine: 140hp suzuki
Join Date: Feb 2004
Posts: 824
|
Wonder if its worth taking away the top layer of gel coat to expose the top of the wood, see if its wet?
__________________
|
|
|
|
|
19 November 2018, 08:38
|
#13
|
|
Member
Country: UK - England
Town: Wild West
Boat name: No Boat
Make: No Boat
Length: under 3m
Join Date: Jan 2008
Posts: 5,304
|
Quote:
Originally Posted by 69cmw
Max
What about getting it professionally fixed then get the ST steel plate on it. Belt and braces
|
In fairness that would be a matter for the OP and obviously everything helps ..but in terms of strength and ongoing utility...I don't think you'd nessesarly gain very much...with it dryed out as much as poss...treated ...the SS plate WELL sealed/glued i.e... on a bed of Sika with all edges filled ...and S.S bolted in place ...it would still be standing when rest of the Craft was pulp.
I'm just saying what I would do...and have done AND seen work...and on much larger much more high stress powerful RIB's 
__________________
A clever Man learns by his mistakes..
A Wise Man learns by other people's!
The Road to HELL ..is Paved with "Good inventions!"
|
|
|
|
|
19 November 2018, 09:11
|
#14
|
|
Member
Country: UK - England
Boat name: Bluefin
Make: Ribcraft
Length: 5m +
Engine: 150hp
MMSI: Ex Directory
Join Date: Oct 2015
Posts: 346
|
Quote:
Originally Posted by xpertski
Wonder if it’s worth taking away the top layer of gel coat to expose the top of the wood, see if it’s wet?
|
I think that is the way forward.
Generally Gel coat stress cracks are usually 'spider cracks' which can be almost invisable under certain light conditions, however, they get more noticable over time as dirt blackens the spider crack lines.
I had them appear on my Mercury Ocean Runner transom when it was only a couple of weeks old. This was on the top of the transom and was repaired by the local boat yard under Mercury warranty. The repair was excellent and looked just like a brand new boat should look ........ when I questioned the guys that done the job, they told me the only way to do it is to sand back the gel coat to the glass fibre and then reapply a fresh gel coat.
Sand down a test Gel coat area, the Gel coat is only a couple of mm thick and then you will be able to see if it is fibre glass or bare wood underneath.
__________________
|
|
|
|
|
19 November 2018, 09:58
|
#15
|
|
Member
Country: UK - England
Town: Surrey
Boat name: ocean pro 6.3
Make: Humber
Length: 6m +
Engine: 140hp suzuki
Join Date: Feb 2004
Posts: 824
|
Quote:
Originally Posted by gpsguru
I think that is the way forward.
Generally Gel coat stress cracks are usually 'spider cracks' which can be almost invisable under certain light conditions, however, they get more noticable over time as dirt blackens the spider crack lines.
I had them appear on my Mercury Ocean Runner transom when it was only a couple of weeks old. This was on the top of the transom and was repaired by the local boat yard under Mercury warranty. The repair was excellent and looked just like a brand new boat should look ........ when I questioned the guys that done the job, they told me the only way to do it is to sand back the gel coat to the glass fibre and then reapply a fresh gel coat.
Sand down a test Gel coat area, the Gel coat is only a couple of mm thick and then you will be able to see if it is fibre glass or bare wood underneath.
|
Thanks for gpsguru, yes I might do that - would probably help whoever looks at it to advise fully what the issue is and level of repair needed then. [emoji106]
__________________
|
|
|
|
|
19 November 2018, 15:14
|
#16
|
|
Member
Country: UK - Scotland
Town: Maybole
Boat name: Greylag
Make: AVON Searider
Length: 5m +
Engine: Outboard Petrol 70hp
Join Date: Sep 2014
Posts: 51
|
Hi All, as an increasingly experienced Avon owner nearing the end of a refurb but an experienced surveyor with structural knowledge: the diagonal failure of the rigid gelcoat suggests that the lack of top plate, has caused outward failure of the transom. the gap would have been wider and probably moved a lot under load - stop / start - so as I now know here plan for the worst. Please don't bodge it and cover up. regards iain
__________________
|
|
|
|
|
19 November 2018, 16:18
|
#17
|
|
Member
Country: UK - England
Town: Surrey
Boat name: ocean pro 6.3
Make: Humber
Length: 6m +
Engine: 140hp suzuki
Join Date: Feb 2004
Posts: 824
|
Thanks Ian, agree, certainly wont bodge as want this rib for many years to come, upgrading and restoring it over the next year. Thanks!
__________________
|
|
|
|
|
19 November 2018, 16:38
|
#18
|
|
Member
Country: USA
Town: California
Make: zodiac futura
Length: 4m +
Join Date: May 2018
Posts: 259
|
Part of the discovery portion of the job could have small holes drilled in to see what is wet. Once you redo your work just fill holes with epoxy. Guessing what is wet might be right- or not!
__________________
|
|
|
|
|
19 November 2018, 21:52
|
#19
|
|
Member
Country: UK - England
Town: southampton
Boat name: TOP CAT 2
Make: Scorpion 8.1
Length: 8m +
Engine: 250hp HO
Join Date: Aug 2003
Posts: 1,806
|
Quote:
Originally Posted by pagick
Part of the discovery portion of the job could have small holes drilled in to see what is wet. Once you redo your work just fill holes with epoxy. Guessing what is wet might be right- or not!
|
I agree, some exploratory holes. A few in the top and then where the engine bolts go.
Before filling with epoxy, decide if you are planning a polyester repair with gel coat finish or epoxy that will probably need paint or metal capping. Getting gel coat to stick to epoxy repairs can be tricky.
It is likely wet. Looks like water pools on the top too. Might be time to decide if you want the forum to see you through a transom repair or pay a man that can. Several people done them now.
__________________
|
|
|
|
|
19 November 2018, 22:21
|
#20
|
|
Member
Country: USA
Town: California
Make: zodiac futura
Length: 4m +
Join Date: May 2018
Posts: 259
|
One last tip. If you are putting on a metal cap, sand down to fiberglass where the cap covers. Then put bondo body filler in the metal channel and use it as a filler of any voids and a glue. But still bolt it on. This is how I attach anything to the hull. Like installing it a tower on a wakeboard boat. I would use a backer plate that has bondo on one side, against the interior fiberglass. Then bolt the new fixture to the backer plate from the outside. It helps a lot with spider cracking the gelcote. Since your backer plate becomes a 100% contact fit.
__________________
|
|
|
|
|
|
 Posting Rules
|
You may not post new threads
You may not post replies
You may not post attachments
You may not edit your posts
HTML code is Off
|
|
|
|
 Recent Discussions
 |
|
|
|
|
|
|
|
|
|
|
|
|
|
|
|
|
|
|
|
|
|
|
|
|
|
|
|
|
|
|
|
|
|


 Tickler