|
|
 22 September 2015, 17:30
|
#1
|
|
Member
Country: USA
Town: Boston
Boat name: Floating RIB
Make: AB
Length: 4m +
Engine: 98 Johnson 3cyl 35hp
Join Date: Sep 2012
Posts: 25
|
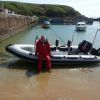
Hypalon patch
This is the first time I've had a significant enough leak in one of my tubes to do a patch. It produces bubbles from underneath when I'm inflating in the water.
There seem to be a lot of options from paints to patches. I'm attaching a pic of where the leak seems to be. I've circled it with pencil. If anyone can suggest the best (i.e. Easiest and cheap) approach I'd be very grateful...thanks! 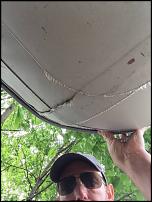
__________________
|

|

|
|
22 September 2015, 18:57
|
#2
|
|
Member
Country: USA
Town: S. Carolina
Boat name: D560
Make: Avon
Length: 5m +
Engine: 2016 Merc 115hp CT
Join Date: Aug 2013
Posts: 1,277
|
It looks like you're chewing up your stern transverse seam by running the boat underinflated.
It's a difficult repair location... I would probably leave it up to a professional?
__________________
Richard
Gluing geek since 2007
Opinions and intepretations expressed are solely my own and do not express the views or opinions of my employer
|
|
|
|
|
23 September 2015, 08:01
|
#3
|
|
Member
Country: UK - England
Town: Dartmouth
Boat name: TIDEL III
Make: AVON SEARIDER
Join Date: Jun 2003
Posts: 823
|
Easiest method for home repairer if you cannot or don't want to pay to have it done properly is to pour leak sealant into tube to seal leak internally , then patch externally with a triangular patch (radius corners ) making sure that one corner/point is facing forwards so that it does not get lifted by water flow .This is not the proper way to do it but will work
__________________
|
|
|
|
|
23 September 2015, 19:03
|
#4
|
|
Member
Country: USA
Town: Boston
Boat name: Floating RIB
Make: AB
Length: 4m +
Engine: 98 Johnson 3cyl 35hp
Join Date: Sep 2012
Posts: 25
|
even with a heavy RIB?
I thought those internal sealants worked mostly on soft inflatables that you could shake around to distribute the stuff around the tube?
I tried an external patch today (actually that stretch-tape stuff) and the air kept pushing just enough water out to stop it from sealing correctly. It ran along the seams to the outside of the tape.
will this internal sealant work if there is a little water in the tubes?
Cheers and thanks 
__________________
|
|
|
|
|
24 September 2015, 10:53
|
#5
|
|
Member
Country: UK - England
Town: Dartmouth
Boat name: TIDEL III
Make: AVON SEARIDER
Join Date: Jun 2003
Posts: 823
|
The tube sealant will work fine on large ribs if used correctly and the sealant can get to the leak .The inside of the tube does need to be dry for it to work well
__________________
|
|
|
|
|
24 September 2015, 13:24
|
#6
|
|
Member
Country: USA
Town: S. Carolina
Boat name: D560
Make: Avon
Length: 5m +
Engine: 2016 Merc 115hp CT
Join Date: Aug 2013
Posts: 1,277
|
Quote:
Originally Posted by porkpiehat

I thought those internal sealants worked mostly on soft inflatables that you could shake around to distribute the stuff around the tube?
I tried an external patch today (actually that stretch-tape stuff) and the air kept pushing just enough water out to stop it from sealing correctly. It ran along the seams to the outside of the tape.
will this internal sealant work if there is a little water in the tubes?
Cheers and thanks |
The O'brians stretch tape stuff will not hold and can potentially tear the topcoat off the hypalon.
This location is a very high wear area.
All patchwork must be completed while the boat is uninflated.
Paul is correct, water will dilute the internal sealant which can make it work poorly. Remove your valve and utilize a shopvac to remove the water.
They work fine on ribs if you can locate the sealant to the leak. However, if the tubes are still ran underinflated, the oscillation of the tube will continue to tear the seam apart and will eventually displace the sealant. Eventually the entire seam will blow open in a magnificent fashion.
__________________
Richard
Gluing geek since 2007
Opinions and intepretations expressed are solely my own and do not express the views or opinions of my employer
|
|
|
|
|
24 September 2015, 15:59
|
#7
|
|
Member
Country: USA
Town: Boston
Boat name: Floating RIB
Make: AB
Length: 4m +
Engine: 98 Johnson 3cyl 35hp
Join Date: Sep 2012
Posts: 25
|
seams blowing in a magnificent fashion will not do at all!
Ok...so shop vac the water...I was also thinking isopropyl alcohol will help to dry that out if I can't reach it...unless that will destroy the neoprene inside.
add the internal sealant. Moving it around might be tough as the RIB is sitting on a trailer. No harm in trying.
Can a patch be applied over a large seam intersection like this or will the internal stuff be sufficient?
Thanks!
__________________
|
|
|
|
|
24 September 2015, 17:18
|
#8
|
|
Member
Country: USA
Town: S. Carolina
Boat name: D560
Make: Avon
Length: 5m +
Engine: 2016 Merc 115hp CT
Join Date: Aug 2013
Posts: 1,277
|
Quote:
Originally Posted by porkpiehat
seams blowing in a magnificent fashion will not do at all!
Ok...so shop vac the water...I was also thinking isopropyl alcohol will help to dry that out if I can't reach it...unless that will destroy the neoprene inside.
add the internal sealant. Moving it around might be tough as the RIB is sitting on a trailer. No harm in trying.
Can a patch be applied over a large seam intersection like this or will the internal stuff be sufficient?
Thanks!
|
Both Hypalon and Neoprene have excellent resistance against isopropyl alcohol.
The valve removal will require a tool? It's a little plastic wrench that fits in to the valve.
__________________
Richard
Gluing geek since 2007
Opinions and intepretations expressed are solely my own and do not express the views or opinions of my employer
|
|
|
|
|
24 September 2015, 19:18
|
#9
|
|
Member
Country: UK - England
Town: Dartmouth
Boat name: TIDEL III
Make: AVON SEARIDER
Join Date: Jun 2003
Posts: 823
|
Porkpiehat the sealant will easily run to the stern whilst on a trailer . deflate tube pour in sealant when inside of tube is dry , partially inflate tube and shake tube about , inflate tube hard , when sealant drips out of leak soften tube and leave for 24hrs so that sealant hardens in leak , inflate tube and fit reinforcing patch with tube fully inflated , definitely not deflated . 
__________________
|
|
|
|
|
24 September 2015, 19:22
|
#10
|
|
Member
Country: USA
Town: S. Carolina
Boat name: D560
Make: Avon
Length: 5m +
Engine: 2016 Merc 115hp CT
Join Date: Aug 2013
Posts: 1,277
|
Quote:
Originally Posted by paul tilley
Porkpiehat the sealant will easily run to the stern whilst on a trailer . deflate tube pour in sealant when inside of tube is dry , partially inflate tube and shake tube about , inflate tube hard , when sealant drips out of leak soften tube and leave for 24hrs so that sealant hardens in leak , inflate tube and fit reinforcing patch with tube fully inflated , definitely not deflated . |
I guess I should have specified "air holding patches must be done with the boat deflated".
Rear transverse seams, I get them holding air first, then I do the reinforcing patches to match the curve of the boat.
__________________
Richard
Gluing geek since 2007
Opinions and intepretations expressed are solely my own and do not express the views or opinions of my employer
|
|
|
|
|
25 September 2015, 11:27
|
#11
|
|
Member
Country: UK - England
Town: Dartmouth
Boat name: TIDEL III
Make: AVON SEARIDER
Join Date: Jun 2003
Posts: 823
|
Richard M if my instructions are followed the tube will be holding air when the patch is put on as it will have been sealed with the sealant and the reinforcing patch will then be easier to glue to a hard tube .
__________________
|
|
|
|
|
01 October 2015, 16:01
|
#12
|
|
Member
Country: USA
Town: Boston
Boat name: Floating RIB
Make: AB
Length: 4m +
Engine: 98 Johnson 3cyl 35hp
Join Date: Sep 2012
Posts: 25
|
Hey guys
I couldn't get the valve out so I couldn't remove what water there was inside. I'm sure it was a small amount.
I used the sealant from WM and at first it would bubble out the leak. Let it cure for a week. Just filled it completely and the smallest amount of bubbling still occurs.
In terms of patching the outside, it is on the underside and because of its attachments to the fiberglass hull it would be nearly impossible to deflate, bend it facing up and keep it flat enough to do a proper patch job.
Do you think it could be done upside down and inflated??
My other thought is this "flex seal" stuff in a can they sell on Tv. It might be enough I'm guessing, at least to protect the edges of the seem from opening any further on the water in travel. I can also see that going horribly wrong lol.
__________________
|
|
|
|
|
01 October 2015, 18:51
|
#13
|
|
Member
Country: USA
Town: Boston
Boat name: Floating RIB
Make: AB
Length: 4m +
Engine: 98 Johnson 3cyl 35hp
Join Date: Sep 2012
Posts: 25
|
This is what is looks like now. Crusty from the sealant with some of the seals still pulled back a little.
__________________
|
|
|
|
|
01 October 2015, 18:52
|
#14
|
|
Member
Country: USA
Town: Boston
Boat name: Floating RIB
Make: AB
Length: 4m +
Engine: 98 Johnson 3cyl 35hp
Join Date: Sep 2012
Posts: 25
|
__________________
|
|
|
|
|
01 October 2015, 21:38
|
#15
|
|
Member
Country: UK - England
Town: Alton
Boat name: Seascaper
Make: Zodiac Hurricane, Ca
Length: 6m +
Engine: Diesel 170hp
Join Date: Mar 2007
Posts: 34
|
Hello, you have to make sure you have the correct glue and material to repair it as well as the necessary hands on practical skills. Do you have any of these, you need the two pack glue for example as starters, a good acetone cleaner and some correct grade hypalon, not pvc patches. Once you have this stuff sorted I can talk you through it.....
__________________
|
|
|
|
|
01 October 2015, 21:48
|
#16
|
|
Member
Country: USA
Town: Boston
Boat name: Floating RIB
Make: AB
Length: 4m +
Engine: 98 Johnson 3cyl 35hp
Join Date: Sep 2012
Posts: 25
|
yes sir, I do..
I bought a hypalon patch kit with hypalon glue and hypalon patches, sand paper. I haven't moved forward with it yet because:
-last weekend it was still bubbling the internal sealant.
-It has been cool and rainy here.
-as mentioned the awkard positioning on the underside of the boat gives me pause; and...
-I was still hoping the 3M 5200 or Rustoleum LeakSeal spray rubber solution would get the thumbs up from someone 
It is supposed to remain cool and rainy for the next week and I thought the hypalon glue needs 70 degree temps (F) to cure. But my hands are your instruments and I'm all ears.
If it has to wait for warmer weather, is there a shorter-term fix so I can take my buddy fishing this saturday?
Thanks for the help!
__________________
|
|
|
|
|
02 October 2015, 00:59
|
#17
|
|
Member
Country: USA
Town: Boston
Boat name: Floating RIB
Make: AB
Length: 4m +
Engine: 98 Johnson 3cyl 35hp
Join Date: Sep 2012
Posts: 25
|
actually let me retract part of that...the glue is not a "two-part" type of deal, it's a use-alone tube.
__________________
|
|
|
|
|
02 October 2015, 20:25
|
#18
|
|
Member
Country: UK - England
Town: Dartmouth
Boat name: TIDEL III
Make: AVON SEARIDER
Join Date: Jun 2003
Posts: 823
|
two part is better than single component glue as it gives a stronger bond otherwise tube manufacturers would use the single part
__________________
|
|
|
|
|
04 October 2015, 04:12
|
#19
|
|
Member
Country: USA
Town: S. Carolina
Boat name: D560
Make: Avon
Length: 5m +
Engine: 2016 Merc 115hp CT
Join Date: Aug 2013
Posts: 1,277
|
Quote:
Originally Posted by porkpiehat
I bought a hypalon patch kit with hypalon glue and hypalon patches, sand paper. I haven't moved forward with it yet because:
-last weekend it was still bubbling the internal sealant.
-It has been cool and rainy here.
-as mentioned the awkard positioning on the underside of the boat gives me pause; and...
-I was still hoping the 3M 5200 or Rustoleum LeakSeal spray rubber solution would get the thumbs up from someone
It is supposed to remain cool and rainy for the next week and I thought the hypalon glue needs 70 degree temps (F) to cure. But my hands are your instruments and I'm all ears.
If it has to wait for warmer weather, is there a shorter-term fix so I can take my buddy fishing this saturday?
Thanks for the help! |
Gluing is more dependent on humidity than temperature. It needs to be below 65% RH. Gluing in the rain or in direct sunlight will result in premature failure.
3M 5200 and Rustoleum LeakStop have no place on an inflatable boat.
The only way to repair the boat is to reglue the seam.
You could probably reglue it with one part glue, but the strength and longevity will be poor.
Try to get in there with some 60 or 80 grit sandpaper to sand both pieces of hypalon. Wipe the dust out with a rag of toluene. Then wipe it again. And wipe it again to be sure...allow about 10 min between wipings to ensure evaporation of solvents.
After the toluene has evaporated, apply the glue with a fine brush. I recommend an artist's brush rather than a chip brush in your case. Trim the bristles so they are about 1/2" long. Then simply paint an even coat of glue on all surfaces. Work very quickly with deliberate, quick strokes. Don't just "pack glue in".
Most 1-part glues specify a 20-30 min cure on the 1st coat. On the 2nd coat, allow 5-15 min for curing before pressuring the pieces together.
I recommend having some vice clamps ready with some wood blocks. After the gluing is complete and you have burnished the unglued spot together, fold the material over itself, then position the wood blocks, and clamp them down. Allow 2-3 days for maximum cure strength.
FYI, this gluing should be done while the boat is uninflated.
__________________
Richard
Gluing geek since 2007
Opinions and intepretations expressed are solely my own and do not express the views or opinions of my employer
|
|
|
|
|
04 October 2015, 20:46
|
#20
|
|
Member
Country: USA
Town: San Francisco Bay
Boat name: SRMN 600
Make: Zodiac
Length: 6m +
Engine: Honda 90
Join Date: Mar 2013
Posts: 478
|
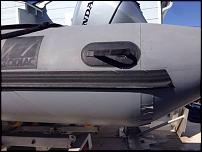
For a patch that covers a few inches onto where the cone tapers, any tips on how to avoid wrinkles? Dont laugh too hard, this was my first try at a patch
__________________
|
|
|
|
|
|
| Thread Tools |
Search this Thread |
|
|
|
 Posting Rules
|
You may not post new threads
You may not post replies
You may not post attachments
You may not edit your posts
HTML code is Off
|
|
|
|
 Recent Discussions
 |
|
|
|
|
|
|
|
|
|
|
|
|
|
|
|
|
|
|
|
|
|
|
|
|
|
|
|
|
|
|
|
|
|