|
|
 23 May 2012, 04:10
|
#1
|
|
Member
Country: Australia
Town: Sydney
Make: Zodiac
Length: 3m +
Join Date: May 2012
Posts: 104
|
Zodiac MKII C GT - Transom Repair
Hi All,
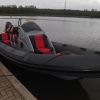
I recently purchased this Zodiac and I am about to embark on a transom repair. Here are a few pics of the boat so you can all see what I have to work with.


I have the tools, the space, the time and the practical knowledge to repair this boat and I will be posting photos and details on the repair.
My next step is to set it up in the garage and lay it all out to see exactly what's there and what I need.
I will be asking some questions in regards to materials required and I welcome any advice on the repair.
Cheers.
__________________
|

|

|
|
23 May 2012, 17:09
|
#2
|
|
Member
Country: USA
Town: NorCal
Boat name: SHARKY
Make: AB
Length: 4m +
Engine: Honda BF75 & BF5
Join Date: Dec 2009
Posts: 1,910
|
Plan on doing the entire floor! I would assume it is a PVC boat? If so the tubes are thermo welded and generally do not fail. The floor and transom are glued on and if one failed, the other is not far behind. I went through all of this a couple of years ago. It took over 40 hours of work and fortunately the weather cooperated, since temperature and humidity are critical with the two part glue used. I went through 2 quarts of glue.
__________________
|
|
|
|
|
23 May 2012, 22:42
|
#4
|
|
Member
Country: Australia
Town: Sydney
Make: Zodiac
Length: 3m +
Join Date: May 2012
Posts: 104
|
Quote:
Originally Posted by Peter_C

Plan on doing the entire floor! I would assume it is a PVC boat? If so the tubes are thermo welded and generally do not fail. The floor and transom are glued on and if one failed, the other is not far behind. I went through all of this a couple of years ago. It took over 40 hours of work and fortunately the weather cooperated, since temperature and humidity are critical with the two part glue used. I went through 2 quarts of glue.
|
Thanks for the advice, I will inspect the floor but like you said if the transom has failed the floor can't be far off either.
Would it make sense to do the floor first and then do the transom?
Again - thank you for your input, much appreciated.
__________________
|
|
|
|
|
23 May 2012, 22:56
|
#5
|
|
Member
Country: Australia
Town: Sydney
Make: Zodiac
Length: 3m +
Join Date: May 2012
Posts: 104
|
__________________
|
|
|
|
|
23 May 2012, 22:56
|
#6
|
|
Member
Country: Australia
Town: Sydney
Make: Zodiac
Length: 3m +
Join Date: May 2012
Posts: 104
|
11. Zodiac Dinghy Floor prior to cleaning off old glue.

12. After final gluing to tubes transom strapped tight for 48 hours.

13. Gluing floor to base of transom.

__________________
|
|
|
|
|
24 May 2012, 01:25
|
#7
|
|
Member
Country: Australia
Town: Sydney
Make: Zodiac
Length: 3m +
Join Date: May 2012
Posts: 104
|
Can anyone tell me what year this boat is? Is it 80's or 90's?
__________________
|
|
|
|
|
27 May 2012, 21:37
|
#8
|
|
Member
Country: UK - Scotland
Town: Aberdeenshire
Boat name: Sula
Make: Ribcraft 4.8m
Length: 4m +
Engine: Tohatsu 70hp + aux
MMSI: 235087213
Join Date: Jun 2007
Posts: 4,531
|
I take it you don't have the transom ID plate - the year of manufacture is there. Looks mid-80s to me. Earlier Zodiac GTs didn't have the rubbing strake around the sponsons.
On mid 80s Zodiacs, the tube seam runs under the rowlocks and lace cuff. Later 90s models, the seam ran under the sponsons. More of an issue in hot climates - as these models didn't have pressure release valves, and in hot climates like your own and the west coast of the US, they were prone to rupture. Take a look at the end cones - they can leak there too where they join the sponsons.
__________________
Is that with or without VAT?
|
|
|
|
|
30 May 2012, 01:01
|
#9
|
|
Member
Country: Australia
Town: Sydney
Make: Zodiac
Length: 3m +
Join Date: May 2012
Posts: 104
|
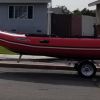
Hi All,
Finally inflated the boat for the first time last night and the tubes are in good condition. Happy with that!
The floor on the other hand is coming away so my first job will be to remove it with a heat gun, clean all surfaces and re-glue the floor down.
Please excuse the crappy phone pics!
Cheers.
__________________
CURRENT PROJECT // MKII C GT
|
|
|
|
|
30 May 2012, 02:44
|
#10
|
|
Member
Country: Australia
Town: Sydney
Make: Zodiac
Length: 3m +
Join Date: May 2012
Posts: 104
|
Quote:
Originally Posted by Peter_C
I would assume it is a PVC boat?
|
Peter,
I am not sure, how do I tell? Can you tell from looking at the pics I posted?
Do I get a bit of acetone on a rag and dab a spot on the tubes to see if it goes tacky/sticky? If it goes tacky does that mean that it's PVC?
Cheers.
__________________
CURRENT PROJECT // MKII C GT
|
|
|
|
|
30 May 2012, 11:39
|
#11
|
|
Member
Country: Australia
Town: Sydney
Make: Zodiac
Length: 3m +
Join Date: May 2012
Posts: 104
|
Okay so I got some acetone to test whether or not the boat is PVC or Hypalon.

After going through the bag of stuff that came with the boat I found some pieces of fabric, not sure what was what but the 2 were very different in look and feel. So I decided to use these off cuts to test which was which, the red piece was identical to the fabric that the boat is made of, one side was read and the other was black. The other piece of fabric was black and shiny on both sides, I think this one is PVC.
So I laid them next to each other and applied some acetone to a rag and rubbed them both next to each other.

After some rubbing the fabric on the right became grippy and the cloth took on some of the black colouring of the fabric, the fabric on the left (which is identical to the boat) did not become grippy it just became cleaner. Afterwards there was a finger mark from the rubbing left on the black fabric however the red fabric was smooth and unmarked.
In conclusion I think the boat is Hypalon. I then rubbed some acetone on one of the tubes and all it did was clean it, didn't make it tacky to the touch.
__________________
CURRENT PROJECT // MKII C GT
|
|
|
|
|
30 May 2012, 11:39
|
#12
|
|
Member
Country: Australia
Town: Sydney
Make: Zodiac
Length: 3m +
Join Date: May 2012
Posts: 104
|
I found this gauge in a box anyone know where I can buy the end fitting to fit the zodiac valve?

__________________
CURRENT PROJECT // MKII C GT
|
|
|
|
|
30 May 2012, 11:40
|
#13
|
|
Member
Country: Australia
Town: Sydney
Make: Zodiac
Length: 3m +
Join Date: May 2012
Posts: 104
|
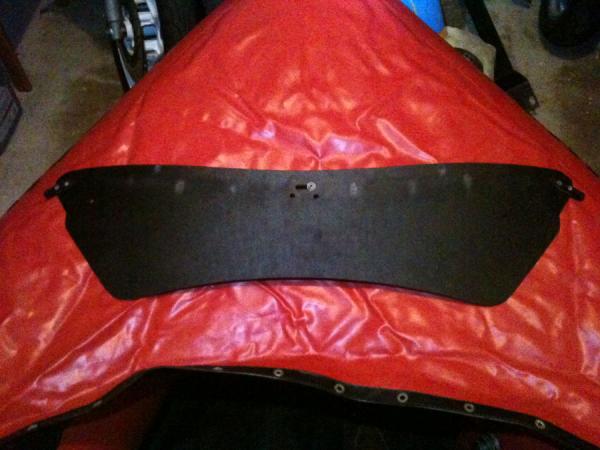
What is this piece for? Couldn't figure out where it went? Under the bow?
__________________
CURRENT PROJECT // MKII C GT
|
|
|
|
|
30 May 2012, 11:41
|
#14
|
|
Member
Country: Australia
Town: Sydney
Make: Zodiac
Length: 3m +
Join Date: May 2012
Posts: 104
|
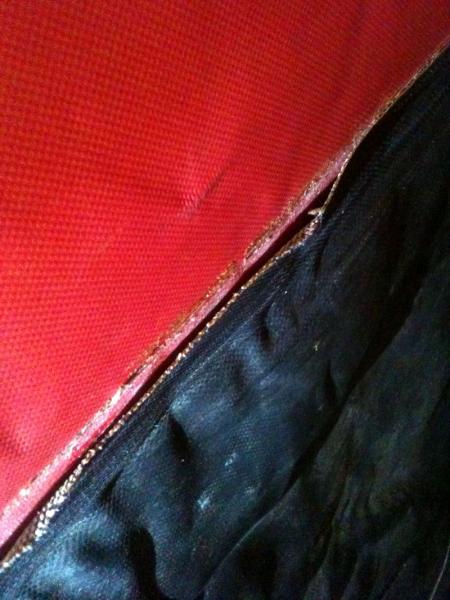
This is the seam at the front of the left tube.

__________________
CURRENT PROJECT // MKII C GT
|
|
|
|
|
30 May 2012, 11:43
|
#15
|
|
Member
Country: Australia
Town: Sydney
Make: Zodiac
Length: 3m +
Join Date: May 2012
Posts: 104
|
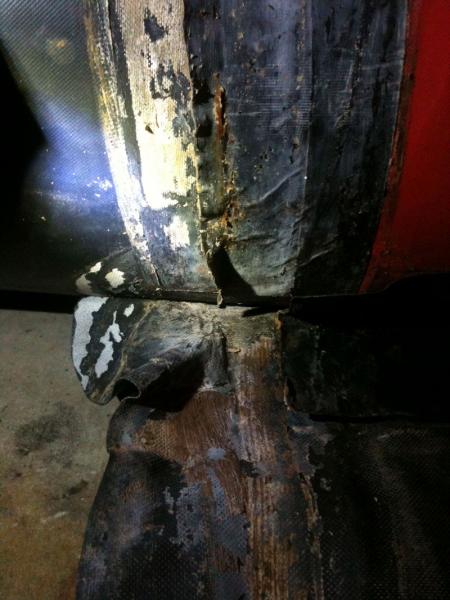
Here's the transom, lots of work to be done here!
__________________
CURRENT PROJECT // MKII C GT
|
|
|
|
|
30 May 2012, 11:43
|
#16
|
|
Member
Country: Australia
Town: Sydney
Make: Zodiac
Length: 3m +
Join Date: May 2012
Posts: 104
|
Floor coming away too, more glue, more glue!
__________________
CURRENT PROJECT // MKII C GT
|
|
|
|
|
30 May 2012, 14:35
|
#17
|
|
Member
Country: USA
Town: San Diego
Make: zodiac futura mk2
Length: 4m +
Engine: Nissan 40 plus
Join Date: Oct 2008
Posts: 269
|
I can say with almost 100% certainty that your boat is PVC. The acetone wipe rubbed off some color on the red material (the same as the boat) and did not do much to the black material. That is what you would expect. The acetone, since it flashes off fast, doesn't do a very good job of softening the PVC like MEK does. This is why serious repairs should be properly prepped with MEK IMO. Here is a link to the proper steps to take to use PVC two part glues. Information From ShipStore.com | Zodiac Inflatable Boat Fabric Glue and Repair Instructions | GLUE from the ShipStore.com on-line catalog. Don't underestimate the need to remove all of the old glue. Glue will not bond to old glue.
Another way to indentify the fabric type in this case is by looking at the seams on the tubes. I bet they are thermowelded. You can tell by the way the fabric has a hot melt edge around the areas where the seams were pressed together. If the tubes are thermowelded then the boat is PVC. The floor seams, the transom seams and the speed tube seams are all hand glued. These are the places that fail over time.
If you prep properly and observe the correct environmental parameters you can get a really strong bond. My Zodiac was in terrible shape. It had had some repairs and it was not possible to fully disassemble without damaging the fabric, so I reglued any floor seams i could work apart and reglued the majority of the transom. These repairs have lasted for years and show no sign of failing or leaking. Whether I should have just bought a new boat is debatable. But I had the time and developed the skills.
I'm sorry I missed your PM. I don't log in too often. I'll try to pull up some pics for you. Anything in particular you are interested in?
The best advice I can give is good prep and go slow when gluing. I would glue one side of the floor joint, then the other. I reglued my transom in multiple steps. I turned, flopped, strapped and actually stretched my boat so the every glue step ended with a nice easy lay down into position. No tugging, no pulling, no stress on the uncured seam at all. Be methodical.
Some will debate the real need to use MEK rather than acetone to prep for a bond. But if you try MEK and feel the result on the PVC surface compared to an acetone wipe you will see why I don't even consider using anything else. Remember, you are going to be in a hot climate. Don't mess around. You want the best bond possible.
__________________
|
|
|
|
|
30 May 2012, 18:15
|
#18
|
|
Member
Country: USA
Town: NorCal
Boat name: SHARKY
Make: AB
Length: 4m +
Engine: Honda BF75 & BF5
Join Date: Dec 2009
Posts: 1,910
|
Looking at the pics I am going to say that boat is in bad shape. The left seam you show looks toast. The transom material looks like it is no longer serviceable. How is the wood?
I cleaned with acetone and prepped with mek. Lots of scuffy pads were used, and I dang near wore out a pair of chemical gloves.
If you are going to take the time to repair the boat make sure it is going to be usable for years to come, or it is not worth the time and money invested. If you need a motor And trailer it might just be worth finding a complete package. Sorry I just don't want to see you waste your time.
__________________
|
|
|
|
|
30 May 2012, 23:09
|
#19
|
|
Member
Country: Australia
Town: Sydney
Make: Zodiac
Length: 3m +
Join Date: May 2012
Posts: 104
|
Quote:
Originally Posted by Peter_C
Looking at the pics I am going to say that boat is in bad shape.
|
It looks worse than it is, wait until I clean it all up and take some quality pics, the phone pics definitely make it look worse than it is.
Quote:
Originally Posted by Peter_C
The left seam you show looks toast.
|
Why? Because of the frayed strands running along the seam edge? Does this mean it's 'toast' ? The seam is strong, apart from the frayed edge it is not lifting at all and is definitely not 'toast'.
Quote:
Originally Posted by Peter_C
The transom material looks like it is no longer serviceable.
|
The transom/floor material may be beyond help, it feels brittle and is quite faded. I will remove the floor material and will assess it then.
Quote:
Originally Posted by Peter_C
How is the wood?
|
The transom wood is in good shape, no sign of soft spots, no sign of rot, it is dry and is in good shape.
Quote:
Originally Posted by Peter_C
If you are going to take the time to repair the boat make sure it is going to be usable for years to come.
|
Once I am finished with it, it will be usable for many years to come.
Quote:
Originally Posted by Peter_C
might just be worth finding a complete package.
|
That sounds REALLY boring, that's not how I do things! 
Quote:
Originally Posted by Peter_C
Sorry I just don't want to see you waste your time.
|
Time is something I have plenty of, and while I'm fixing this boat I don't see it as a waste, more enjoyment than anything else. I know it looks rough now but it is definitely fixable and I look forward to working on it.
Cheers.
__________________
CURRENT PROJECT // MKII C GT
|
|
|
|
|
30 May 2012, 23:26
|
#20
|
|
Member
Country: Australia
Town: Sydney
Make: Zodiac
Length: 3m +
Join Date: May 2012
Posts: 104
|
Quote:
Originally Posted by kelson
I can say with almost 100% certainty that your boat is PVC.
|
Thanks for that, can someone else confirm 100% what it is made of? Need to get this right so I buy the right adhesive. ?
Quote:
Originally Posted by kelson
The acetone, since it flashes off fast, doesn't do a very good job of softening the PVC like MEK does. This is why serious repairs should be properly prepped with MEK IMO.
|
Looks like I will be getting some MEK because acetone really didn't do anything to soften the material.
Quote:
|
Don't underestimate the need to remove all of the old glue. Glue will not bond to old glue.
|
I will be meticulous here. All of the old glue residue will be removed.
Quote:
|
Whether I should have just bought a new boat is debatable. But I had the time and developed the skills.
|
Some like to work with their hands and get them dirty, others prefer not to. Each to their own.
Quote:
|
The best advice I can give is good prep and go slow when gluing. I would glue one side of the floor joint, then the other. I reglued my transom in multiple steps. I turned, flopped, strapped and actually stretched my boat so the every glue step ended with a nice easy lay down into position. No tugging, no pulling, no stress on the uncured seam at all. Be methodical.
|
Thank you for the advice, will take on board when carrying out the repairs.
__________________
CURRENT PROJECT // MKII C GT
|
|
|
|
|
|
 Posting Rules
|
You may not post new threads
You may not post replies
You may not post attachments
You may not edit your posts
HTML code is Off
|
|
|
|
 Recent Discussions
 |
|
|
|
|
|
|
|
|
|
|
|
|
|
|
|
|
|
|
|
|
|
|
|
|
|
|
|
|
|
|
|
|
|


 Sula
Sula