|
|
 08 July 2021, 22:42
|
#41
|
|
Member
Country: UK - England
Town: Cambridgeshire
Boat name: Nimrod II
Make: Aerotec 380
Length: 3m +
Engine: Yam 15 Tohatsu 9.8
Join Date: Nov 2007
Posts: 8,305
|
The seat set as mentioned in post #34 arrived from Germany today. Post Brexit customs arrangement being as it was under £135 no customs, VAT or handling fee.
Seat is decent ply 21mm thick so matches the Aerotec original. Nice to get the kit inc the glue and instructions for the "rails".
Cushion is a decent high density foam so very supportive not soggy. It's for Mrs F initially on the forward seat... if she likes it I'll get one too... if not she'll pass it onto me.
Weather looks suitable for all my glue jobs from 15th onwards so will inflate then and do all same day.
I noticed this German supplier has some 200 items of the Raiblaza range... no ideal how prices compare in detail but they look a little less than the UK Railblaza website with a much larger range.
https://bengar.de/en/schlauchboote-z...anufacturer=80
__________________
|

|

|
|
09 July 2021, 10:19
|
#42
|
|
Member
Country: UK - England
Town: Kent
Boat name: ever dry
Make: Elling KB350
Length: 3m +
Engine: Yamaha 15hp 2 stroke
Join Date: Jun 2020
Posts: 617
|
Nice to see you so influenced by the Elling David that you scoured the internet until you found someone who sells the exact same seat mountings that are used to support the Elling seats.
Thanks also for the link as they do sell the Borika seat mounting plastics separately which is handy for Elling owners who may wish to fit a double seat for attaching a swivel seat with back rest.
https://bengar.de/en/schienenbefestigung.html
__________________
|
|
|
|
|
09 July 2021, 18:04
|
#43
|
|
Member
Country: UK - England
Town: Cambridgeshire
Boat name: Nimrod II
Make: Aerotec 380
Length: 3m +
Engine: Yam 15 Tohatsu 9.8
Join Date: Nov 2007
Posts: 8,305
|
It was just a case of ordering from the first folks to have the parts exactly as I wanted. Then I was most amused to see the items were marked made in the Ukraine and/or with the Borika logo. Very easy ordering process and quick delivery.
__________________
|
|
|
|
|
19 July 2021, 17:13
|
#44
|
|
Member
Country: UK - England
Town: Cambridgeshire
Boat name: Nimrod II
Make: Aerotec 380
Length: 3m +
Engine: Yam 15 Tohatsu 9.8
Join Date: Nov 2007
Posts: 8,305
|
It's not a competition and folks have many favoured 12v pump types but something I've not done before is to time the Bravo 12v analogue inflating the Aerotec but did so getting it ready for a glue session today. 8min 37sec for the three tube compartments and both HP floor panels all up to full pressure. That was with a newly charged 10ah battery.
As mentioned above a few glued on mods to do and finally a good temp and humidity reading.
__________________
|
|
|
|
|
19 July 2021, 17:25
|
#45
|
|
Member
Country: UK - England
Town: Cambridgeshire
Boat name: Nimrod II
Make: Aerotec 380
Length: 3m +
Engine: Yam 15 Tohatsu 9.8
Join Date: Nov 2007
Posts: 8,305
|
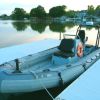
The heat was actually a bit much for a glue job as the mixed glue was going off very quickly so I decided to keep it to one job and only mixed a small batch. Four oar Velcro patches glued to the top of the tubes. Initially I'd intended to locate them part way down the inside of the tube similar to the Elling. But with the Aerotec the most comfortable position to reach and unclip an oar and where they were out of the way of other kit was where they've ended up.
It echoes the position as in one image below of the oars on my first SIB, an early 1970s Zodiac Mk.1.
__________________
|
|
|
|
|
19 July 2021, 19:24
|
#46
|
|
Member
Country: UK - England
Town: Sussex
Boat name: Bombard
Make: Aerotec 380
Length: 3m +
Engine: Mercury Mariner 15hp
Join Date: Jul 2010
Posts: 3,401
|
Nice job David. Mines still in its bag! 
__________________
|
|
|
|
|
20 July 2021, 07:06
|
#47
|
|
Member
Country: UK - England
Join Date: May 2021
Posts: 37
|
I have tried to glue things to inflatable boats in the past using the IBS PVC adhesive. Following the instructions of first coat leave 20 mins, Second and 3rd coat leave 2 mins. Then stick. I have never had much success. May I ask what glue you use and how you do it as you seem to have great success
__________________
|
|
|
|
|
20 July 2021, 10:31
|
#48
|
|
Member
Country: UK - England
Town: Cambridgeshire
Boat name: Nimrod II
Make: Aerotec 380
Length: 3m +
Engine: Yam 15 Tohatsu 9.8
Join Date: Nov 2007
Posts: 8,305
|
Well I'm very by the book so my procedure is...
Temp and humidity are crucial in the actual location you are working, always keep out of direct sunlight. In truth 25deg C is plenty or the glue will dry so much faster than the standard times... and 70% humidity is the absolute max but far from ideal... I like under 60% max and as near to 45% as possible.
Make sure the boat and patch really are PVC and the glue is the PVC two-part type. For structural repairs best advice is to use glue within date... but for things like my oar patches I was using glue that expired a year ago. In truth I think sealed up it lasts many years past expiry just the sellers can't guarantee the bond strength.
For a cleaner/prep Acetone can be used but I've come to the conclusion MEK is far better... a stronger solvent that softens the PVC far better. Also I pre-clean both boat and patches with warm water on a cloth to remove top layer grime.
Work out your patch posn and mark with biro on the boat. Use masking tape to mask around this posn about 3mm outside the biro mark.
Mix up your glue and hardener in precise percentages putting in a glass jar with lid keeping lid on when not using (this will last several hours).
Clean/prep both patches and boat with MEK... it should make the PVC feel a bit sticky.... perhaps do twice to achieve this.
Paint on first layer of glue to patches and boat.. as thin as it will allow while covering fully. Leave to dry for 20-30mins. But note in the sort of temps we had yesterday above 30deg this time was drastically less... nearer 10mins.
Then get everything organised if you have several patches to glue so you can be as fast as possible. Paint the second layer of glue on patches and boat. Wait 5-10mins until just still tacky (in normal temps but in high heat keep checking every minute to see it's getting towards this stage because it can be just a couple of mins) then apply the patches starting at their centres contacting first then easing the outer edges down. Immediately apply as much pressure as you can from centre out with a wallpaper roller.
Remove all the masking tape.
Then I'm obsessive about the rolling going round each patch in turn for the first ten mins with maximum possible pressure.
Clean off any excess glue at this point with MEK.
Continue re-rolling every few mins up to the 30min point. Perhaps this is excessive but I only want to do the job once. Note that advice is often to weight the repair overnight... but it's near impossible with most patches to get a 100% pressure across the patch and boat material behind so I prefer rolling.
Then I nip back out about every half hour for the next few hours to roll the patches again.
Leave for at least 48hrs before moving boat or stressing patches... allow a full week for max strength in any structural area.
I've used both Polymarine and IBS glues.
As a matter of interest I'm sitting wasting time today while I watched the humidity climb from first thing at 61% to 65% and now it's on its way down slowly but we have the potential for thunderstorms soon so annoyingly it might not be a glue day today.
__________________
|
|
|
|
|
20 July 2021, 12:53
|
#49
|
|
Member
Country: UK - England
Town: Portsmouth
Boat name: Explorer 4
Make: Elling KB350
Length: 3m +
Engine: Tohatsu 9.8 & 6
MMSI: 235913442
Join Date: Nov 2019
Posts: 68
|
Adhering patches/fixings
Great advice! Followed same process on previous boats with success including using the roller initially but then weights. Next time Ill use the roller technique in lieu of weights! I also used MEK and both of the adhesives referred to.
__________________
|
|
|
|
|
21 July 2021, 13:30
|
#50
|
|
Member
Country: UK - England
Town: Cambridgeshire
Boat name: Nimrod II
Make: Aerotec 380
Length: 3m +
Engine: Yam 15 Tohatsu 9.8
Join Date: Nov 2007
Posts: 8,305
|
Glue day again as its 55% humidity.
Something that was chatted about more 5-10yrs ago and no so much recently was that the OE Aerotec seat knurled nuts which go under the seat rub on the seat mount fabric and eventually could wear into the tube. I put some round grey patches on ours from new and after 6yrs wear time to reinforce them.
As I'd bought a roll of seam tape for another job it was the easiest thing to use and in some ways looks quite original. As it's non-structural I used up the last of my year old out of date glue.
__________________
|
|
|
|
|
21 July 2021, 18:35
|
#51
|
|
Member
Country: UK - England
Town: Cambridgeshire
Boat name: Nimrod II
Make: Aerotec 380
Length: 3m +
Engine: Yam 15 Tohatsu 9.8
Join Date: Nov 2007
Posts: 8,305
|
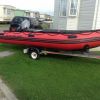
Slightly repeating myself (re the why) from some 20 posts back but next job today was one that's been on the back burner for 4yrs... to glue back the air floor retaining straps to pull from a posn of greater mechanical advantage as they did on earlier models... see first pic where the old ones were glued in the posn shown and the later ones in the lower posn as arrowed on the right side of the image.
Credit has to go to Big Al C for his method of doing so as described in post #14 in this 2017 thread. He has chosen to glue back even higher than the older models but my result should be the same...
https://www.rib.net/forum/f50/bombar...art-75466.html
Just the new seat fittings to glue in place... planned for tomorrow.... except infuriatingly I knocked over the small pot of activator after making up the mix for the above work and spilt the lot so have to wait for more to arrive.
__________________
|
|
|
|
|
21 July 2021, 20:40
|
#52
|
|
Member
Country: UK - England
Town: Retford
Boat name: Spy-sea-one
Make: Excel 435
Length: 4m +
Engine: Suzuki Outboard/25/4
Join Date: Oct 2011
Posts: 7,454
|
Some good info here David  size 10,11? 
__________________
|
|
|
|
|
21 July 2021, 22:07
|
#53
|
|
Member
Country: UK - England
Town: Cambridgeshire
Boat name: Nimrod II
Make: Aerotec 380
Length: 3m +
Engine: Yam 15 Tohatsu 9.8
Join Date: Nov 2007
Posts: 8,305
|
Thanks it's just some stuff to chuck up that may interest folks searching the forum in the future.
The spillage cause... I wear varifocals all the time and there is a certain edge of vision position where things are not quite where they seem to be by an inch or two. Going to try the two local river boatyards for a two part glue kit tomorrow... I'd have said no chance except there are so many paddle boards and inflatable kayaks about now they might just have started to keep stock.
__________________
|
|
|
|
|
26 July 2021, 22:17
|
#54
|
|
Member
Country: UK - England
Town: Cambridgeshire
Boat name: Nimrod II
Make: Aerotec 380
Length: 3m +
Engine: Yam 15 Tohatsu 9.8
Join Date: Nov 2007
Posts: 8,305
|
Annoyingly the replacement activator didn't arrive as expected on Friday so had to sit on my hands all weekend until it turned up this am.
Sliding seat "rails" next. The kit from Germany came with its own glue which on inspection was a single part with cleaner/thinner and I didn't trust that for a permanent job so used the IBS two-part stuff.
The rails were a pain to glue as by default the two sides that needed to be spread out and glued on like butterfly wings wanted to close and would have stuck together so easily. I found by bending them back and clamping in the vice just before applying glue they stayed apart long enough. They're on now anyway and look OK.
The seat ply came in the kit but I'll not put any strain on the rails for 48hrs to fit... and I'm pondering if the seat should solely hang on the plastic brackets or if I trim it a little longer and chamfer the undersides it could get extra support from also bearing on the tube. I'll fiddle about with the seat bracket on a bit of scrap to see what seems best.
While I had spare glue I took the floor straps back one stage further to the full Big Al C job with another strip of reinforcing seam tape.
__________________
|
|
|
|
|
27 July 2021, 12:21
|
#55
|
|
Member
Country: UK - England
Town: Cambridgeshire
Boat name: Nimrod II
Make: Aerotec 380
Length: 3m +
Engine: Yam 15 Tohatsu 9.8
Join Date: Nov 2007
Posts: 8,305
|
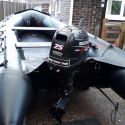
It was my intention to fit lift handles to the tubes behind the transom as part of this gluing session. They arrived yesterday, genuine Honwave ones as they seemed to be what I wanted and the best available of the "rope" type. I didn't want hard PVC.
Sadly too large and too blue.
But I have an idea to re-make them smaller and covered with black fabric so they might just do.
__________________
|
|
|
|
|
27 July 2021, 21:47
|
#56
|
|
Member
Country: UK - England
Town: Cambridgeshire
Boat name: Nimrod II
Make: Aerotec 380
Length: 3m +
Engine: Yam 15 Tohatsu 9.8
Join Date: Nov 2007
Posts: 8,305
|
Cut one handle patch down the middle and trimmed a little from the top/bottom edges... much more in proportion to the space available. I'll glue it up like this and overlay black material on the front which will strengthen the join as well as getting the colour match... then glue to the boat as an assembly.
Not sure which position is best yet though.
__________________
|
|
|
|
|
28 July 2021, 07:33
|
#57
|
|
Member
Country: UK - England
Length: 3m +
Join Date: May 2021
Posts: 696
|
Neat fix. Would position depend upon the likelihood of using them when the OB is on?
Those type of handle strike me as the better solution for the internal grab handles I'm thinking of fitting. Is there a particular search term to use when looking?
__________________
|
|
|
|
|
28 July 2021, 08:12
|
#58
|
|
Member
Country: UK - England
Town: Up North and right a bit
Make: XS500/Merc340/Bic245
Length: 5m +
Engine: Mar 60/20/3.5/Hon2.3
Join Date: Sep 2013
Posts: 1,065
|
Nice job![emoji106]
As far back as you can, so on the cones would be my preference.
__________________
|

|
|
|
28 July 2021, 09:50
|
#59
|
|
Member
Country: UK - England
Town: Cambridgeshire
Boat name: Nimrod II
Make: Aerotec 380
Length: 3m +
Engine: Yam 15 Tohatsu 9.8
Join Date: Nov 2007
Posts: 8,305
|
To be honest TM if the outboard was on likely fuel tank and other kit would be in the boat and then... even if easy for others... it would be an unwise lift attempt for me with my creaky 65yr old neck/shoulder. They are for the circumstance when we've inflated the boat and want to move it before fitting transom wheels. Also when fitting transom wheels at setup there is nothing easy to grab to lift the boat to get the legs on the tabs. So they are just another small refinement to make the boat easier to use for this next life period.
Re the supplier... they were from John Bridger in Exeter listed on Ebay at a reasonable £14.99 inc post...
https://www.ebay.co.uk/itm/193128933582
I looked for ages and they were the only rope type handles I could find in the UK. The folks I bought my seat kit and cushion from in Germany do a slightly neater version and already in black but with postage would be twice as much however the job would have been easier...
https://bengar.de/en/ultra-leichter-...max-25-kg.html
BTW re your location... just up the (old days) Fish Hill and the other end of Five Mile Drive from my teen stomping grounds.
Chipko I think you're right it will be a little easier to carry with them that bit further back from the transom... also will make it less likely to get the transom wheel leg tangled with them when removing in the water. I'm sure I've seen a similar handle location on the cones of some SIB in the past... perhaps a rescue type or an older boat??
__________________
|
|
|
|
|
28 July 2021, 11:00
|
#60
|
|
Member
Country: UK - England
Length: 3m +
Join Date: May 2021
Posts: 696
|
Thanks. I'd just fit the handles in the position that is best for lifting with a straight back then. I'd imagine that would be where they can be as close together and as high up as reasonable but far enough away from the transom for that to not get in the way of your knees and risk leaning forward to hoist etc.
My children love Broadway as the old fashioned sweat shop is on the same side of the road as the play area. 
__________________
|
|
|
|
|
|
 Posting Rules
|
You may not post new threads
You may not post replies
You may not post attachments
You may not edit your posts
HTML code is Off
|
|
|
|
 Recent Discussions
 |
|
|
|
|
|
|
|
|
|
|
|
|
|
|
|
|
|
|
|
|
|
|
|
|
|
|
|
|
|
|
|
|
|


 spy-sea-one