Reply
 
Thread Tools Search this Thread
 
Old 14 February 2016, 09:11   #21
Member
 
Country: UK - England
Town: Cambridgeshire
Boat name: Nimrod II
Make: Aerotec 380
Length: 3m +
Engine: Yam 15 Tohatsu 9.8
Join Date: Nov 2007
Posts: 8,308
Ahh thanks... that makes sense. Those dimples are the "spot weld" type marks I'd noticed. I assume there must be glue too as the water seal?
__________________
Fenlander is offline   Reply With Quote
Old 14 February 2016, 09:19   #22
Member
 
Country: UK - England
Town: Cambridgeshire
Boat name: Nimrod II
Make: Aerotec 380
Length: 3m +
Engine: Yam 15 Tohatsu 9.8
Join Date: Nov 2007
Posts: 8,308
BTW I really like the look of that jacker plate... just wondering if the way it places an outboard 2"-3" further back as well as allowing for raising could be a neat answer for the Aerotec splash issue??
__________________
Fenlander is offline   Reply With Quote
Old 14 February 2016, 14:21   #23
Member
 
Country: UK - England
Town: Retford
Boat name: Spy-sea-one
Make: Excel 435
Length: 4m +
Engine: Suzuki Outboard/25/4
Join Date: Oct 2011
Posts: 7,454
RIBase
Quote:
Originally Posted by lowpro View Post
More pics...
How do you clamp the engine is there another plate for the top or do you just bolt through?
__________________
jeffstevens763@g is offline   Reply With Quote
Old 14 February 2016, 19:28   #24
Member
 
Country: USA
Length: 3m +
Join Date: Feb 2016
Posts: 10
Quote:
Originally Posted by Fenlander View Post
BTW I really like the look of that jacker plate... just wondering if the way it places an outboard 2"-3" further back as well as allowing for raising could be a neat answer for the Aerotec splash issue??
I do not know what the Aerotec splash issue is but my other boat has a bracket on it and it rides better with a bracket than with the old i/o. I did go just over the 5" difference in raising the mini jacker. I think it is about 1inch up for every 1foot out you go, so 5 and 1/4" up instead of 5" (sorry no metric conversions here). We will see. Hope to post once I get it all fixed. Super foggy and wet here so I am going to have to wait till it starts to get dry for the transom repair.
__________________
lowpro is offline   Reply With Quote
Old 14 February 2016, 19:30   #25
Member
 
Country: USA
Length: 3m +
Join Date: Feb 2016
Posts: 10
Quote:
Originally Posted by jeffstevens763@g View Post
How do you clamp the engine is there another plate for the top or do you just bolt through?
Yes it comes with a nicely routed marine ply backing plate.
Attached Thumbnails
Click image for larger version

Name:	mj-1-dp-mini-jacker-small-engine-jack-plate-500_4.jpg
Views:	119
Size:	11.0 KB
ID:	110770  
__________________
lowpro is offline   Reply With Quote
Old 15 February 2016, 07:30   #26
Member
 
Country: UK - England
Town: Retford
Boat name: Spy-sea-one
Make: Excel 435
Length: 4m +
Engine: Suzuki Outboard/25/4
Join Date: Oct 2011
Posts: 7,454
RIBase
Quote:
Originally Posted by lowpro View Post
Yes it comes with a nicely routed marine ply backing plate.
nice job that once the engine is on it will look neat.
__________________
jeffstevens763@g is offline   Reply With Quote
Old 16 February 2016, 14:22   #27
Member
 
Country: USA
Town: S. Carolina
Boat name: D560
Make: Avon
Length: 5m +
Engine: 2016 Merc 115hp CT
Join Date: Aug 2013
Posts: 1,277
Quote:
Originally Posted by lowpro View Post
The bottom of the transom is definitely glued together, but not so much on my boat after taking out the floor and inspecting. The transom itself looks like it is possibly a plastic dip or just painted. I fixed the one and only hole and still good after 3 days, also put in some D-rings for surfboards. Next step is pull up the entire bottom of the transom, clean, re-glue. Oh yeah, also put on the mini-jacker and got it up to 5". Seems way solid but I am concerned about rolling it up. I think I will have to make a canvas cover with padding for mini, jacker.
Did you clean around the patch with solvent? It looks like a professionally done patch...well done!

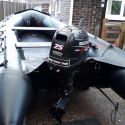
The bottom of the transom is glued. Only the port and starboard sides are welded.

Quote:
Originally Posted by Fenlander View Post
Ahh thanks... that makes sense. Those dimples are the "spot weld" type marks I'd noticed. I assume there must be glue too as the water seal?
No glue...when the plastic melts, it also acts as a sealant. It is suspectible to rot though from the top (i've had people set boats upside down in the grass, and the top edge of the wood wicks water up it) and the bottom (if the water sealing patches on the bottom aren't maintained, then water wicks up the bottom of the wood under the glued PVC section).

I checked my box of goodies...I actually have a little piece of transom as a demonstrator to show you how it works:


__________________
Richard
Gluing geek since 2007
Opinions and intepretations expressed are solely my own and do not express the views or opinions of my employer
office888 is offline   Reply With Quote
Old 16 February 2016, 17:25   #28
Member
 
Country: UK - England
Town: Cambridgeshire
Boat name: Nimrod II
Make: Aerotec 380
Length: 3m +
Engine: Yam 15 Tohatsu 9.8
Join Date: Nov 2007
Posts: 8,308
Excellent images of how they do it. Many thanks.
__________________
Fenlander is offline   Reply With Quote
Old 17 February 2016, 07:17   #29
Member
 
Country: UK - England
Town: Retford
Boat name: Spy-sea-one
Make: Excel 435
Length: 4m +
Engine: Suzuki Outboard/25/4
Join Date: Oct 2011
Posts: 7,454
RIBase
good info Richard new to me thanks.

cheers
__________________
jeffstevens763@g is offline   Reply With Quote
Reply


Posting Rules
You may not post new threads
You may not post replies
You may not post attachments
You may not edit your posts

BB code is On
Smilies are On
[IMG] code is On
HTML code is Off
Trackbacks are Off
Pingbacks are Off
Refbacks are Off


All times are GMT. The time now is 08:52.


Powered by vBulletin® Version 3.8.8 Beta 1
Copyright ©2000 - 2024, vBulletin Solutions, Inc.