Reply
 
Thread Tools Search this Thread
 
Old 11 September 2017, 04:22   #1
Member
 
Country: USA
Town: Santa Barbara, CA
Make: Avon Searider
Length: 5m +
Join Date: Apr 2014
Posts: 58
Pinhole leaks

Awhile back I successfully repaired a small leak on the starboard tube and replaced a couple A7 valves on my Searider 5.4. I noticed there was still a slow leak occurring in the rear chamber. Today I fully washed and soaped the boat and discovered that there are some tiny pin hole leaks just forward of the last cone seam at the top. The hypalon is fairly porous here so it makes sense. What is the best way to repair this? There seems to be 3 small pinholes along this seam maybe 1/4" forward of the seam. If I do a patch, i would need to do a D shaped patch and also lift up the circular reinforcement "patch" that holds the (not sure what it's called... the strip of material running along the top of the tubes that the rope attaches to), and apply the patch. Should I consider removing the seam? Im assuming this isn't actually holding it airtight, but rather just protecting the material and keep the peices from coming apart? Would this be best for the pros?

It's fairly close the the valve... maybe 2.5' so i may be able to apply an inner patch as well. Or maybe just some aquaseal type material applied to the inside? Tips and advice are appreciated!
Attached Thumbnails
Click image for larger version

Name:	IMG_5306.jpg
Views:	178
Size:	128.0 KB
ID:	121779  
__________________
bowfront26 is offline   Reply With Quote
Old 11 September 2017, 17:30   #2
Member
 
Country: UK - England
Length: 10m +
Join Date: Jan 2017
Posts: 58
Try gently warming the area up with a hot air gun then roll using a hand roller.... The heat will reactivate the Bostik glue just enough to make it "bite" again...
Plan B - If you put a patch on top just remember to fully deflate the tube section and leave until the next day - This will stop leaking air ... I would not remove anything there for placing the patch straight on top.. The key here would be great prep work ...Ensure you sand right into groove ..
__________________
glue jug is offline   Reply With Quote
Old 11 September 2017, 17:59   #3
Member
 
Country: USA
Town: Santa Barbara, CA
Make: Avon Searider
Length: 5m +
Join Date: Apr 2014
Posts: 58
Quote:
Originally Posted by glue jug View Post
Try gently warming the area up with a hot air gun then roll using a hand roller.... The heat will reactivate the Bostik glue just enough to make it "bite" again...
Plan B - If you put a patch on top just remember to fully deflate the tube section and leave until the next day - This will stop leaking air ... I would not remove anything there for placing the patch straight on top.. The key here would be great prep work ...Ensure you sand right into groove ..
Are you saying to heat the area up to reactivate the glue in the hypalon material in an attempt to sort of melt the material back together?

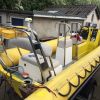
I'm afraid that if I don't remove the circular "anchor patch" for the lifeline/hogging strip(i found the term), then it will lift too easily. If I ended up removing this to lay the patch, I would lay a new one down after the patch was applied.
__________________
bowfront26 is offline   Reply With Quote
Old 12 September 2017, 17:22   #4
Member
 
Country: USA
Town: S. Carolina
Boat name: D560
Make: Avon
Length: 5m +
Engine: 2016 Merc 115hp CT
Join Date: Aug 2013
Posts: 1,277
Awh man, your CSM topcoating is toast...see all of those cracks?

I'd deflate and run a 1/4" bead of aquaseal down the seam, then once that is cured, but a 2" wide strip of material down it (Aquaseal is not UV stable, protect it with a patch).
__________________
Richard
Gluing geek since 2007
Opinions and intepretations expressed are solely my own and do not express the views or opinions of my employer
office888 is offline   Reply With Quote
Old 13 September 2017, 14:53   #5
Member
 
lukewhiting's Avatar
 
Country: UK - England
Town: swanage
Make: Thundercat
Length: 4m +
Engine: Tohatsu 50
Join Date: Apr 2012
Posts: 968
I ended up using that tyreweld for car tyres on the exact same issue!!

Worked a treat and stopped ALL the leaks! Depends how proper you want to do things though...
__________________
lukewhiting is offline   Reply With Quote
Old 13 September 2017, 21:48   #6
Member
 
Country: USA
Town: Santa Barbara, CA
Make: Avon Searider
Length: 5m +
Join Date: Apr 2014
Posts: 58
I'm guessing that i can just apply a patch as normal. Since these holes are so small, it shouldn't take much to "plug" them up.

Last night I was up thinking about ways to get around the lip that an underlying patch creates and thought maybe a light sanding of the the exiting patch materials edge would remove the possibility of an issue. Thoughts?

Right now my main reason for wanting to fix these leaks is to prevent the boat from deflating over time which causes 2 things;

a) the cover to sinches up on the cone folding it in half once the pressure is low enough. This is an old boat and I want to avoid bending the cone material/seam area if at all possible to prevent further damage.

b) the cover will collect rain water when the tubes deflate.
__________________
bowfront26 is offline   Reply With Quote
Reply


Posting Rules
You may not post new threads
You may not post replies
You may not post attachments
You may not edit your posts

BB code is On
Smilies are On
[IMG] code is On
HTML code is Off
Trackbacks are Off
Pingbacks are Off
Refbacks are Off


All times are GMT. The time now is 20:14.


Powered by vBulletin® Version 3.8.8 Beta 1
Copyright ©2000 - 2024, vBulletin Solutions, Inc.