This is info for people who aren't afraid to tackle their own repairs. It lists what I did to effect my repair - I am not saying it's how it should be done; it's just what I did.
The background:
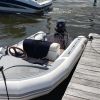
A year ago, I had a bit of a problem with the sealing strip between the hull (1/4" aluminum plate) and the tube (hypalon) coming loose. The section in question was at the starboard stern, about 2' long. Result was a god-awful amount of water coming up onto the deck forward and aft where the inner tube holding flaps stopped.
Guy's advice (the builder) was to use the Zodiac Universal glue (polyurethane), a decent amount of sanding to clean up the hypalon, and glue it back up. While I was at it, I performed the same repair on a section on the portside that looked a little iffy. No big deal, and the repairs went well, but I was still getting water (albeit a hell of a lot less) on deck.
The new (well, old, I guess) problem:
Fast forward a year, and the repair failed again, in the same manner (though I did find out that dropping the elephant trunks early would deal with the water ingress.) I tried a quick and dirty repair job that didn't really work, but was able to not miss a dive with some friends (that had been planned out for a while.)
The repair:
This time, I decided to do a little more prep work with the aluminum, and, on the advice of a local inflatable boat repair guy (Sal of Sal's Inflatable Service in Alameda, CA), went with hypalon glue rather than the crossover glue.
Under the boat, I went at the aluminum with a
flap disk on my 4.5" angle grinder to get rid of corrosion and salt buildup, taking it down to clean bare aluminum. A
sanding drum on a Dremel tool helped clean up most of what the angle grinder wouldn't reach, and hand sanding got to most of the spots that the drum wouldn't reach. The sanding drum was also used to take off the old adhesives from the hypalon, taking that down to the original material. Have to be careful with that one: it's quite easy to take off the inner material (actually neoprene for the inner lining of hypalon, I believe) and expose the fabric; but since it's not an air-holding area, I wasn't too concerned.)
After everything was cleaned up, I hit the aluminum area-to-be-glued with an etching/cleaning product called AlumiPrep 33 (from Aircraft Spruce), followed by a treatment with Alodine 1201 (also from Aircraft Spruce.) This is apparently what aircraft guys do when painting aluminum (the etchant sort of opens up the aluminum so paint will adhere, and the Alodine prevents corrosion under the paint.)
Then, I glued everything up using Weaver 2001 hypalon adhesive. (As an FYI, the crossover glue used last time was Weaver 3001.)
The new (old) problem, part 2:
All well and good, but four miles into a 7 mile run, I had about an inch of water on deck at the transom again. I initially suspected that the repair had not held, but an inspection once in the water on scuba showed that the repair looked just like it had when I had declared it done. So, there was another leak somewhere. Question was, where?
Back at home, with the boat on the trailer (duh - I live in the hills: where else would it be?) I raised the nose of the boat, raised the trunks, and stuck a garden hose on deck, until I had about 5 inches of water up the transom, extending perhaps 8 feet along the deck (BTW, if you do this, make sure your trailer is rated to take the weight of the water. My trailer is rated for about twice the weight of my boat, so it wasn't an issue.) Checking around underneath, I ID's two spots that were leaking through: one portside (actually, the other repair spot from the previous year), and one at the sternmost section of the tube-to-hull join on the starboard side.
For the tail-end repair, I noticed that Guy had used a marine caulk to seal it up, so I picked out as much of the old caulk as possible, treated the aluminum in the same manner (sand, AlumiPrep and Alodine), then used a polysulfide marine caulk to try and seal it up. Should work, but we'll see.
For the portside problem, I tugged and pried and pulled at the strip, and was able to get a fairly large section loose. I decided to enlarge that area more to get better access, and the end result was a section about as large as the opposite side: about 2.5 feet long. I decided that the angle grinder was a bit of overkill, so I started off with the sanding drum in the Dremel, which worked too small an area per pass to really be called efficient. I changed to a
flap wheel sanding bit on the Dremel, and I think I've found a new favorite tool. The flap wheel was aggressive enough to take care of salt and corrosion on the aluminum, and to take the old glue off down to the neoprene layer on the boat material, but was much more controllable in avoiding wearing through the neoprene than the sanding drum was. The only drawback was that, being a larger diameter, I still had to go to the sanding drum and hand sanding to finish up tight areas. The aluminum was treated with AlumiPrep and Alodine, and things were left to dry out (the chemicals require rinseoff with fresh water.)
So, status right now is that the portside repair is awaiting glue (should be taken care of after work today, I think); and repair verification should happen this weekend.
jky