|
|
 29 April 2018, 17:30
|
#21
|
|
Member
Country: UK - England
Town: Poole
Boat name: El Mono
Make: Ribtec 9M
Length: 9m +
Engine: Yanmar 315/Bravo III
Join Date: Aug 2012
Posts: 813
|
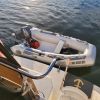
I finally finished putting my Suzuki 2.2 back together today, having taken it apart just before Christmas to clean out the water passages! I replaced all the gaskets mid week and re-assembled the main components, which all went perfectly, the only outstanding thing was the tiller handle...
The original is somewhere in the middle of Newtown Creek as of last August - we were motoring along in the tender, I pushed slightly to turn the engine, and the thing came off in my hand. I was only pushing it, so wasn't actually gripping it, and the thing sank before I could grab it properly! The bolt had completely sheared flush with the casting, presumably the tiller pivot had been slowly seizing up fa while and weakening, and it chose that moment to let go. Thankfully I sourced a replacement with bolt off eBay for a few pounds, managed to drill out the original stub this afternoon, retap the hole, and all now fitted.
Tested in the club's tank this afternoon, and it seems to be spitting water at me, so hopefully all sorted and ready for the season.
I hope yours is going back together nicely as well!
__________________
|

|

|
|
29 April 2018, 21:36
|
#22
|
|
Member
Country: UK - England
Town: London
Make: Aerotec 3.8
Length: 3m +
Engine: Mercury T/S 15hp
Join Date: Jun 2015
Posts: 359
|
Good to know another DT 2.2 was getting put back together today. I've had the tiller handle off while doing this work good to know of a potential fault and glad you got that sorted - tap and die set not on the list of tools required but surely only a matter of time
Managed to get that bolt out with some gentle movement and spray, bit by bit, no need for the you know what
Gasket looked like it had seen better days and stuck to each face so split apart on inspection, couldn't really see how defective it was. Cleaned everything up and rang Pacer Marine for spares, they were most helpful initially emailed by they prefer taking orders over the phone, me too. So, gasket set, gear oil, gearbox seals, bolts, grommets for water tube and impeller
All went back together ok, only hand tight for now as don't have a torque wrench. Will pick that up tomorrow but won't have time until next weekend to nip it all up and see it if works!
__________________
|
|
|
|
|
30 April 2018, 08:23
|
#23
|
|
Member
Country: UK - England
Town: Cambridgeshire
Boat name: Nimrod II
Make: Aerotec 380
Length: 3m +
Engine: Yam 15 Tohatsu 9.8
Join Date: Nov 2007
Posts: 8,305
|
That's looking good. I know sometimes a non invasive job such as de-salt/de-scaler chemicals can be a solution but it's in my nature to want to see what the condition is internally so mostly I'm a take it to bits guy.
__________________
|

|
|
|
02 May 2018, 06:19
|
#24
|
|
Member
Country: UK - England
Town: London
Make: Aerotec 3.8
Length: 3m +
Engine: Mercury T/S 15hp
Join Date: Jun 2015
Posts: 359
|
Morning all
I've always had something about me that likes taking things apart too, in this case if the outboard runs again and has something else about it wrong in the future I'll have a much better idea about what that might be and it's been very enjoyable too
Came across this manual http://www.motoren.ath.cx/outboard/s...p-manual-1.pdf while reading a post on Yachting and Boating Forums - quite a few folk there have/still use the DT 2/2.2 as an outboard for there tender or what some of us go to sea in 
Now then, the impeller. I assumed that the vanes of the impeller should back the way of the spinning prop but the manual has this as opposite see their and my pics
'11 . Install the water pump. Be sure to position the water pump impeller
in the direction shown in the illustration. Note that the impeller vanes curve back relative to the direction of rotation. Don't forget to install the impeller pin.'
Any thoughts on that? If the vanes do stay the way they have them when the engine is in gear the water would get 'cupped' better as it enters the chamber, what happens when the outboard is in reverse? Doesn't apply to mine as it just gets picked up and turned around!
__________________
|
|
|
|
|
02 May 2018, 07:36
|
#25
|
|
Member
Country: UK - England
Town: Cambridgeshire
Boat name: Nimrod II
Make: Aerotec 380
Length: 3m +
Engine: Yam 15 Tohatsu 9.8
Join Date: Nov 2007
Posts: 8,305
|
>>> what happens when the outboard is in reverse? Doesn't apply to mine as it just gets picked up and turned around!
On all OBs I've seen with a fwd/rev gearbox the impellor is on the driveshaft down from the engine above the gearbox so it always turns in the same engine direction regardless of gear lever position.
__________________
|
|
|
|
|
06 May 2018, 19:24
|
#26
|
|
Member
Country: UK - England
Town: London
Make: Aerotec 3.8
Length: 3m +
Engine: Mercury T/S 15hp
Join Date: Jun 2015
Posts: 359
|
Hi Fenlander, yes that makes sense like practical things do, of course the impeller is above the gearbox!
Right then, torqued up the bolts all back together - consensus with the impeller is that it doesn't matter what way you bend the vanes they will find their own way once the outboard starts running
She runs! (and stays running - more or less...)
Had a minor leak from the head gasket so upped the torque a little and that seems to have done the trick, the pin holes halfway up the rear leg are spluttering out more water than they did so all seems healthy
having some trouble getting the tick over to stay low, it's not too bad and probably around the 800 - 900 rpm the manual states. Fair bit of info with the two adjustment screws, top for mixture (rich/lean) and the lower screw for idle speed
General consensus from what I've read is to screw the pilot air screw (# 24 in image attached) in until gently seated and then back out by 2 turns ........ 2 turns is the correct initial setting but is not too critical
With the choke closed, and the throttle part opened the engine will start/run. It starts on a fairly small throttle opening
Once the engine was warmed up, the choke was reduced/turned off and throttle speed lowered with the throttle lever, the throttle stop / idle speed screw (#22) was adjusted until it was running at a normal idle speed
I've not tweaked the pilot air adjustment anymore at this stage
Following the above procedure from cold to warmed up the outboard runs well and ticks over, a bit more revs than I'd like with no neutral but ticks over ok. Coming back to the outboard after 2-3 hours it started first pull but wanted to get up to operating temp before idling plus a bit of faffing about with the choke and throttle lever to stop it from stalling but then needed the idle speed screw #22 tweaking a bit to get it over revving or stalling
Maybe a carb kit in order (it has reed valves somewhere), more inclined to try using it in the local river and see how I go. In summery it starts well and runs without overheating and stalling, still some work to do to make it more of a predictable beasty IE pull, rev, warm up, tick over + go
__________________
|
|
|
|
|
06 May 2018, 20:34
|
#27
|
|
Member
Country: UK - England
Town: Poole
Boat name: El Mono
Make: Ribtec 9M
Length: 9m +
Engine: Yanmar 315/Bravo III
Join Date: Aug 2012
Posts: 813
|
Have you already cleaned the carb and checked the various jets? If not, worth doing that - we got a load of little rust particles from a disintegrating fuel cap in our fuel tank a few years ago that made their way into the carb and jets, and it didn't run nicely at all until we cleaned all that out (and bought a new fuel cap to stop it happening again).
When clean and correctly setup, this little engine should start easily, and typically only needs a few seconds on the choke/idle setting before you flick the dial back to normal running.
__________________
|
|
|
|
|
06 May 2018, 21:48
|
#28
|
|
Member
Country: UK - England
Town: London
Make: Aerotec 3.8
Length: 3m +
Engine: Mercury T/S 15hp
Join Date: Jun 2015
Posts: 359
|
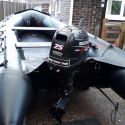
First job a while back was to clear out the carb and tank - caused by rusty prong thing at the end of the filler cap chain
Carb wasn't really affected as tank filter had done it's job, bit of fine stuff inside the float bowl but nothing too bad, jets looked clean
It's just the idle thing I think, with no neutral I'd like it to tick over as low as possible to avoid unwanted movement. On the water I'm pretty confident it will run all day, it's sat by itself chugging away today and yes starting from cold only needed a flick of choke to warm up
Certainly running a lot cooler now
__________________
|
|
|
|
|
07 May 2018, 06:12
|
#29
|
|
Member
Country: UK - England
Town: Cambridgeshire
Boat name: Nimrod II
Make: Aerotec 380
Length: 3m +
Engine: Yam 15 Tohatsu 9.8
Join Date: Nov 2007
Posts: 8,305
|
>>>screw the pilot air screw (# 24 in image attached) in until gently seated and then back out by 2 turns ........ 2 turns is the correct initial setting but is not too critical
In my experience with all engine types this initial advised position of idle mixture is not intended to be the ideal but just to get running to then make the proper setting.
If you haven't already I'd go through the mixture setup of screwing in until it falters then screwing out until falters then setting to the mid posn of those two. Run it a little more then see if there are any improvements in going a little one way or another from this mid posn... 1/4 turn or less can make a big difference. Going slightly rich if anything usually helps prevent a burp/stall when opening the throttle.
Sounds like you're very nearly there with this OB though.
__________________
|
|
|
|
|
13 May 2018, 09:22
|
#30
|
|
Member
Country: UK - England
Town: London
Make: Aerotec 3.8
Length: 3m +
Engine: Mercury T/S 15hp
Join Date: Jun 2015
Posts: 359
|
Took the old Honwave out on the canals last Monday and the outboard ran without a fault all day - cold starts and numerous stop starts when up to temp. Had the cover off during use for easy access to the adjustment screws, tried lowering the idle while going along with the idle screw and found that I could make it idle a little lower still by closing the air mixture screw so to run it richer. As theres no neutral a slow idle is helpful and its nice to tick along on the canal as quiet as possible for a two stroke
Outboard now sputs out a healthy amount of coolant water from the two holes midway on the leg, as close as this outboard design gets to a tell tail. Id say at least a 50% improvement on what I noted using it last year. Temp wise I could put my hand around the power head and it was warm to hot but not the too hot to touch Id experienced when it was conking out
Also ticked a box when out as managed to lift out boat with outboard attached and a little gear inside onto the tow path with the help of a crew and then wheel/walk the boat around the locks, lifting up slightly at certain points. Managed to get from the Regents Canal into the Hertford Union Canal with no bother, with more time will repeat to get to the Lea Navigation / River Lea , a great afternoon out when theres not enough time to get to the sea
So for now this outboard is a keeper, lightweight and running nicely. Thank you all for your help and input, very pleased with the process of initial outboard failure, stripping outboard, repair and servicing. Also now the proud owner of a torque wrench!
__________________
|
|
|
|
|
13 May 2018, 09:28
|
#31
|
|
Member
Country: UK - England
Town: Cambridgeshire
Boat name: Nimrod II
Make: Aerotec 380
Length: 3m +
Engine: Yam 15 Tohatsu 9.8
Join Date: Nov 2007
Posts: 8,305
|
>>> now the proud owner of a torque wrench
Wow mechanic'ing upgrade. I'm a fanatical user of them for critical fixings.
Great result though. Our river OB is a 1980s Mariner 4hp 2-stroke and I went through it in a similar way a while back re water passages (as in post #3 above) and a tune up. Owes me nothing and costs nothing yet pulls out of the garage when needed and is a useful motor to have about.
__________________
|
|
|
|
|
13 May 2018, 14:02
|
#32
|
|
Member
Country: UK - England
Town: Retford
Boat name: Spy-sea-one
Make: Excel 435
Length: 4m +
Engine: Suzuki Outboard/25/4
Join Date: Oct 2011
Posts: 7,454
|
cracking job enjoy 
__________________
|
|
|
|
|
|
 Posting Rules
|
You may not post new threads
You may not post replies
You may not post attachments
You may not edit your posts
HTML code is Off
|
|
|
|
 Recent Discussions
 |
|
|
|
|
|
|
|
|
|
|
|
|
|
|
|
|
|
|
|
|
|
|
|
|
|
|
|
|
|
|
|
|
|


 spy-sea-one