|
 15 October 2012, 09:13
|
#1
|
|
Member
Country: UK - England
Town: Globe
Boat name: Floaty Weirdo
Make: 15m bigego
Length: 10m +
Engine: Ford Alternantor
Join Date: Jun 2012
Posts: 114
|
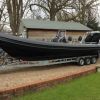
Doing up a searider 4
__________________
|

|

|
|
15 October 2012, 09:27
|
#2
|
|
Member
Country: UK - England
Town: Globe
Boat name: Floaty Weirdo
Make: 15m bigego
Length: 10m +
Engine: Ford Alternantor
Join Date: Jun 2012
Posts: 114
|
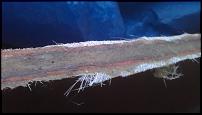
The small crack in the deck
First thing to do was sort out the "small crack" which had never let any water in , apparently I could just sikaflex it. Not that the seller was any the wiser than me, he was a nice fellow, I think , right Neil ?? I got a wire brush and drill and just started to remove the old repair, which started off as a 3 inch crack.
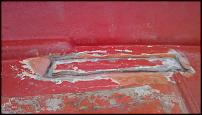
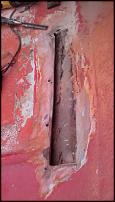
 Each layer of the deck has to go back as was, you cant just fill it with glass as it will create a hard point which will crack.
Firstly I put back the gellcoat layer in the hull, I used a bit of hard plastic off an old TV, this forms a seal and a base to put the rest of the deck material onto. I used eastcoast fibreglass marine grade epoxy and glued it and then used fibre strips where it met the edge of the hull.
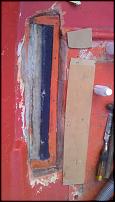
then I cut out some ply and put that layer back which layed on a "thin" level layer of resin. I only left this to go solid enoguh to lay the firbreglass so it could co-cure with the next layer.

__________________
|
|
|
|
|
15 October 2012, 10:09
|
#3
|
|
Member
Country: UK - England
Town: Globe
Boat name: Floaty Weirdo
Make: 15m bigego
Length: 10m +
Engine: Ford Alternantor
Join Date: Jun 2012
Posts: 114
|
Glass on top
__________________
|
|
|
|
|
15 October 2012, 10:25
|
#4
|
|
Member
Country: UK - England
Town: Globe
Boat name: Floaty Weirdo
Make: 15m bigego
Length: 10m +
Engine: Ford Alternantor
Join Date: Jun 2012
Posts: 114
|
holes
__________________
|
|
|
|
|
15 October 2012, 10:37
|
#5
|
|
Member
Country: UK - England
Town: Globe
Boat name: Floaty Weirdo
Make: 15m bigego
Length: 10m +
Engine: Ford Alternantor
Join Date: Jun 2012
Posts: 114
|
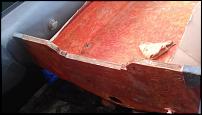
The transom
__________________
|
|
|
|
|
15 October 2012, 10:53
|
#6
|
|
Member
Country: UK - England
Town: Dorset & Hants
Boat name: Streaker/Orange
Make: Avon/Ribcraft
Length: 4m +
Engine: 50Yam/25 Mariner
Join Date: Apr 2007
Posts: 5,551
|
Great stuff. Makes me realise what I am doing to mine is minor in comparison . And thats just based on what you have done so far ! 
__________________
|
|
|
|
|
15 October 2012, 11:47
|
#7
|
|
Member
Country: UK - England
Town: Globe
Boat name: Floaty Weirdo
Make: 15m bigego
Length: 10m +
Engine: Ford Alternantor
Join Date: Jun 2012
Posts: 114
|
rott
__________________
|
|
|
|
|
15 October 2012, 12:03
|
#8
|
|
Member
Country: UK - England
Town: Globe
Boat name: Floaty Weirdo
Make: 15m bigego
Length: 10m +
Engine: Ford Alternantor
Join Date: Jun 2012
Posts: 114
|
Glassfibre reinforced transom top.
I then layed up the cavity with long stips of glass matt until the 8mm deep channels were filled.

I ground out the loose fibreglass before putting a 5mm capping layer on.
So thats a 13mm tapered firbreglass bow in the top of my transom. Engineers comments welcome.
This was then sanded down and shaped into this little beauty. Now the top was solid , what about the rest ?
__________________
|
|
|
|
|
15 October 2012, 12:20
|
#9
|
|
Member
Country: UK - England
Town: Globe
Boat name: Floaty Weirdo
Make: 15m bigego
Length: 10m +
Engine: Ford Alternantor
Join Date: Jun 2012
Posts: 114
|
Quote:
Originally Posted by PeterM

Great stuff. Makes me realise what I am doing to mine is minor in comparison . And thats just based on what you have done so far ! |
It easy when the alternative is having a rotting pile of money on your drive and a steaming misses!! Thanks mate.
__________________
|
|
|
|
|
15 October 2012, 12:23
|
#10
|
|
Member
Country: UK - England
Town: Globe
Boat name: Floaty Weirdo
Make: 15m bigego
Length: 10m +
Engine: Ford Alternantor
Join Date: Jun 2012
Posts: 114
|
Quote:
Originally Posted by spareribs
It easy when the alternative is having a rotting pile of money on your drive and a steaming misses!! Thanks mate.
|
Well when I say pile I mean a little wad, enough for an average pair of Jimmy's Shoes , or is that Jimmy Chew, or Jimmy "takes the piss out of gullable blokes" Chew , thats how she will see it anyway. Her lovely shoes rotting on the drive.
__________________
|
|
|
|
|
15 October 2012, 20:29
|
#11
|
|
Member
Country: UK - England
Town: Globe
Boat name: Floaty Weirdo
Make: 15m bigego
Length: 10m +
Engine: Ford Alternantor
Join Date: Jun 2012
Posts: 114
|
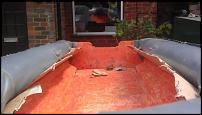
transom holes
There were previous engine drill holes to fill on the transom, these I filled with rockwool soaked in resin, this was pushed in so it compressed and then uncompressed to fill the hole. Rockwool is also fibreglass so I figured it would provide the resin with a similar structure, the holes then were covered with glass patches on either side and all was rubbed down.


Then I gave the whole inside and transom a carefull wire brushing to remove the old paint and other layers untill I got somewhere near the origional gelcoat before acetoning the sureface and painting it with none slip flowcoat on the deck and normal on the transom.
A tip was to slide cardboard inbetween the deck and tubes as a paint mask , remove them before it goes of or it will crack bits off the deck as well as the cardboard, where its gone over the two.
I used a brush but would go for a roller next time but thin out the flowcoat first with epoxy so its thins out. Not really sure about this yet , I think its epoxy, depending on type of coating your applying.

__________________
|
|
|
|
|
15 October 2012, 20:46
|
#12
|
|
Member
Country: UK - England
Town: Globe
Boat name: Floaty Weirdo
Make: 15m bigego
Length: 10m +
Engine: Ford Alternantor
Join Date: Jun 2012
Posts: 114
|
Anyway , I lost interest in the photo taking after a bit , slaved away a bit more, got some nice rubbry bits from Henshaws, I wont bore you with how I rigged up the engine "n" that , but basically this is where it is today.
I will eventually tart up the consol and get some new bits but it all runs and thats all that matter for now. Roll on some calm weather for the flat out , see if it disintegrates or the transom explodes.

To all none fans, LOL , this is for you, just as I was drilling in the key hole into the consol, after restoring it all painstakingly, I turned round with drill , literally just moved slightly , had the drill bit point sticking out and...............pierced the bloody tube , a pin prick puncture in my otherwise patchless tube, GUTTED !! lol , NOT.
__________________
|
|
|
|
|
 Posting Rules
|
You may not post new threads
You may not post replies
You may not post attachments
You may not edit your posts
HTML code is Off
|
|
|
|
 Recent Discussions
 |
|
|
|
|
|
|
|
|
|
|
|
|
|
|
|
|
|
|
|
|
|
|
|
|
|
|
|
|
|
|
|
|
|