|
 27 June 2014, 17:59
|
#1
|
|
Member
Country: USA
Town: Santa Barbara, CA
Boat name: Searider 4m + 5.4m
Make: Avon
Length: 5m +
Engine: Outboard
Join Date: Jun 2009
Posts: 62
|
Searider 5.4 Transom Repair
I have found several helpful posts here on refurbishing Searider's including transom replacements/refurbishments, and thought I would add to it with a repair I just completed that is a little shy of a full transom re-build. I'm in the middle of doing a bit of a refit on my boat, and I set out to raise my transom about 1" from where the prior owner had cut it since my new engine sits a bit higher. When having a closer inspection, I realized that there was a small hairline crack at the upper edge of the transom hole for the flooding compartment. Some further investigative grinding confirmed that the plywood core was saturated and had pretty much de-laminated from the plywood. I took a grinder to the outer laminate on the transom to see what I was dealing with and could see pretty quickly that the transom was in poor shape:
__________________
|

|

|
|
27 June 2014, 18:02
|
#2
|
|
Member
Country: USA
Town: Santa Barbara, CA
Boat name: Searider 4m + 5.4m
Make: Avon
Length: 5m +
Engine: Outboard
Join Date: Jun 2009
Posts: 62
|
photo of transom with laminate removed:
__________________
|
|
|
|
|
27 June 2014, 18:07
|
#3
|
|
Member
Country: USA
Town: Santa Barbara, CA
Boat name: Searider 4m + 5.4m
Make: Avon
Length: 5m +
Engine: Outboard
Join Date: Jun 2009
Posts: 62
|
I really wanted to avoid having to remove the tubes and re-build the joints between the hull and the transom as well as the deck and the transom, so I left enough glass all around the edges to be able to scarf a new transom laminate in. Removing some of the saturated wood layer-by-layer with a chisel confirmed another poster's findings that the transom is made up of two plywood plates, 18mm aft and 12mm forward, separated by some glass. In this case, I only went through the aft plate until I hit glass separating it from the forward plate.
__________________
|
|
|
|
|
27 June 2014, 18:59
|
#4
|
|
Member
Country: UK - Scotland
Town: Fort William
Make: Ribcraft 585
Length: 5m +
Engine: Yamaha F115
Join Date: Mar 2012
Posts: 2,896
|
Oh the memories!
Personally I'd have gone in from the other side of transom. You will struggle to get all of the ply out without whipping tubes off.
Detaching and reattaching tubes really isn't a big issue.
__________________
There is a place on this planet for all of Gods creatures.........right next to my tatties and gravy.
|
|
|
|
|
27 June 2014, 20:33
|
#5
|
|
Member
Country: USA
Town: Santa Barbara, CA
Boat name: Searider 4m + 5.4m
Make: Avon
Length: 5m +
Engine: Outboard
Join Date: Jun 2009
Posts: 62
|
Thanks for your reply, I actually already completed the repair, just wanted to share my experience for others to see/report how it went for me. I just didn't get around to uploading the rest of the pictures/story. I wasn't so much concerned with just taking the tubes off (I just re-tubed the boat a year ago) as I was about re-building all of the joints including the hull/deck joint and transom.
I used a router to take out the ply with just enough glass left over for the scarf, and then somewhat painstakingly used some woodworking chisels of correct width to dig out most of the remaining ply towards the bottom of the hull. Looking at the quality of the laminate in this area I found quite a few air-pockets which made me feel a little better about my somewhat shotty fit-up of the new ply.
__________________
|
|
|
|
|
27 June 2014, 20:41
|
#6
|
|
Member
Country: USA
Town: Santa Barbara, CA
Boat name: Searider 4m + 5.4m
Make: Avon
Length: 5m +
Engine: Outboard
Join Date: Jun 2009
Posts: 62
|
Next, I spent a couple of weeks trying to source some Joubert Okoume marine grade plywood into Santa Barbara which is another story altogether. Once that came in, I made a pattern to fit the new board into the hole, and actually extended it to fit into the tapered gap near the bottom of the transom. This involved a lot of grinding and fitting, but I got it pretty close. Since the board must be completely sealed, I painted the whole thing with penetrating epoxy and then glassed the back-side of the board (towards the front of the boat) including the chamfered hole for the flooding hull.
__________________
|
|
|
|
|
27 June 2014, 20:45
|
#7
|
|
Member
Country: USA
Town: Santa Barbara, CA
Boat name: Searider 4m + 5.4m
Make: Avon
Length: 5m +
Engine: Outboard
Join Date: Jun 2009
Posts: 62
|
Once I had a reasonable fit, I chopped up a bunch of long fibers and bedded them into all of the gaps, followed up by some thickened epoxy with WestMarine filleting blend, wetted out all of the surfaces first with resin, then with paste, and glued the new core in place. I used the exiting engine mount holes and transom support holes to clamp the whole thing together.
__________________
|
|
|
|
|
27 June 2014, 20:58
|
#8
|
|
Member
Country: USA
Town: Santa Barbara, CA
Boat name: Searider 4m + 5.4m
Make: Avon
Length: 5m +
Engine: Outboard
Join Date: Jun 2009
Posts: 62
|
Once cured, some more scarfing and filling was required to make a decent surface for the new transom lamination. It looked like there were about 4mm of chopped fibers on the outer part of the transom before, and I had some really nice 450g/m2 biax, so I went a little over and put back about 5mm of laminate. Once that was finished, I added another filler piece of plywood to the front board to match the new engine cutout shape and filled/faired painted it.
__________________
|
|
|
|
|
27 June 2014, 21:03
|
#9
|
|
Member
Country: USA
Town: Santa Barbara, CA
Boat name: Searider 4m + 5.4m
Make: Avon
Length: 5m +
Engine: Outboard
Join Date: Jun 2009
Posts: 62
|
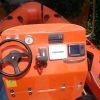
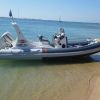
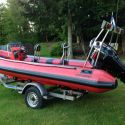
Final painted photos:
I think this should work out ok, keeping my finges crossed...the only place I have some concern is the area on the sides where there is a break in the plywood that is not chamfered or tapered. I put a bunch of filled resin in there, and the fact that the inner sheet of ply is continuous and the added glass outside gives me some hope that it will work. Also, the new sheet covers the area from the engine to the strut support mounts, so load distribution in that area should be ok as well.
I will report back once I put the boat back in if there are any issues. I just thought I would share since while this was definitely a pain in the ass, it was likely less work than doing the whole transom.
__________________
|
|
|
|
|
27 June 2014, 21:46
|
#10
|
|
Member
Country: USA
Town: Santa Barbara, CA
Boat name: Searider 4m + 5.4m
Make: Avon
Length: 5m +
Engine: Outboard
Join Date: Jun 2009
Posts: 62
|
one final crappy hand-drawn section through the center of the transom: I only replaced the aft (18mm) sheet of ply, the inner one seemed to be in acceptable shape.
__________________
|
|
|
|
|
 Posting Rules
|
You may not post new threads
You may not post replies
You may not post attachments
You may not edit your posts
HTML code is Off
|
|
|
|
 Recent Discussions
 |
|
|
|
|
|
|
|
|
|
|
|
|
|
|
|
|
|
|
|
|
|
|
|
|
|
|
|
|
|
|
|
|
|


 Red Mist