|
 21 October 2015, 22:52
|
#1
|
|
Member
Country: USA
Town: Lafayette
Make: Avon
Length: 3m +
Engine: Outboard
Join Date: Sep 2015
Posts: 9
|
RIB 340 Inner Tube repair - big gash
Hello from the Bay Area California, bought this science project for $200. It is a Avon Rib 340, the previous owner left the boat behind his sailing vessel and turn the heat on, the heat exhaust scorched the boat and created blisters and dry cracking skin. I have cut out the brittle areas and now wondering how to do an interior patching. One thought that I have is to inflate beach ball inside the tube so that the tube is hold up in the correct position, what I am not clear on is how to get the whole patch to stick on the inside since you do not have access to the inside of the tube. Another thought that I have is to put a plastic binding to the back of the patch material, something like a plastic folder material and the create a hook with coat hanger to pull the patching material in place. Yes I will have a small hole for the coat hanger, but I figured that will easily be solved with the exterior patch. Please comments, helps or point out pitfalls that I have not foreseen.
__________________
|

|

|
|
22 October 2015, 15:34
|
#2
|
|
Member
Country: USA
Town: S. Carolina
Boat name: D560
Make: Avon
Length: 5m +
Engine: 2016 Merc 115hp CT
Join Date: Aug 2013
Posts: 1,277
|
http://www.henshaw.co.uk/userfiles/f...air_damage.pdf
There are instructions in here on how to do an inside patch.
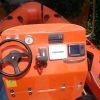
For the outside patch, you will need to remove the handle and reglue it later.
It will be in the way.
__________________
Richard
Gluing geek since 2007
Opinions and intepretations expressed are solely my own and do not express the views or opinions of my employer
|
|
|
|
|
06 November 2015, 22:02
|
#3
|
|
Member
Country: USA
Town: Lafayette
Make: Avon
Length: 3m +
Engine: Outboard
Join Date: Sep 2015
Posts: 9
|
Update to my science project
Hi,
After checking out the videos and instructions out there, I really did not find any of them applicable to the extreme repairs I am embarking on. Most seems to address a simple gash, not a big gaping holes, and multiple holes to boot. The problem with a big gaping hole is that the hypalon sags and create valleys and hills making it very difficult to try to do it in one piece. This is my chronicle so far if it helps someone else down the way.
1. I did not try to do the inner hole repair in one big patch, I try and the valleys and hills cause multiple leaks, I tore that out and decided to do it in two steps. One piece would be done half way so that I can get my hand behind it and really smooth it in, the second piece would be done in two stages, the first stage coming to the seam but stopping about 1/2 inch from the seam, I fold this flap back so that I can get my hand and fingers in there to really make sure that the piece is smooth inside, once that dry, all I have left is the seam in the middle, with about 2 inches of material for the seam overlap, this works great.
__________________
|
|
|
|
|
06 November 2015, 22:10
|
#4
|
|
Member
Country: USA
Town: Lafayette
Make: Avon
Length: 3m +
Engine: Outboard
Join Date: Sep 2015
Posts: 9
|
Glue SC4000 with hardener
More details on my journey
I used the Rema Tip SC4000 glue, it is used primary for conveyor belt repairs and it is also contact cement, but it is a lot easier to use, and it suppose to last a longer once opened. This is also a 2 parts contact cement, but for industrial use. I got this idea from one of the link and thought I would try it since my hypalon specific glue, less than one year old seems to be congealing an awful lot and it was harder to work with even when brand new. You need to sand down the two surfaces, paint on a coat, let it dry at least an hour, recommended overnight, you need at least one more coat to make it work, but 3 coats is recommended.
__________________
|
|
|
|
|
06 November 2015, 22:16
|
#5
|
|
Member
Country: USA
Town: Lafayette
Make: Avon
Length: 3m +
Engine: Outboard
Join Date: Sep 2015
Posts: 9
|
Almost there - still one small leak
This is what it looks like when the inner patch is done, the valleys and hills are killing me, you will notice that I tried to resolve this by putting in a small patch on problem spots. With the heavy hypalon materials sagging, and I am patching guessing how it will line up, there are going to be wrinkles. Eveything works great except one little spot, you notice a small leak there with the bubbles bubbling up.
__________________
|
|
|
|
|
06 November 2015, 22:25
|
#6
|
|
Member
Country: USA
Town: Lafayette
Make: Avon
Length: 3m +
Engine: Outboard
Join Date: Sep 2015
Posts: 9
|
Fiberglass Resin test
I have seen multiple thread on using fiberglass resin to repair hypalon, and most seems to discourage it, but I do not think anyone has tried it, since hypalon has what looks like fiberglass meshing in the middle layer, I thought why not try it on this science project. Yep I am going to use fiberglass resin and fiberglass cloth as an intermediary layer between the inside and outside patch. For the sake of science, I am leaving a smaller repair area with just the standard Hypalon outside patch, and we will see how the two repairs hold up overtime. I will update the results once the resin has time to dry
__________________
|
|
|
|
|
06 November 2015, 23:32
|
#7
|
|
Member
Join Date: Jun 2010
Posts: 2,934
|
dude, if that FG is still wet i would strongly urge you to go take it off right now.
i'm not a tube expert but you have a few options to fix it.
you mention beach ball, probably onto an idea there to just hold the inside patch on while it dries, recover the beach ball through the valve if you have to.
could try going in from the bigger patch above the area you are trying to fix perhaps.
or peel the seam apart on the corner.
hopefully one of the tube repair dudes will see this and assist you.
it looks like it will need a retube TBH but for the money i understand why you want to tinker.
__________________
|
|
|
|
|
06 November 2015, 23:44
|
#8
|
|
Member
Country: USA
Town: S. Carolina
Boat name: D560
Make: Avon
Length: 5m +
Engine: 2016 Merc 115hp CT
Join Date: Aug 2013
Posts: 1,277
|
Resin does not have the required flexibility.
Use of a polychloroprene type adhesive for your application is required.
__________________
Richard
Gluing geek since 2007
Opinions and intepretations expressed are solely my own and do not express the views or opinions of my employer
|
|
|
|
|
07 November 2015, 00:30
|
#9
|
|
Member
Country: USA
Town: Connecticut
Make: Zodiac
Length: 6m +
Engine: Undecided
Join Date: Nov 2009
Posts: 777
|
Resin is not a good idea at all. Will be hard and brittle. The thread you see inside the fabric is the woven threads to which the hypalon is coated on the outside and neoprene on the inside.
Also you should buy adhesive made for inflatables if you want it to last .
|
|
|
|
|
07 November 2015, 08:51
|
#10
|
|
Member
Country: Finland
Town: Helsinki
Boat name: SR 5.4
Make: Avon
Length: 4m +
Engine: Toh1 3,5 Yam 90/2S
Join Date: Oct 2009
Posts: 919
|
There is a reason why this is not a common or recomended "repair" method. The good thing with the limited adhesion properties of polyester resin is that most likely this patch, when properly cured, can be peeled off without much efforts.
Out of memory don't remember the sc4000 but some of the Rema TipTop glues works well and gives a very strong bond on hyplon, so possible You could have completed the repair with the same glue.
__________________
fun on a boat is inversely proportional to size...sort of anyway
|
|
|
|
|
27 June 2016, 15:05
|
#11
|
|
Member
Country: USA
Town: Lafayette
Make: Avon
Length: 3m +
Engine: Outboard
Join Date: Sep 2015
Posts: 9
|
Update on Science project
Well Fiberglass resin and cloth is definitely not the way to go even in between layers of Hypalon fabric. I had to take it off and sanded down the fiberglass with my Dremmel tool. I still have some small leaks from the patches, so now I am using plan B.
I am using windshield adhesive to cover the seams and then applying the Hypalon fabric patch over the whole patch area with generous overage allowance. and then applying windshield adhesive over the seams of the exterior patch. After allowing generous time for the glue to cure, the
Avon R340 lives again, no leaks around my patch area, but definitely a very small leak(s) somewhere in the bow section that I can not find. I have replaced the B7 valve and tested it. I have sprayed the whole bow section may times with my homemade leak detection brew of Dawn dish washing liquid and water. I can not find this mystery leak(s). For now, it is on hold as I want to test the Avon RIB 340 against my Avon R310 with wooden floor ride on the Tomales bay in white cap choppy conditions.
__________________
|
|
|
|
|
 Posting Rules
|
You may not post new threads
You may not post replies
You may not post attachments
You may not edit your posts
HTML code is Off
|
|
|
|
 Recent Discussions
 |
|
|
|
|
|
|
|
|
|
|
|
|
|
|
|
|
|
|
|
|
|
|
|
|
|
|
|
|
|
|
|
|
|