|
|
 15 October 2009, 12:57
|
#1
|
|
Member
Country: UK - England
Town: Brighton
Boat name: Zed "Dodgy II"
Make: Zodiac
Length: 3m +
Engine: NA
Join Date: Oct 2009
Posts: 14
|
Replacing Transom
Hi everyone,
I'm quite new to this sort of thing and bought my first inflatable boat about 6 weeks ago from Ebay. It's quite an old Zodiac from (1989/90). I have since found out that the transom is rotten and am in the process of replacing it (a can or worms, I know).
I intend to glue together three sheets of 9mm marine ply to get the required thickness.
What glue should I use?
Some say Cascamite (despite the fact it has a limited life), others say a waterproof PVA will do the job.
I'll try and keep this updated with my progress on restoring this boat if anyone is interested and put some pictures up when I'm not at work 
Any help would be much appreciated!
Aj
__________________
Wet behind the ears
|

|

|
|
15 October 2009, 14:47
|
#2
|
|
Member
Country: UK - Scotland
Town: fife
Make: Humber / searider
Length: 5m +
MMSI: ... - - - ...
Join Date: Sep 2005
Posts: 720
|
To laminate ply I would not use any Glue. I would use epoxy resin.
But could I ask why not just buy thicker ply in the first place ?
and yes photos are good 
__________________
The only difference between men and boys, is the price and size of their toys
|
|
|
|
|
15 October 2009, 15:18
|
#3
|
|
Member
Country: UK - England
Boat name: llyn raider
Make: xs
Length: 7m +
Engine: 1 200hp merc
Join Date: Nov 2006
Posts: 211
|
+1 for epoxy resin. you will be needing a bit of it anyway.
__________________
|
|
|
|
|
15 October 2009, 16:01
|
#4
|
|
Member
Country: Other
Town: Principalite d'Chaos
Boat name: The Nashers Revenge!
Make: Windsor Brothers
Length: 6m +
Engine: Optimax 225
MMSI: "Mmmmm SI" she said!
Join Date: Jan 2004
Posts: 4,828
|
And another for Epoxy Resin.
I can't imagine doing it any other way.
Nasher
__________________
|
|
|
|
|
15 October 2009, 16:24
|
#5
|
|
Member
Country: UK - England
Town: andover
Make: Renegade 720
Length: 7m +
Engine: 200 verado
Join Date: Dec 2008
Posts: 41
|
replacing transom
I would normally bond the ply by scoring the surfaces to be bonded and thenpolyester or epoxy resin with a 450grm chopped strand mat between then clamp or screw to hold repeat for required thickness
__________________
|
|
|
|
|
15 October 2009, 19:58
|
#6
|
|
Member
Country: UK - Scotland
Town: fife
Make: Humber / searider
Length: 5m +
MMSI: ... - - - ...
Join Date: Sep 2005
Posts: 720
|
Quote:
Originally Posted by markb

I would normally bond the ply by scoring the surfaces to be bonded and thenpolyester or epoxy resin with a 450grm chopped strand mat between then clamp or screw to hold repeat for required thickness
|
I would say there is no need at all for the CSM at all in fact may make a point of weekness. but aye screw and or clamp to keep it all together while it sets.
__________________
The only difference between men and boys, is the price and size of their toys
|
|
|
|
|
15 October 2009, 23:33
|
#7
|
|
Member
Country: UK - England
Town: Brighton
Boat name: Zed "Dodgy II"
Make: Zodiac
Length: 3m +
Engine: NA
Join Date: Oct 2009
Posts: 14
|
Epoxy Resin it is then. That's great - and such a speedy response. I'm impressed!
I'm using 9mm sheets of marine ply glued together because I could only buy it in 8ft x 4ft sheets from the timber merchants. I didn't fancy a sheet the same size at a thickness of 27mm (for ease of handling as well as cost).
As it happens, three transom templates (I'll draw round the old one) and some proposed new floor panels all fit nicely onto the sheet I bought. Over time, I intend on finishing the new transom and floor panels with the same stain/varnish (preferably before next summer).
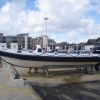
I've attached some pictures.
First the boat, second the old transom prior to discovering its rotten condition and, thirdly, the pvc "gutter" I will need to glue the new transom into. This isn't something I'm looking foward to - I'm learning as I go and will probably need some advice on securing it into the base and rubber moulding.
Thank you all for your help so far...
__________________
Wet behind the ears
|
|
|
|
|
04 January 2010, 06:27
|
#8
|
|
Member
Country: UK - Scotland
Town: Edinburgh
Make: Avon
Length: 3m +
Join Date: Oct 2009
Posts: 9
|
Hi Adrian,
I'm about to do a similar job on an old avon s400 that I bought on ebay a while back.
What glue did you use to fix the new transom into the boat?
__________________
|
|
|
|
|
04 January 2010, 12:58
|
#9
|
|
Member
Country: UK - Scotland
Town: Aberdeenshire
Boat name: Sula
Make: Ribcraft 4.8m
Length: 4m +
Engine: Tohatsu 70hp + aux
MMSI: 235087213
Join Date: Jun 2007
Posts: 4,531
|
Quote:
Originally Posted by Paganferret
Hi Adrian,
I'm about to do a similar job on an old avon s400 that I bought on ebay a while back.
What glue did you use to fix the new transom into the boat?
|
The Zodiac ZED models (including Zoom, Bombard and most leisure Zodiac models) use PVC material and require a specific 2-part PVC glue. The Avon S400 is hypalon. Again there is a specific glue available from Polymarine. Key with any type of sponson, seam or transom repair is surface preparation, in addition to a thorough degrease with MEK (methyl-ethyl-ketone). To prepare hypalon tubes use toluene or MEK.
Instructions: http://www.allinflatables.com/support/hypalon.html
Adhesive and curer: http://www.polymarine.com/products/p...ools/index.cfm
__________________
|
|
|
|
|
04 January 2010, 14:48
|
#10
|
|
Member
Country: USA
Town: San Diego
Make: zodiac futura mk2
Length: 4m +
Engine: Nissan 40 plus
Join Date: Oct 2008
Posts: 269
|
The PVC gluing instructions on the Allinflatable website are very good. Don't discount the importance of low humidity and proper temperature. The glue is hygroscopic and the cured bond strength is definitely affected by exposure. I bought a cheap hygrometer. Don't go by what the weather feels like or the local news report.
It is also a one shot deal when placing glued surfaces. If you have any doubt about how a gutter or seam will fall or layer, glue it in stages. I never overlapped other uncured repairs.
Not a huge deal, but you don't want to make a repair twice.
__________________
|
|
|
|
|
04 January 2010, 21:37
|
#11
|
|
Member
Country: UK - England
Town: Brighton
Boat name: Zed "Dodgy II"
Make: Zodiac
Length: 3m +
Engine: NA
Join Date: Oct 2009
Posts: 14
|
Hey Paganferret,
I got slightly confused with a similar question when I replied to a different thread a short while back. Here it
is...
http://www.rib.net/forum/showthread....ikaflex&page=2
I was advised to use Bostik 2402 to glue the transom into its PVC base gutter. However, I don't know if it will work for the RUBBER side moulding that the transom fits into.
I haven't glued the transom in yet, which is just as well if Spartacus is recommending the Polymarine stuff. I have actually already used some on a previous repair between the RUBBER moulding and part of the pontoon side.
Paganferret - Even though you have a Hypalon boat, I'm guessing you may still need to glue the wooden transom into the same sort of RUBBER moulded slot?
My question is - Will this two-part PVC adhesive make a good contact between Transom and PVC or RUBBER slot mould?
In other words - can you use the same glue for both applications?
For you Paganferret, I'm guessing the question is whether this would also work using the two-part Hypalon equivalent...
Any thoughts?
Cheers, Adrian
__________________
Wet behind the ears
|
|
|
|
|
06 January 2010, 13:18
|
#12
|
|
Member
Country: UK - Scotland
Town: Edinburgh
Make: Avon
Length: 3m +
Join Date: Oct 2009
Posts: 9
|
Thanks for the info guys,
I have put on a couple of patches and replaced the valves but wasn't really sure if the same sort of glue (I used polymarine 2 part) could be used to stick the transom in.
If it can then that's good news as I still have some left in the tin.
Bruce
__________________
|
|
|
|
|
07 January 2010, 13:36
|
#13
|
|
Member
Country: UK - England
Town: Brighton
Boat name: Zed "Dodgy II"
Make: Zodiac
Length: 3m +
Engine: NA
Join Date: Oct 2009
Posts: 14
|
I too have some left over Polymarine two-part. I'm not confident it will work for the bond between the transom and rubber edging which, as you can imagine, could become quite an issue.
If you don't have this sort of rubber slot housing on your boat though I guess it isn't a problem. I've had some conflicting information, so kinda need to get it cleared up. Anyone?
__________________
Wet behind the ears
|
|
|
|
|
07 January 2010, 15:45
|
#14
|
|
Member
Country: USA
Town: San Diego
Make: zodiac futura mk2
Length: 4m +
Engine: Nissan 40 plus
Join Date: Oct 2008
Posts: 269
|
I don't have that particular rubber boot. I have used two part PVC glue to replace the transom on my Zodiac. Bonded very well to the transom and the plastic spacer on the tube. E-mail Polymarine about your application.

I have used partial tins of glue before, but never store them for any length of time. For the amount of hassle involved with removing a failing bond I would not cheap out. Buy a new can. Old cans of glue with headspace may set, but the bond may be weak.
__________________
|
|
|
|
|
07 January 2010, 15:52
|
#15
|
|
Member
Country: USA
Town: Oakland CA
Length: 3m +
Join Date: Feb 2005
Posts: 6,653
|
Quote:
|
I too have some left over Polymarine two-part.
|
Left over for how long?
Most glues suitable for inflatables have a fairly short shelf life (shorter once the can has been opened.)
As a side note, I used the Weaver equivalent of what's called the Zodiac Universal Glue, and it seemed to work quite well; it's a polyurethane based adhesive that seems to hold pretty well (I was gluing hypalon to aluminum; the stuff is designed for use on hypalon or PVC.)
jky
Edit to insert quote because Kelson slipped his post in there while I was typing. :-)
__________________
|
|
|
|
|
09 January 2010, 10:46
|
#16
|
|
Member
Country: UK - England
Town: Brighton
Boat name: Zed "Dodgy II"
Make: Zodiac
Length: 3m +
Engine: NA
Join Date: Oct 2009
Posts: 14
|
The glue has been left for 6 months - sealed tightly mind you. If you think it's no use, then I'll use it to reinforce some worn areas on the PVC and buy a new tin for the job.
This pic shows what I'm dealing with in terms of that "rubber" (I assume) moulding on each pontoon and the PVC tray along the base...
You can see why I have my doubts as to which glue is most suitable. Not the easiest of jobs to fit it in and, as has been pointed out, you only really get one shot once the tackiness has been achieved...
__________________
Wet behind the ears
|
|
|
|
|
09 January 2010, 11:01
|
#17
|
|
Member
Country: UK - Scotland
Town: Aberdeenshire
Boat name: Sula
Make: Ribcraft 4.8m
Length: 4m +
Engine: Tohatsu 70hp + aux
MMSI: 235087213
Join Date: Jun 2007
Posts: 4,531
|
Ensure the transom seal is completely dry and dust free and you've cleaned it with MEK. Do a couple of dry-runs with the new transom to see the best angle to insert it.
Use small wooden spacers to keep the transom seal open when you're applying the coats of adhesive. Probably easier with someone else helping in order to fit. Work quickly drop in the transom and g-clamp the seal at key points to ensure air is expelled and you achieve a solid bond. Clean off any extra adhesive. Bare in mind the ambient air temperature. Conditions right now aren't ideal. If you're doing this in the house ensure you've got adequate ventilation.
__________________
|
|
|
|
|
09 January 2010, 19:28
|
#18
|
|
Member
Country: USA
Town: San Diego
Make: zodiac futura mk2
Length: 4m +
Engine: Nissan 40 plus
Join Date: Oct 2008
Posts: 269
|
If you are using the two part pvc glue I would not try to glue the boot in one shot. You are never going to get that to work right without a crew or a set up to hold the boot open all the way around. I would work in stages. You should work out your process by performing some dry runs, but I would guess that I would glue the bottom of the boot to the transom so it could be inserted straight in and then glue the sides of the boot if possible. I think you should be able to pull the boot sides out and coat with glue after the transom has been inserted and glued to the bottom of the boot. If you are having problems holding the sides of the boot out you might try positioning the boat so you can hold the boot sides out using some weights tied to a thread that runs through a small hole near the outer edge of the seam. When the glue is ready for placement snip the thread and remove the weight. I've used this trick a number of times on repairs where I needed to hold open a seam while prepping and coating with glue. Trying to use wedges is a pain, doesn't work all that well and keeps you from coating the entire surface to be bonded. To replace my transom I oriented my boat in a number of ways, worked in stages and even had to tie the bow to a car and the transom to my truck and tension the boat to get the bottom fabric to fit properly without wrinkles or puckers. Whatever it takes to make the lay down work right. Simply, you need to be able to lay the glued surfaces nicely together. Any tugging or pulling or messing around won't be a good thing. In my example below the threads and weights made it possible to get a good glue bond right out to the edges of the open seam. The wood on the floor was for applying pressure to the seam edges. In small cracks the glue isn't going to dry like it does across the open surfaces. You may not get that initial tacky bond. If you just leave areas like this alone they may not seal well. Applying pressure to maintain contact until the glue dries is not necessary for the majority of glued repairs, but works well for tight spots that don't have a good tackiness to hold themselves together. The wet glue will dry and if the seam is held closed by pressure the glue will out gas and bond well. Just a heads up!

A painters pole holding the back edge of a speed tube seam closed and tight while the glue cures. The rest of the glued surfaces were tacky and had a great initial bond.

__________________
|
|
|
|
|
10 January 2010, 16:28
|
#19
|
|
Member
Country: UK - England
Town: Brighton
Boat name: Zed "Dodgy II"
Make: Zodiac
Length: 3m +
Engine: NA
Join Date: Oct 2009
Posts: 14
|
Thanks all for your replies - your advice is much appreciated! I agree that glueing in stages is probably better although keeping the gap of that rubber edging open will be a big challenge.
So I'm ok to use a two-part PVC Polymarine glue for all surfaces?
And for others' reference, are they ok to use the Hypalon equivalent if needs be?
Sorry for all the questions but that's just to bit to be sure about...
Cheers, Adrian
__________________
Wet behind the ears
|
|
|
|
|
06 February 2010, 15:05
|
#20
|
|
Member
Country: UK - Scotland
Town: Edinburgh
Make: Avon
Length: 3m +
Join Date: Oct 2009
Posts: 9
|
Well, I went ahead and fitted my new transom and it all looks pretty good up to now.
I used polymarine 2 part hypalon adhesive for the job and the bond to the rubber doesn't seem to have suffered.
The sections were glued in seperately and was a 2 man job to get the positioning right.
I used duct tape to hold the rubber "flaps" (for want of a better word) open while the layers of glue dried before pressing them to the transom to bond.
This took a couple of nights in total but most of the time involved was waiting of the glue to cure before putting the second coat on.
Haven't had it out on the water yet so fingers crossed!
__________________
|
|
|
|
|
|
 Posting Rules
|
You may not post new threads
You may not post replies
You may not post attachments
You may not edit your posts
HTML code is Off
|
|
|
|
 Recent Discussions
 |
|
|
|
|
|
|
|
|
|
|
|
|
|
|
|
|
|
|
|
|
|
|
|
|
|
|
|
|
|
|
|
|
|


 Sula
Sula