|
|
 17 March 2019, 21:31
|
#1
|
|
Member
Country: UK - England
Town: Surrey
Boat name: ocean pro 6.3
Make: Humber
Length: 6m +
Engine: 140hp suzuki
Join Date: Feb 2004
Posts: 824
|
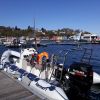
Re-fitting our Humber Ocean Pro 6.3
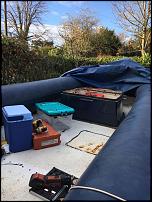
Thought Id put this up to show what Im doing with my Humber rib.
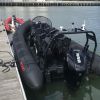
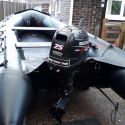
So far Ive replaced the engine (previous 140hp Suzuki) with a 2009 175 opti from a fellow forum member.
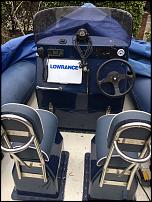
All kit bought, new console, seat pods, bench seat - fair bit of work ahead for me, a novice at boat DIY.
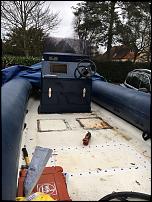
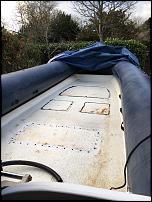
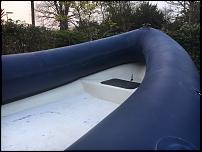
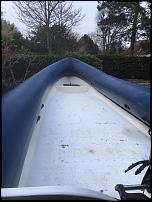
Removed all seating and console, so next step is preparing the hull for the new kit.
How do you all fill the holes from screws fitting seats to floor? Plan is to fill and seal then flowcoat the whole floor before fitting new seating and console.
__________________
|

|

|
|
17 March 2019, 21:32
|
#2
|
|
Member
Country: UK - England
Town: Surrey
Boat name: ocean pro 6.3
Make: Humber
Length: 6m +
Engine: 140hp suzuki
Join Date: Feb 2004
Posts: 824
|
__________________
|
|
|
|
|
17 March 2019, 21:51
|
#3
|
|
Member
Country: Australia
Town: Dalmeny
Make: zodiac
Length: 5m +
Engine: outboard
Join Date: May 2015
Posts: 1,200
|
Wow that's quite a project, hopefully the cost doesn't run out of control as it can be very hard to recover in an older boat.
__________________
|
|
|
|
|
17 March 2019, 22:42
|
#4
|
|
Member
Country: UK - England
Town: Surrey
Boat name: ocean pro 6.3
Make: Humber
Length: 6m +
Engine: 140hp suzuki
Join Date: Feb 2004
Posts: 824
|
Quote:
Originally Posted by jonp

Wow that's quite a project, hopefully the cost doesn't run out of control as it can be very hard to recover in an older boat.
|
Yeah hope it doesnt. Should be fairly in control as I have bought everything I need, just couple bits and bobs along the way, but will essentially be a new boat afterwards - and a neater fit out than Humber did in the first place I think! Cant wait to get it on the water again [emoji106]
__________________
|
|
|
|
|
17 March 2019, 23:38
|
#5
|
|
Member
Country: France
Town: Côte d'Azur
Boat name: Beaver Patrol
Make: Avon Searider SR4
Length: 4m +
Join Date: Jan 2004
Posts: 5,934
|
Quote:
Originally Posted by jonp
Wow that's quite a project, hopefully the cost doesn't run out of control as it can be very hard to recover in an older boat.
|
Who cares if he's having fun!
In answer to the question about the holes, I would start by counter sinking them all, then mix up some resin and drop it into the holes with a lollypop stick. Once it's gone off you can give it a quick rough sand to even off any lumps and then flow coat over the top. I'd do a coat of gelcoat (which will leave a tacky finish when cured) over which I'd do a final layer of flowcoat (same product but with wax added so it cures hard). You'll get a much more consistent finish that way.
__________________
|
|
|
|
|
18 March 2019, 07:03
|
#6
|
|
Member
Country: UK - England
Town: Surrey
Boat name: ocean pro 6.3
Make: Humber
Length: 6m +
Engine: 140hp suzuki
Join Date: Feb 2004
Posts: 824
|
Quote:
Originally Posted by Tim M
Who cares if he's having fun!
In answer to the question about the holes, I would start by counter sinking them all, then mix up some resin and drop it into the holes with a lollypop stick. Once it's gone off you can give it a quick rough sand to even off any lumps and then flow coat over the top. I'd do a coat of gelcoat (which will leave a tacky finish when cured) over which I'd do a final layer of flowcoat (same product but with wax added so it cures hard). You'll get a much more consistent finish that way.
|
Thanks [emoji106]
By countersinking do you mean just drilling the holes out so they are clean? So not plugging with wooden plugs? Any particular resin you recommend? I have both gelcoat and flowcoat so can do that. Would you suggest brushing it on or roller?
Thanks!
__________________
|
|
|
|
|
18 March 2019, 12:58
|
#7
|
|
Member
Country: UK - England
Town: Whitehaven
Boat name: Cerberus
Make: Destroyer 5.8
Length: 5m +
Engine: 115hp Merc 4st
Join Date: Oct 2012
Posts: 462
|
Are you going to fit under deck trunking? I did with my new Humber (was a stock boat otherwise would have it installed at manufacture). I think it makes a big difference to the look and feel of the boat and is worth the effort. It will be relatively easy with the console removed. Happy to share details of what I did, if you are interested. It didn't cost much either.
Phil M
__________________
|
|
|
|
|
18 March 2019, 13:21
|
#8
|
|
Member
Country: UK - England
Town: Surrey
Boat name: ocean pro 6.3
Make: Humber
Length: 6m +
Engine: 140hp suzuki
Join Date: Feb 2004
Posts: 824
|
Hi Phil
Yes looking at under deck trunking, Ill PM you my email to discuss, thanks!!! [emoji106]
__________________
|
|
|
|
|
18 March 2019, 13:52
|
#9
|
|
Member
Country: UK - England
Town: Retford
Boat name: Spy-sea-one
Make: Excel 435
Length: 4m +
Engine: Suzuki Outboard/25/4
Join Date: Oct 2011
Posts: 7,454
|
hole wise i filled mine with dowel rod with gorilla glue all over them its 100% waterproof swells to 4-5 times its volume so it seals real tight disc down when dry and flowcoat to seal. you just need to dampen the dowels for the glue to react
ash dowel are good from B&Q dense wood used for chipboard furniture dont worry about end grain you're going to seal them with flow coat
__________________
|
|
|
|
|
18 March 2019, 14:05
|
#10
|
|
Member
Country: UK - Scotland
Boat name: Wildheart
Make: Humber/Delta Seasafe
Length: 5m +
Engine: Merc 60 Clamshell
MMSI: 235068449
Join Date: Apr 2007
Posts: 4,671
|
Quote:
Originally Posted by jonp
Wow that's quite a project, hopefully the cost doesn't run out of control as it can be very hard to recover in an older boat.
|
You mean like my totally rebuilt to the point of having to run it in again Merc Clamshell? 
+1 on the fun factor.
__________________
|
|
|
|
|
18 March 2019, 17:27
|
#11
|
|
Member
Country: UK - England
Town: Surrey
Boat name: ocean pro 6.3
Make: Humber
Length: 6m +
Engine: 140hp suzuki
Join Date: Feb 2004
Posts: 824
|
Quote:
Originally Posted by 9D280
You mean like my totally rebuilt to the point of having to run it in again Merc Clamshell?
+1 on the fun factor. |
Will be good fun, I also wanted to do it to learn how the boat goes together - will learn valuable skills for the future and in case future issues arise [emoji106]
__________________
|
|
|
|
|
18 March 2019, 17:28
|
#12
|
|
Member
Country: UK - England
Town: Surrey
Boat name: ocean pro 6.3
Make: Humber
Length: 6m +
Engine: 140hp suzuki
Join Date: Feb 2004
Posts: 824
|
Quote:
Originally Posted by jeffstevens763@g
hole wise i filled mine with dowel rod with gorilla glue all over them its 100% waterproof swells to 4-5 times its volume so it seals real tight disc down when dry and flowcoat to seal. you just need to dampen the dowels for the glue to react
ash dowel are good from B&Q dense wood used for chipboard furniture dont worry about end grain you're going to seal them with flow coat
|
Thanks thats useful [emoji106]
__________________
|
|
|
|
|
19 March 2019, 00:08
|
#13
|
|
Member
Country: Australia
Town: Dalmeny
Make: zodiac
Length: 5m +
Engine: outboard
Join Date: May 2015
Posts: 1,200
|
Quote:
Originally Posted by xpertski
Yeah hope it doesnt. Should be fairly in control as I have bought everything I need, just couple bits and bobs along the way, but will essentially be a new boat afterwards - and a neater fit out than Humber did in the first place I think! Cant wait to get it on the water again [emoji106]
|
Totally get the fun factor people are talking about, it's also a heap of fun finding the parts and setting a boat up exactly how you want them. From my own experience I rarely keep a boat more than 12 months before moving onto the next fun factor to buy. The rib I currently have I've just clocked over 800 engine hours on in two years ( I also work on comercial ribs ). I do feel I've done my time with this boat and ready for the next project.
A few boats back I bought a Formula boat with a 250hr 90 merc opti, which I must admit because of the newish age of the outfit I didn't inspect overly well. On getting home I started to discover a few issues, then a few more. Trim tilt leaks, rectifier and other ellectricle issues, leaking gearbox, The hull had stress fractures and wear through the gellcoat from the skids on the trailer ( comercial hull with 10yr warranty). Ended up having to replace the engine, replace most of the trailer and get the hull repaired costing more than a brand new outfit. Sold this after the fun factor subsided 15months later at less than half new cost, dropping $27000 for 15 months of use.
Hopefully yours goes a lot better than mine did.
__________________
|
|
|
|
|
19 March 2019, 06:55
|
#14
|
|
Member
Country: UK - England
Town: Surrey
Boat name: ocean pro 6.3
Make: Humber
Length: 6m +
Engine: 140hp suzuki
Join Date: Feb 2004
Posts: 824
|
Quote:
Originally Posted by jonp
Totally get the fun factor people are talking about, it's also a heap of fun finding the parts and setting a boat up exactly how you want them. From my own experience I rarely keep a boat more than 12 months before moving onto the next fun factor to buy. The rib I currently have I've just clocked over 800 engine hours on in two years ( I also work on comercial ribs ). I do feel I've done my time with this boat and ready for the next project.
A few boats back I bought a Formula boat with a 250hr 90 merc opti, which I must admit because of the newish age of the outfit I didn't inspect overly well. On getting home I started to discover a few issues, then a few more. Trim tilt leaks, rectifier and other ellectricle issues, leaking gearbox, The hull had stress fractures and wear through the gellcoat from the skids on the trailer ( comercial hull with 10yr warranty). Ended up having to replace the engine, replace most of the trailer and get the hull repaired costing more than a brand new outfit. Sold this after the fun factor subsided 15months later at less than half new cost, dropping $27000 for 15 months of use.
Hopefully yours goes a lot better than mine did.
|
That sounds like a roller coaster of a project!
Thankfully this boat has been in the family since new so I know the history. The hull is sound so wont be any surprises. Buying new would have cost far more than the parts I have had to buy. Probably spent in the region of £3k in new console, seating, electrics and couple of new instruments and new 207 litre fuel tank. Only the engine has been bought second hand (a 2009 engine) from a fellow forum member but has lots of history and looks to have been well looked after. Sold the old engine (which was 5 years older) for the same price so managed to not lose anything there - cancelled each other out cost wise.
Though must say at some point, another time, I will be very tempted by a 7-8 metre Humber Ocean Pro [emoji16][emoji106]
__________________
|
|
|
|
|
09 April 2019, 16:37
|
#15
|
|
Member
Country: UK - England
Town: Surrey
Boat name: ocean pro 6.3
Make: Humber
Length: 6m +
Engine: 140hp suzuki
Join Date: Feb 2004
Posts: 824
|
So it doesnt look like Ive done much, but finished preparing the floor ready for flowcoat; sanded floor (lots and lots of sanding!), drilled clean holes from seat screws, countersunk then filled with epoxy resin thickened with some silica. Then sanded smooth the raised epoxy and cleaned. Its ready for the console to be fitted, flow coat and flexi teal flooring.
__________________
|
|
|
|
|
09 April 2019, 19:30
|
#16
|
|
Member
Country: UK - England
Town: suffolk
Boat name: not yet
Make: Gemini
Length: 5m +
Engine: Suzuki 140
Join Date: Jan 2015
Posts: 1,273
|
interesting thread ,thanks for sharing ,following your buying and selling activities alone provides intrigue ,and it is now interesting to see it all coming together , which console did you go for in the end ? ,please keep us up to date with progress ,we may even look forward to a show and tell on the east coast in the future , thanks
__________________
|
|
|
|
|
09 April 2019, 21:41
|
#17
|
|
Member
Country: UK - England
Town: Surrey
Boat name: ocean pro 6.3
Make: Humber
Length: 6m +
Engine: 140hp suzuki
Join Date: Feb 2004
Posts: 824
|
Quote:
Originally Posted by Orwell boy
interesting thread ,thanks for sharing ,following your buying and selling activities alone provides intrigue ,and it is now interesting to see it all coming together , which console did you go for in the end ? ,please keep us up to date with progress ,we may even look forward to a show and tell on the east coast in the future , thanks
|
Thanks, yeah will keep updating [emoji106]
Went for an XS ribs double wide console, fitted the hatches so far with all electrics to follow.
Just about to book it in for flexi teak as well. Jobs on the list while I refit include re polishing all the stainless, will hopefully look pretty new and fresh when Im finished [emoji846]
Well up for an east coast show and tell!
__________________
|
|
|
|
|
14 April 2019, 07:01
|
#18
|
|
Member
Country: UK - England
Town: Surrey
Boat name: ocean pro 6.3
Make: Humber
Length: 6m +
Engine: 140hp suzuki
Join Date: Feb 2004
Posts: 824
|
Hi all, so I need some advice please.
All engine cables are due to go into the sealed rear bench seat then inside the seat go under deck, coming up under the console. This is straight forward for the cluster of engine cables.
The hydraulic steering cable, fuel line and the cables for vhf/transducer/bilge/nav lights are all separate to the rear of the boat. My thoughts were to either:
A) run the aforementioned cables through small ducting, then through the right side of the rear bench using a witches hat, then having the fuel separator in the rear bench (battery also there and Optimax oil tank), will probably need to work out if the hydraulic feeding tube is long enough.
B) as above but using a cable gland with holes drilled for the aforementioned cables.
C) taking the aforementioned cables through a second under tack ducting from side of splashwell, sealing deck with witches hat, and having the fuel water separator in the console instead.
Ill try draw a sketch if this helps. Thoughts on most water proof way of getting aforementioned cables into the side of rear bench seat?
__________________
|
|
|
|
|
14 April 2019, 07:31
|
#19
|
|
Member
Country: UK - England
Town: Surrey
Boat name: ocean pro 6.3
Make: Humber
Length: 6m +
Engine: 140hp suzuki
Join Date: Feb 2004
Posts: 824
|
Or combine a) and b) for something radical .... for gland and witches hat over the top... ducting carrying in cables to side of bench finishing at witches hat then cables through gland into side of bench seat ...
__________________
|
|
|
|
|
11 May 2019, 10:51
|
#20
|
|
Member
Country: UK - England
Town: Surrey
Boat name: ocean pro 6.3
Make: Humber
Length: 6m +
Engine: 140hp suzuki
Join Date: Feb 2004
Posts: 824
|
So started flo coat, need to finish this weekend but the rain means today is out - tomorrow looks clear.
Looking at the Humber logo, it seems to be missing the black letters with material exposed beneath, what would people suggest? Use of a small amount of hypalon paint to fill in the letters with black/ white? Or just a basic rubber paint? 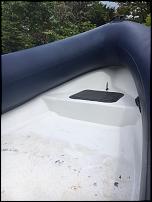 
__________________
|
|
|
|
|
|
 Posting Rules
|
You may not post new threads
You may not post replies
You may not post attachments
You may not edit your posts
HTML code is Off
|
|
|
|
 Recent Discussions
 |
|
|
|
|
|
|
|
|
|
|
|
|
|
|
|
|
|
|
|
|
|
|
|
|
|
|
|
|
|
|
|
|
|


 spy-sea-one