Reply
 
Thread Tools Search this Thread
 
Old 21 September 2012, 17:46   #1
Member
 
Nasher's Avatar
 
Country: Other
Town: Principalite d'Chaos
Boat name: The Nashers Revenge!
Make: Windsor Brothers
Length: 6m +
Engine: Optimax 225
MMSI: "Mmmmm SI" she said!
Join Date: Jan 2004
Posts: 4,828
New Hatch fabricated
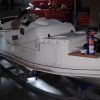
As previously mentioned My Ocean 6.5 ‘The Nashers Revenge’ has a large underdeck void
topped off near the bow by a simple hatch, which I’ve never been happy with.

Bearing in mind it’s a commercial hull, so was never finished to leisure boat standards,
the builders jig-sawed a hole in the deck, screwed some 2x1 underneath to form a lip then dropped the bit they’d cut out back in the hole with a couple of latches

Any water that gets on the deck just goes straight down the hole and fills the void which doesn’t drain anywhere.

I’ve tried various things over the years to seal the hatch without success, and couldn’t bring myself to spend silly money on a readymade hatch when I could have all the fun of making one.

Plan A was to completely replace the hatch with an alloy one which I was going to machine lips in etc in my milling machine, however after I’d cut it to shape and put it loosely in place I hated it, so wanted to find a way to use the existing piece and keep the patterned deck.

I didn’t take many pics I’m afraid, but I’m pleased that the total cost to me has been a favour called in at work, the remainder of a tube of Sikaflex I had in the garage that was already open, and a few screws, nuts and washers I had hanging around.
Plus several hours of my time of course - but I enjoyed it.

Pic 1 & 2
How the original looked.

Pic 3
First step was to thinly flowcoat over the bare wood to protect it, then screw and Sikaflex a vertical aluminium strip around the inside of the hole. This sticks up above the deck @3mm, the plan being to give a consistent flat surface to seal to, plus small amounts of water running over the deck would be diverted around the hole rather than down it.

Pic 4
Through a contact at work I had a 1.5mm thick Stainless steel ‘Bezel’ laser cut from flat sheet to my design. This would have been £30, but I was owed a favour.

I spent an anxious 1/2hr carefully turning the outer 5mm edge of this over to 45deg using a mallet and various sized bits of scrap steel I had laying around. It’s not too easy to see in the image but shows up better later on.

I was going to drill countersunk holes in the bezel to screw it too the original hatch, but decided it would look much nicer if I welded hidden studs to the back of it instead.
I know there are proper weld on studs available, but I turned the heads down on some M5 countersunk set screws I had laying around the garage instead to avoid spending any cash.
The original hatch was drilled and countersunk to allow room for the welds.

I also added a strip of self adhesive Neoprene strip to act as the seal on top of the vertical Aluminium strip mentioned before.

Pic 5
With the front polished up it looks quite nice, apart from the marks still showing from the welding.
The images seam to highlight these more than they show in the flesh.
Attached Thumbnails
Click image for larger version

Name:	hatch1.jpg
Views:	198
Size:	109.7 KB
ID:	72377   Click image for larger version

Name:	hatch2.jpg
Views:	214
Size:	116.0 KB
ID:	72378   Click image for larger version

Name:	Hatch3.jpg
Views:	220
Size:	139.7 KB
ID:	72379   Click image for larger version

Name:	hatch4.jpg
Views:	214
Size:	242.5 KB
ID:	72380   Click image for larger version

Name:	hatch5.jpg
Views:	198
Size:	210.1 KB
ID:	72381  

__________________
Nasher is offline   Reply With Quote
Old 21 September 2012, 17:47   #2
Member
 
Nasher's Avatar
 
Country: Other
Town: Principalite d'Chaos
Boat name: The Nashers Revenge!
Make: Windsor Brothers
Length: 6m +
Engine: Optimax 225
MMSI: "Mmmmm SI" she said!
Join Date: Jan 2004
Posts: 4,828
Pic 6 & 7
Show how it’s assembled with the studs plus some more Sikaflex after I’d cut 3mm from all around the outside of the original hatch and re-flowcoated it. In the image you can see two small areas that annoyingly refused to go off because of something soaked into the wood, and the state of the original flow coat on the back which obviously had the same issue when it was originally done.

I’ve also added a secondary seal with another length of self adhesive Neoprene strip.
Both seals are superglued where they join to prevent a gap.

Pic 8
Finished and fitted.

Nasher.
Attached Thumbnails
Click image for larger version

Name:	hatch6.jpg
Views:	155
Size:	174.4 KB
ID:	72382   Click image for larger version

Name:	hatch7.jpg
Views:	182
Size:	167.3 KB
ID:	72383   Click image for larger version

Name:	hatch8.jpg
Views:	207
Size:	149.5 KB
ID:	72384  
__________________
Nasher is offline   Reply With Quote
Old 21 September 2012, 18:00   #3
Member
 
Leapy's Avatar
 
Country: UK - England
Town: Sheepy Parva
Boat name: Sadly Sold
Length: no boat
Join Date: Sep 2008
Posts: 1,731
Excellent Nasher. Always enjoy your zero cost DIY threads

Just need to be out in the boat this weekend and swamp it to test for water tightness :-)
__________________
Leapy is offline   Reply With Quote
Old 21 September 2012, 18:05   #4
Member
 
Nasher's Avatar
 
Country: Other
Town: Principalite d'Chaos
Boat name: The Nashers Revenge!
Make: Windsor Brothers
Length: 6m +
Engine: Optimax 225
MMSI: "Mmmmm SI" she said!
Join Date: Jan 2004
Posts: 4,828
Thanks Leapy.

I didn't mention that I threw a bucket of water over it as a test, and an pleased to report it kept it all out.

Nasher.
__________________
Nasher is offline   Reply With Quote
Old 21 September 2012, 18:21   #5
ncp
Member
 
ncp's Avatar
 
Country: USA
Town: California
Make: Avon 5.4m Searider
Length: 5m +
Engine: Yamaha 90
Join Date: Aug 2011
Posts: 1,260
You've got skills...
__________________
ncp is offline   Reply With Quote
Old 21 September 2012, 18:24   #6
Member
 
Country: UK - England
Town: Surrey
Boat name: Fugly & Rokraider 1
Make: Pac 22 & Porter 6.5
Length: 6m +
Engine: Ford 250 & jet,DT140
Join Date: Jun 2008
Posts: 681
Nice job!
__________________
Rokraider is offline   Reply With Quote
Old 21 September 2012, 19:18   #7
Member
 
Ian M's Avatar
 
Country: UK - England
Town: New Milton
Boat name: Jianna
Make: Osprey
Length: 6m +
Engine: 200 E-TEC
MMSI: 235076954
Join Date: Sep 2004
Posts: 1,940
Very sharp
__________________
Ian

Dust creation specialist
Ian M is offline   Reply With Quote
Old 21 September 2012, 20:40   #8
Member
 
Razorbill RIBs's Avatar
 
Country: UK - Wales
Town: N. Pembrokeshire
Boat name: Various
Make: RIBs & Hovercraft
Length: 9m +
Engine: Outboards
MMSI: Various
Join Date: May 2009
Posts: 1,358
RIBase
Excellent Job as usual Nasher I'm tempted to put a hatch there on mine now....none at present.
__________________
Dan Worth
www.razorbillribs.co.uk

Follow us on Facebook https://www.facebook.com/#!/group.php...17306504953480
Razorbill RIBs is offline   Reply With Quote
Reply

Thread Tools Search this Thread
Search this Thread:

Advanced Search

Posting Rules
You may not post new threads
You may not post replies
You may not post attachments
You may not edit your posts

BB code is On
Smilies are On
[IMG] code is On
HTML code is Off
Trackbacks are Off
Pingbacks are Off
Refbacks are Off


All times are GMT. The time now is 00:14.


Powered by vBulletin® Version 3.8.8 Beta 1
Copyright ©2000 - 2024, vBulletin Solutions, Inc.