|
|
 09 March 2007, 20:08
|
#21
|
|
Member
Country: UK - Wales
Town: West Wales
Make: Vipermax 5.8, SR4.7
Length: 5m +
Engine: 150 Opti, F50EFi
Join Date: Sep 2005
Posts: 6,299
|
Not a 6.5 with a 200 then, but pretty impressive, all the same. What's the max speed you've seen out of a 6.5 with a 200hp?
Sorry Ian M - pinching your thread here. Lovely looking boat btw 
__________________
|

|

|
|
09 March 2007, 20:13
|
#22
|
|
Member
Country: Sweden
Town: Stockholm
Boat name: Osprey & Ring
Make: Osprey & Ring
Length: 9m +
Engine: Plenty
Join Date: Mar 2003
Posts: 860
|
Quote:
Originally Posted by Downhilldai

Not a 6.5 with a 200 then, but pretty impressive, all the same. What's the max speed you've seen out of a 6.5 with a 200hp?
Sorry Ian M - pinching your thread here. Lovely looking boat btw |
With a 225 E-tec 62knots (as they say) and i had a Viper Max 6,5m with a 200HPDI, that one did 53 knots but console was pretty far front.
|
|
|
|
|
09 March 2007, 22:26
|
#23
|
|
Member
Country: UK - England
Town: New Milton
Boat name: Jianna
Make: Osprey
Length: 6m +
Engine: 200 E-TEC
MMSI: 235076954
Join Date: Sep 2004
Posts: 1,940
|
Quote:
Originally Posted by Downhilldai
Sorry Ian M - pinching your thread here. Lovely looking boat btw |
Pinch away, it's interesting 
__________________
Ian
Dust creation specialist
|
|
|
|
|
09 March 2007, 22:30
|
#24
|
|
Member
Country: Other
Town: Oakley
Boat name: Zerstörer
Make: Ribcraft
Length: 5m +
Engine: Suzuki DF 140
MMSI: 235050131
Join Date: Jun 2003
Posts: 3,931
|
Ian,
Nice looking boat. Well done. Will it be ready for the 17th ?
|
|
|
|
|
10 March 2007, 08:36
|
#25
|
|
Member
Country: UK - England
Town: New Milton
Boat name: Jianna
Make: Osprey
Length: 6m +
Engine: 200 E-TEC
MMSI: 235076954
Join Date: Sep 2004
Posts: 1,940
|
Quote:
Originally Posted by Biggles
Ian,
Nice looking boat. Well done. Will it be ready for the 17th ?
|
I wish Nick. No I will be in my XS for the 17th. See you then.
__________________
Ian
Dust creation specialist
|
|
|
|
|
16 March 2007, 14:39
|
#26
|
|
Member
Country: UK - England
Make: OSPREY
Length: 5m +
Join Date: Nov 2005
Posts: 166
|
Good luck on the 17th Ian - hopefully next trip will be in the Osprey! For anyone who doesn't want the fun of fitting out their own RIB and wants to be on the water quickly, perhaps they should look at our demonstrator - available now all ready to go @ £22,500 (sensible offers considered). Details on www.ospreyribs.co.uk.
__________________
|
|
|
|
|
23 April 2007, 18:45
|
#27
|
|
Member
Country: UK - England
Town: New Milton
Boat name: Jianna
Make: Osprey
Length: 6m +
Engine: 200 E-TEC
MMSI: 235076954
Join Date: Sep 2004
Posts: 1,940
|
I thought that I had better own up to how much progress I have been making of late. As you can see from the photograph all the instrumentation is fitted as is the steering 
Actually the pile of bits is growing by the day, I just wish that some of them would find their way into the boat 
A lot of what I need to do is serial, and often I find myself waiting for that key component before I can continue.
Still not all bad, I think that I have at least mentally solved most of the design issues that kept me awake at night.
As you can see from the other photo I have even taken a hole cutter to my nice new shiny boat 
__________________
Ian
Dust creation specialist
|
|
|
|
|
23 April 2007, 22:25
|
#28
|
|
Member
Country: UK - England
Town: Southampton
Boat name: Hissing Sid
Make: Ross Smith Cobra
Length: 6m +
Engine: 200HP Optimax
MMSI: 235038046
Join Date: Jun 2002
Posts: 3,804
|
Quote:
Originally Posted by Ian M
As you can see from the other photo I have even taken a hole cutter to my nice new shiny boat |
Got to be done 
|
|
|
|
|
23 April 2007, 23:26
|
#29
|
|
Member
Country: UK - England
Town: Fareham
Length: 6m +
Join Date: Sep 2003
Posts: 7,866
|
Like the console Have faith! You'll get there in the end Ian.
__________________
Andy
Looks Slow but is Fast
Member of the ebay Blue RIB cover club.
|
|
|
|
|
16 May 2007, 22:04
|
#30
|
|
Member
Country: UK - England
Town: Reading, Hants
Boat name: Juicy
Make: Sealine F43
Length: 10m +
Engine: 2 x 370hp
MMSI: TBC
Join Date: Sep 2005
Posts: 2,884
|
hey ian....looking good i must say, only just found this thread so good to see your boat at last
Bradders......mine is just on 50 knots now and top end seems to have been increasing over time as engine loosens up as i always treat her very gently 
__________________
|
|
|
|
|
16 May 2007, 23:00
|
#31
|
|
Member
Country: UK - Wales
Town: West Wales
Make: Vipermax 5.8, SR4.7
Length: 5m +
Engine: 150 Opti, F50EFi
Join Date: Sep 2005
Posts: 6,299
|
Quote:
Originally Posted by Hugh Jardon
......mine is just on 50 knots now and top end seems to have been increasing over time as engine loosens up.....
|
And the boat is getting lighter over time, as you're getting to the end of that first tankfull of fuel
__________________
|
|
|
|
|
16 May 2007, 23:03
|
#32
|
|
Member
Country: UK - England
Town: Reading, Hants
Boat name: Juicy
Make: Sealine F43
Length: 10m +
Engine: 2 x 370hp
MMSI: TBC
Join Date: Sep 2005
Posts: 2,884
|
Quote:
Originally Posted by Downhilldai
And the boat is getting lighter over time, as you're getting to the end of that first tankfull of fuel |
you should notice quite an improvement with the opti over the suz i would imagine. plus we wont have to keep stopping so you can top up the oil tank 
__________________
|
|
|
|
|
17 May 2007, 09:05
|
#33
|
|
Member
Country: UK - England
Town: Bromsgrove
Boat name: Kick-Ass !
Make: PAC/Artic 22
Length: 6m +
Engine: 250hp Yamaha
Join Date: Nov 2003
Posts: 3,572
|
very nice can not beat a home built RIB.
which console is this?
__________________
MY BIGGEST WORRY IS THAT MY WIFE(WHEN I"M DEAD)WILL SELL MY TOY'S FOR WHAT I SAID I PAID FOR THEM.
|
|
|
|
|
19 May 2007, 11:00
|
#34
|
|
Member
Country: UK - England
Town: Brittany/Portsmouth
Boat name: Merlin
Make: Solent 6.5
Length: 6m +
Engine: 200
MMSI: soon !
Join Date: Jul 2003
Posts: 5,451
|
Ian look forward to seeing it all up & running soon?
Priory Bay if not before
How's it all progressing?
Kathleen & Paul
__________________
Happy New Resolutions!!! : RIBbing for the craic!!!
|
|
|
|
|
19 August 2007, 19:27
|
#35
|
|
Member
Country: UK - England
Town: New Milton
Boat name: Jianna
Make: Osprey
Length: 6m +
Engine: 200 E-TEC
MMSI: 235076954
Join Date: Sep 2004
Posts: 1,940
|
Update
I thought that I should show progress to date. I will not go into the reasons why progress has been slow, infact there are quite a few reasons, one may be my inherent laziness
On Friday I think that I passed a major landmark, I now have all the major bits
Scrolling back a few months here are some pics to show whats been happening.
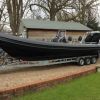
The first is a reminder, mainly for me, of what the boat looked like when I got it home. I can only remember this time with fond naivety. A couple of weeks and I'll be on the water
The second shot shows the results of me playing around with bits of cardboard to try to get the control positions right. The major factor was that I needed to raise the helm pposition above the liine of the console (an Outhill CF19). So I set about building a box to sit above the console to mount the helm. This is where it got tricky
At this point I have got to admit a major character trait, I'm a bit of a perfectionist. Can't help it, my Dad was the same!! So it's all his fault. The box was constructed out of 18mm marine ply, bonded and screwed (A4 screws), G4 ed (thanks for the tip from your thread Slimtim) then three layers of 450 CS mat, followed by a layer of gelcoat. And its the gelcoat where I struck trouble.
To cut a long story short I was not careful enough with the ratios of gelcoat to catalyst. I feel that I have now made all the mistakes possible when applying gelcoat, so if you want to know how to do it wrong, I am your man . One of the re-curring problems that I had was what appeared to be microscopic gas bubbles in the gelcoat. What threw me was that the local chandler had said that he had encountered the same problem, and gelcoat suppliers had advised him that "it sometimes happens". After experimenting with ratios of catalyst, I found that I got consistently good results not using the 2% catalyst as stated by all, but dropping this to 1%. At least that is in the summer, such as it has been!
Having sorted this. it was then into the rubbing down of the gelcoat. Once again, I found things to learn. However, having applied two good coats of the white stuff, and much rubbing down later I do have a workable result, not entirely perfect, but that can be worked on!
One of the early layout decisions was what to do with the compass. So I made sure that the the helm box had a nice flat top into which to mount the compass. It has only slowly dawned on me that this may not be the great solution I first thought, the helm mount is a dirty great piece of iron! I have decided that I will not mount the compass until I have got the boat on the water, and I will then try it to see if I can compensate for the helm, or whether to just throw the compass overboard
More to follow
__________________
Ian
Dust creation specialist
|
|
|
|
|
19 August 2007, 20:32
|
#36
|
|
Member
Country: UK - England
Town: New Milton
Boat name: Jianna
Make: Osprey
Length: 6m +
Engine: 200 E-TEC
MMSI: 235076954
Join Date: Sep 2004
Posts: 1,940
|
The Next Bit
Having made the mistakes with my first ever effort at fibreglassing/gelcoating, I am now moderately pleased with the result shown in the first pic. I have even bought some polish recommended for gelcoat, Farecla G3, but to be honest so far I have used good old Solvol Autosol to good effect. Can't imagine using it on a sbstantial job, but for smallish ones........
During this time Stainless Steve was busy producing all the various bits of stainless that I needed, seat backrests, grab handles, battery clamps, the 'A' frame etc. More on that later.
Another aspect that I had to get in motion was production of the upholstery. I had my own ideas about how a wanted the backrest pads fitting, which was with fixed studs through the backrest frames. It appeared to me that the only way to get this right, was to produce the backing ply for the backrest pads, with the studding fixed. Stainless Steve produced the studs and fittings, to match the back rest frames he had produced. With the studs in place on the backing ply, it was all covered in West System epoxy, and sent off to the upholsterers.
Back to that steering helm mounting box. Having completed the box I turned my attention to the console. The Outhill is a good product, but is somewhat less substantial than the rest of the boat, and less rugged than I would prefer. So the next task was to beef up the console.
The Outhill CF19 comes in two parts, a lower section that is bonded onto the deck, and an upper section. My attentions to date have been directed to the upper section, but I have plans for the lower bit too.
The picture shows the reinforcement job partially completed, with 18mm marine ply under the 'deck' of the console, to which the steering helm mounting box is now bonded. 18mm marine ply is also bonded inside the rear most face, where the throttle control will be mounted. 12mm marine ply is bonded inside each of the sides of the console. It is my intention to fit hatches to either side of the console, but I have yet to find inspection hatches that I like.
For all of the bits of marine ply reinforcement I have G4'ed the inner faces of the ply, applied 2 layers of 450gm cs mat and then the ply. Eventually all this woodwork will be covered in 2/3 layers of cs mat.
Here I must leave this tale for tonight, I could blame the batteries of this laptop, but in truth, I have got to see how the latest bit of fibreglassing has come out . More to follow.
__________________
Ian
Dust creation specialist
|
|
|
|
|
19 August 2007, 23:02
|
#37
|
|
Member
Country: UK - England
Town: Fareham
Length: 6m +
Join Date: Sep 2003
Posts: 7,866
|
Wow, you certainly are giving much attention to detail, would it not have been easier to have reverse moulded that box? Still looks great though!
Which upholsterers did you use Ian, somewhere local?
__________________
Andy
Looks Slow but is Fast
Member of the ebay Blue RIB cover club.
|
|
|
|
|
20 August 2007, 06:42
|
#38
|
|
Member
Country: UK - England
Town: New Milton
Boat name: Jianna
Make: Osprey
Length: 6m +
Engine: 200 E-TEC
MMSI: 235076954
Join Date: Sep 2004
Posts: 1,940
|
Quote:
Originally Posted by Hightower
Wow, you certainly are giving much attention to detail, would it not have been easier to have reverse moulded that box? Still looks great though!
Which upholsterers did you use Ian, somewhere local?
|
Andy,
Yes in hindsight it probably would have been easier to reverse mould the box. What I wanted ws to make sure the structure of the box was solid before adding the cladding, so I decided to do it this way. Maybe next time......
I have had some difficulties with the upholsterers I have used, although I have to say that they have come good in the end, having produced an entirely new set of upholstery for me (12 pieces). It has been purely the time taken. So I do not want to dirty their name in public. Will PM you.
Where were you (and the rest of the Portsmouth lot) last Monday?
Ian
__________________
Ian
Dust creation specialist
|
|
|
|
|
20 August 2007, 09:09
|
#39
|
|
Member
Country: UK - England
Town: Fareham
Length: 6m +
Join Date: Sep 2003
Posts: 7,866
|
Quote:
Originally Posted by Ian M
Andy,
Where were you (and the rest of the Portsmouth lot) last Monday?
Ian
|
Was it a poor turn out then?
I was working otherwise I'd have gone. Summers seem to be a little quite up there anyway (Holidays etc).
I think I'm working next month as well.
__________________
Andy
Looks Slow but is Fast
Member of the ebay Blue RIB cover club.
|
|
|
|
|
20 August 2007, 21:06
|
#40
|
|
Member
Country: UK - England
Town: New Milton
Boat name: Jianna
Make: Osprey
Length: 6m +
Engine: 200 E-TEC
MMSI: 235076954
Join Date: Sep 2004
Posts: 1,940
|
'A' Frames
One of the design features unique to Ospreys are the transom boxes (well I have not seen them on any other make of RIB, maybe someone knows better?). These can be clearly seen in the first picture. They provide support to the transom and provide a much larger area for the tubes to be fitted to.
The way that most Ospreys have the 'A' frame mounted is with the forward leg of a double 'A' frame mounted to the forward face of the transom box, with the rear leg sitting on top of the box. For me, an 'A' frame is an almost essential part of a RIB, but I do not like this method of mounting. This is only a personal opinion, and I know that I will get some flack for this, but to me the rear most leg sitting on top of the transom box a) does not give the most strength to the 'A' frame mounting, and b) to my eyes, looks wrong! Don't shoot, it is only an opinion 
So what I wanted was a sturdy 2" 'A' frame that has the front leg mounting to the front face of the transom box, but with the rear leg mounted to the stern face of the transom. That's easy, well no, actually it's not. There are a number of issues. Firstly the forward faces of the transom boxes are at an angle to the vertical, as is the transom (a different angle!). The legs of the 'A' frame are not parallel, but get closer near the top. So what you have is a complex set of angles to try and model the 'A' frame from. Also, there is a lip on the upper edge of the transom (another unique Osprey feature? - you can just make it out in the second picture), so this has to be cut away around the 'A' frame leg to allow the leg to sit flush on the stern face of the transom. Finally, one of the options on the Vipermax is the fitment of transom 'U' bolts as towing or tie down points. Naturally I ticked this box on the options list. Error
You see, the 'U' bolts fit through the transom just where I wanted to mount my 'A' frame rear legs  Now I could use these 'U' bolts to mount the rear legs, but first I needed to get them out!! Mike does a good job of bunging them in, lots of gelcoat, just what you need, everyone that is, but me.
So how did I go about solving these problems? Getting the angles of the 'A' frame and mounting plates right I left to Stainless Steve
The cutting away of the transom lip I did myself
But those 'U' bolts, how to get them out. I tried levers, I pulled, I used levers and pulled at the same time, and I used hammers while pulling and levering. They would not budge, and yes I had taken the nuts off - not easy as they are deep in the transom boxes.
Finally a friend came up with what I think is a shroud tensioner. By inserting this through a heavy alloy plate spaced off from the transom by blocks of wood, I had myself a puller. You can see this rigged in the second picture. I have to say that it was a marginal exercise. You would not believe how hot the tensioning nuts got as I tightened them, far too hot to handle. On the second pull, the thread started to 'pick up' almost welding the nut to the stud of the puller. Eventually and with careful work, and the gentle application of a lump hammer, the 'U' bolts did eventually cooperate.
Then, the 'A' frame arrived. The moment is captured for all time
It would be a lie to say that it fitted first time, but with a small amount of 'adjustment', it should now fit. I say should, because that is where I am up to. As soon as I can rustle up suitable help, the 'A' frame will be offered up again. Just need to be a little more careful this time, as last time I did ding the surface of the transom a little. Ah well, nothing that cannot be fixed.
You can see the 'A'frame sitting in my garage in the fourth picture; you might also get an impression of the Mason working habits and environment - well those impressions are definitely wrong
To cover over the various antennas and the anchor light that I will be fixing to the top of the 'A' frame, I have made up a marine ply box that will sit on top of the 'A' frame to allow the boat cover to sit undamaged over it. A wooden beam will fit in a slot in the box, with the other end of the beam sitting on the screen surround - I used the same principle on my previous RIB, and it worked well. That's all I can manage for now, my fingers are worn to the bone. More to follow soon.
__________________
Ian
Dust creation specialist
|
|
|
|
|
|
 Posting Rules
|
You may not post new threads
You may not post replies
You may not post attachments
You may not edit your posts
HTML code is Off
|
|
|
|
 Recent Discussions
 |
|
|
|
|
|
|
|
|
|
|
|
|
|
|
|
|
|
|
|
|
|
|
|
|
|
|
|
|
|
|
|
|
|