|
|
 25 February 2012, 16:39
|
#1
|
|
Member
Country: UK - England
Town: Manchester
Boat name: Quaaack
Make: Zodiac
Length: 4m +
Engine: Yamaha 40 O.B
MMSI: 235093362
Join Date: Nov 2011
Posts: 32
|
HELP - ive broken it!
Hi folks - come seeking your collective knowledge and help on this one.
I have a Yamaha 40HP 2 stroke outboard 1991.
Today (following the instructions for once) I set about it with intent to change the impeller to complete the service on it before the season starts.
In the process of removing the lower unit one of the larger side bolts shearer as did the bolt hiding under the trim tab anode.
The side one doesn't appear to be a problem as some slight movement can be seen when trying to prise the halves apart.
The sheared bolt under the trim tab is a) sheared flush with the case and b) most probably full of oxidation as none of the other bolts removed show anything other than the white powder I associate with being aluminium oxide.
I have tried WD40, wiggling it, hitting it from side and the exposed end to no avail. Obviously with the case being aluminium heat isn't an option.
Im rather hoping there is an obvious solution to this that the collective has come across over the years.
Any help/suggestions gratefully received.
Cheers
John
__________________
|

|

|
|
25 February 2012, 16:53
|
#2
|
|
Member
Country: UK - Scotland
Town: Aberdeenshire
Boat name: Sula
Make: Ribcraft 4.8m
Length: 4m +
Engine: Tohatsu 70hp + aux
MMSI: 235087213
Join Date: Jun 2007
Posts: 4,533
|
If there's no way you can get mole grips on it, then you'll probably have to drill it out. Try Duck Oil Penetrating Release on it. It may be possible to drill a recess in what's left of the bolt so you can put a decent large flathead screwdriver on it. Worth a shot anyway.
__________________
Is that with or without VAT?
|
|
|
|
|
25 February 2012, 17:27
|
#3
|
|
Member
Country: UK - England
Town: Wakefield
Boat name: Bouncer
Make: Redbay Stormforce
Length: 6m +
Engine: 2x Honda 100 Hp
MMSI: 235025718
Join Date: Jun 2009
Posts: 4,175
|
Can you put a photo up if you know anyone who is a good welder get a nut welded on and sometimes the heat from the weld will help loosen it and won't damage the casing.
__________________
|
|
|
|
|
25 February 2012, 17:44
|
#4
|
|
Member
Country: UK - England
Town: Manchester
Boat name: Quaaack
Make: Zodiac
Length: 4m +
Engine: Yamaha 40 O.B
MMSI: 235093362
Join Date: Nov 2011
Posts: 32
|
Photos as requested
Top photo an over view the larger hole is for the trim tab
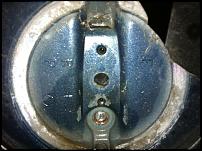
The lower is a closer up of the actual damage itself.

As you can see there is nothing to weld onto. I had hoped that none of the threaded part would be involved in holding the lower case on but sadly it won't part so I'm assuming there is some thread involved there.
Cheers
__________________
|
|
|
|
|
25 February 2012, 17:49
|
#5
|
|
Member
Country: UK - England
Town: Sompting
Make: quicksilver 310
Length: 3m +
Engine: Yamaha 15HP
Join Date: Nov 2011
Posts: 190
|
i would say your going to have to drill that out  drill a small pilot hole slowly with lots off coolant then open it out with a bigger drill until you can collapse it in on itself.
but its going to be a pig i bet
__________________
|
|
|
|
|
25 February 2012, 17:53
|
#6
|
|
Member
Country: UK - England
Town: Manchester
Boat name: Quaaack
Make: Zodiac
Length: 4m +
Engine: Yamaha 40 O.B
MMSI: 235093362
Join Date: Nov 2011
Posts: 32
|
Cheers,
I had a feeling this was going to be a pig, all because whoever serviced it last time. couldn't be bothered putting some grease on the threads. I guess this explains why dole fins have been fitted over a broken cavitation plate, right about where you might reasonably hit the case to separate the two halves!!
__________________
|
|
|
|
|
25 February 2012, 17:56
|
#7
|
|
Member
Country: UK - England
Town: Wakefield
Boat name: Bouncer
Make: Redbay Stormforce
Length: 6m +
Engine: 2x Honda 100 Hp
MMSI: 235025718
Join Date: Jun 2009
Posts: 4,175
|
A good welder would sort that easy I have seen them brake an inch in and still come out
__________________
|
|
|
|
|
25 February 2012, 18:24
|
#8
|
|
Member
Country: UK - N Ireland
Town: Rostrevor
Boat name: Ricochet
Make: Redbay
Length: 7m +
Engine: Twin F115 Yams
MMSI: 235083269
Join Date: Oct 2011
Posts: 930
|
By coincidence I removed the lower leg of the exact same engine today.
I can tell you that your sheared bolt is in no way threaded to the lower unit.
As you know the problem is that electrochemical corrosion has siezed the bolt to the housing of the lower unit. The good news is if you can free the lower unit then you will have no bother removing the broken stud.
The bad news is how to free the seizure? - I had a look and there is a chance that if you apply heat - be careful - each side of the lower unit between the anode and the water slats that the subsquent expansion will help break the corrosion - you need to be very careful and patience
__________________
Maximum Preparation - Maximum Fun
|
|
|
|
|
25 February 2012, 19:20
|
#9
|
|
Member
Country: UK - England
Town: Manchester
Boat name: Quaaack
Make: Zodiac
Length: 4m +
Engine: Yamaha 40 O.B
MMSI: 235093362
Join Date: Nov 2011
Posts: 32
|
Ribochet,
Thanks for this. Approximately how much of the bolt is within the area of the lower leg?
if the corrosion is holding the bolt to the lower leg then drilling the centre of the bolt might give a degree of flexibility to free it up and once the lower section is away deal with the remaining bolt accordingly.
Just me thinking out loud, shoot me down if in talking rubbish.
__________________
|
|
|
|
|
25 February 2012, 19:55
|
#10
|
|
Member
Country: UK - N Ireland
Town: Rostrevor
Boat name: Ricochet
Make: Redbay
Length: 7m +
Engine: Twin F115 Yams
MMSI: 235083269
Join Date: Oct 2011
Posts: 930
|
There is about 47mm of the bolt in the lower leg with only about 10mm screwed into the leg itself.
It is a stainless steel bolt and IMHO it would be extremely difficult to drill it out - I certainly couldn't do it.
It is a tricky one and the broken antiventilation plate gives the impression that this has been a problem for a while.
I have used heat on aluminium castings a lot in the past to great effect - but you do need to be very careful.
If you need any pictures let me know
__________________
Maximum Preparation - Maximum Fun
|
|
|
|
|
25 February 2012, 20:13
|
#11
|
|
Member
Country: UK - England
Town: yorkshire
Boat name: little vicky
Make: avon ex RNLI
Length: 3m +
Engine: tohatsu
Join Date: Mar 2008
Posts: 2,310
|
try boiling water ,,at least your not going to burn a hole in it if your unsure with a blow lamp and it all falls in a pool of molten ali on the floor .
__________________
|
|
|
|
|
25 February 2012, 20:42
|
#12
|
|
Member
Country: UK - England
Town: Manchester
Boat name: Quaaack
Make: Zodiac
Length: 4m +
Engine: Yamaha 40 O.B
MMSI: 235093362
Join Date: Nov 2011
Posts: 32
|
Quote:
Originally Posted by Ribochet

If you need any pictures let me know
|
If its not too much hassle some photos so we know what we are dealing with would be fantastic.
thanks
__________________
|
|
|
|
|
25 February 2012, 22:44
|
#13
|
|
Member
Country: UK - Scotland
Town: livingston
Boat name: the massive
Make: valiant
Length: 6m +
Engine: honda BF115
MMSI: 235092322
Join Date: Feb 2011
Posts: 200
|
I would drill a 5mm pilot hole and then use as big a screw extractor as you can. Using heat is a very drastic measure on alu as it cause damage easily if you are not careful.
__________________
|
|
|
|
|
25 February 2012, 23:19
|
#15
|
|
Member
Country: UK - Scotland
Town: Central Belt of Scotland
Boat name: Puddleduck III
Make: Bombard
Length: 5m +
Engine: 50 HP
Join Date: Mar 2009
Posts: 2,066
|
assuming you can drill it you can also buy stud extractors
http://www.outdooraddict.co.uk/silve...r-remover.html
site is used as example of - basically drill small hole and then screw this in and in theory should remove the stud...
S.
__________________
SPRmarine / SPRtraining
RYA Training Courses & Safety Equipment Sales
|
|
|
|
|
26 February 2012, 01:06
|
#16
|
|
Member
Country: UK - Scotland
Make: HumberOceanOffshore
Length: 8m +
Engine: Volvo KAD300/DPX
Join Date: Oct 2002
Posts: 5,596
|
Do not try to drill the remains and use easyout type extractors. If the bolt is so seized that it has snapped, there is no way a skinny, brittle extractor is going to wind it out. Trust me on this.
Use a centre punch and tap the end of the stud and also tap around the lower unit in the area of the stud to break the seize to the lower unit, you should be able to work the lower unit off by tapping and working it by rocking. Once free you can probably whack the end of the bolt pretty firmly and crack the seize then withdraw it using a stud extractor. You can apply heat and that is good. If you can do the welding of a nut onto the bolt remains that is a good option too. The temperature at the weld will be in the region of 1400 degrees celcius and it will free the seize.
Contrary to popular belief, you can safely apply heat to the aluminium because it is a very good conductor of head and dissipates it quickly. You are unlikely to melt it unless you are using oxy-acetylene and even then you'd need to be applying it to an edge or lingering far too long in one place. If you use heat and want an indication of the temperature, rub some soap onto the metal and it will turn dark brown shortly before melting occurs. It sounds mickey mouse but that is standard practice for annealing aluminium to discern when it is up to temperature.
__________________
JW.
|
|
|
|
|
26 February 2012, 04:07
|
#17
|
|
RIBnet admin team
Country: UK - England
Town: The wilds of Wiltshire
Boat name: Dominator
Make: SR5.4
Length: 7m +
Engine: Yam 85
MMSI: 235055163
Join Date: Jul 2005
Posts: 13,054
|
Quote:
Originally Posted by jwalker
Do not try to drill the remains and use easyout type extractors. If the bolt is so seized that it has snapped, there is no way a skinny, brittle extractor is going to wind it out. Trust me on this.
Use a centre punch and tap the end of the stud and also tap around the lower unit in the area of the stud to break the seize to the lower unit, you should be able to work the lower unit off by tapping and working it by rocking. Once free you can probably whack the end of the bolt pretty firmly and crack the seize then withdraw it using a stud extractor. You can apply heat and that is good. If you can do the welding of a nut onto the bolt remains that is a good option too. The temperature at the weld will be in the region of 1400 degrees celcius and it will free the seize.
Contrary to popular belief, you can safely apply heat to the aluminium because it is a very good conductor of head and dissipates it quickly. You are unlikely to melt it unless you are using oxy-acetylene and even then you'd need to be applying it to an edge or lingering far too long in one place. If you use heat and want an indication of the temperature, rub some soap onto the metal and it will turn dark brown shortly before melting occurs. It sounds mickey mouse but that is standard practice for annealing aluminium to discern when it is up to temperature.
|
I was about to start typing almost the same reply when I saw yours... 
__________________
Need spares,consoles,consumables,hire,training or even a new boat?
Please click HERE and HERE and support our Trade Members.
Join up as a Trade member or Supporter HERE
|
|
|
|
|
26 February 2012, 09:01
|
#18
|
|
Member
Country: UK - Scotland
Town: wormit
Boat name: lots of them
Make: various
Length: no boat
Engine: all types
Join Date: Dec 2004
Posts: 618
|
Jeezo....... Get a battery drill. Put a 1mm drill bit in it and drill out the corrosion! After you have drilled as many holes as possible around this "stud" you will find you have released enough grip your gearbox will come off easier than expected. You cannot drill the stud out with a bigger drill as the propshaft will get in your way. HTH
__________________
|
|
|
|
|
26 February 2012, 09:59
|
#19
|
|
Member
Country: UK - England
Town: swanwick/hamble
Boat name: stormchaser
Make: custom rib
Length: 8m +
Engine: inboard/diesel
Join Date: Aug 2007
Posts: 3,848
|
Just as well I'm back from my skiing. A welder could drop a nut on top of that bit of stud and puddle weld inside. The heat from the welding will expand the Ali. Once the nuts in place give it a solid wack with a hammer to shock it and then undo it.
If it snaps off again then drill through the centre of the stud with ever growing sizes of drills. Use cutting fluid.if you're slightly off centre you will come to the edge of stud then it will loosen up enough to turn what is left. Don't be tempted to drill further than that.
Above all don't break the drill bit in it. Start with about 3mm and work up from there. Once the first hole is done the rest will be easier. Just go steady. The drilling bit should take about half hour to an hour to do it nice and steady. The welding bit would take me ten mins most
__________________
|
|
|
|
|
26 February 2012, 12:12
|
#20
|
|
Member
Country: UK - England
Town: Manchester
Boat name: Quaaack
Make: Zodiac
Length: 4m +
Engine: Yamaha 40 O.B
MMSI: 235093362
Join Date: Nov 2011
Posts: 32
|
Guys,
Thanks for this. All this is a bit beyond my skill and tool sets but at least i know what my options are and for that I am grateful.
One thing I have found on the web looking for solutions is a suggestion that the drive shaft splines may have rusted to the powerhead. (That will teach me to go looking!)
Is this likely? Are the symptoms of zero movement(<1mm up down, forwards backwards and side to side) at the joint between the lower unit and center section more symptomatic of one than the other? Is there a way to tell one way or the other from this position?
Assuming I have now reached wallet out time any recommendations in the Manchester / North West area?
Cheers
John
__________________
|
|
|
|
|
|
 Posting Rules
|
You may not post new threads
You may not post replies
You may not post attachments
You may not edit your posts
HTML code is Off
|
|
|
|
 Recent Discussions
 |
|
|
|
|
|
|
|
|
|
|
|
|
|
|
|
|
|
|
|
|
|
|
|
|
|
|
|
|
|
|
|
|
|


 Sula
Sula "The Massive"
 White Noise