|
|
 30 September 2015, 03:21
|
#1
|
|
Member
Country: USA
Town: Mountain View, CA
Boat name: Six Park
Make: True Kit
Length: 3m +
Engine: Suzuki 6
Join Date: Dec 2014
Posts: 236
|
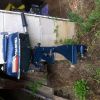
Fishing hook damage & repair
I read somewhere on this forum that fishing hooks aren't really a concern on an inflatable. Well, I guess that's not entirely true :-)
After last Saturday's fishing trip, I found that one of the tubes leaking air slowly. I used soapy water to find out where the leak was (two tiny slits). Here's a video of it:
I am thinking of using the procedure described in this video. Would that be the right thing to do? My tubes are Hypalon.
In the future, I will try to put a towel over the tube where I land the fish.
__________________
|

|

|
|
30 September 2015, 03:23
|
#2
|
|
Member
Country: USA
Town: Mountain View, CA
Boat name: Six Park
Make: True Kit
Length: 3m +
Engine: Suzuki 6
Join Date: Dec 2014
Posts: 236
|
Here are close-ups of the leaks
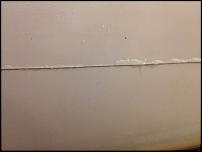
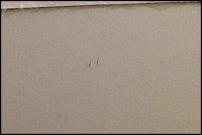
The leaks are just 5/8 inch away from a seam. My patch is 3 inches in diameter. Should I put the patch just to the edge of the seam? Or, should I align the center of the patch with the leaks, such that the patch would cover the seam?
__________________
|
|
|
|
|
30 September 2015, 03:33
|
#3
|
|
Member
Country: USA
Town: Mountain View, CA
Boat name: Six Park
Make: True Kit
Length: 3m +
Engine: Suzuki 6
Join Date: Dec 2014
Posts: 236
|
I've also read:
"Punctures less than 1/8" in size can be repaired simply without a patch. Deflate your boat, then clean and dry the area to be repaired. Apply a small drop of glue to cover the puncture and let dry for 12 hours. If you need to get on the water sooner, let dry for 30 minutes and then inflate the boat, inflating the compartment with the repair only 3/4 full. This repair might not be permanent so add a drop again at a later date to make it permanent."
Should I try that instead?
__________________
|
|
|
|
|
30 September 2015, 05:43
|
#4
|
|
Member
Country: USA
Town: San Francisco Bay
Boat name: SRMN 600
Make: Zodiac
Length: 6m +
Engine: Honda 90
Join Date: Mar 2013
Posts: 478
|
Maybe a Rockfish fin? No big deal, its an easy fix. I would definitely use a proper patch though and not just some glue over the hole. That video from NRS is exactly how I did some patches and they came out perfect. As far as placement of a patch, its recommended that you have the patch extend a few inches all around the leak. Im sure the pros will let you know about the placement.
If you need glue, I have a can of the good stuff with the accelerator from NRS.
__________________
|
|
|
|
|
30 September 2015, 06:36
|
#5
|
|
Member
Country: UK - England
Town: South Yorks
Boat name: Black Pig
Make: Ribcraft
Length: 5m +
Engine: DF140a
MMSI: 235111389
Join Date: Feb 2008
Posts: 11,879
|
They don't look like fishing hook wounds. It looks as if it's just the surface layer that's cut, which shouldn't cause a leak anyway. If a fishing hook had penetrated the tube you'd know about it.
__________________
Rule#2: Never argue with an idiot. He'll drag you down to his level & then beat you with experience.
Rule#3: Tha' can't educate pork.
Rule#4: Don't feed the troll
|

|
|
|
30 September 2015, 08:27
|
#6
|
|
Member
Country: USA
Town: Oakland CA
Length: 3m +
Join Date: Feb 2005
Posts: 6,653
|
Quote:
Originally Posted by tworotorturbo

Maybe a Rockfish fin?
|
First thing I thought of as well.
jky
__________________
|
|
|
|
|
30 September 2015, 09:44
|
#7
|
|
RIBnet Supporter
Country: Ireland
Length: 4m +
Join Date: Feb 2008
Posts: 14,679
|
That's a tiny leak 
IMO - when fishing, use a small section of flexible flooring covering to protect the tubes you're landing fish over - as much for piece of mind as anything else. Land fish and lines into a fishbox.
A patch will be the most ideal long term fix - but IMO, a small amount of Urethane glue (as used to repair waders and other rubberlike items) will also work and be solid for many years. Part deflate the tube, put some glue into a syringe (no needle  ) and force a little into the pin holes and finish with a small blob over the holes (be sure to clean the area well with thinners first). The intention is to form a mini dumbbell blob of glue that creates a natural plug. The plus side to this method is that you don't suddenly have a patched boat. The leak is not a risk at sea - even if the glue did give way for some reason.
__________________
I'm sorry, but there IS no Mars Bar.
|
|
|
|
|
09 October 2015, 15:19
|
#8
|
|
Member
Country: USA
Town: San Francisco Bay
Boat name: SRMN 600
Make: Zodiac
Length: 6m +
Engine: Honda 90
Join Date: Mar 2013
Posts: 478
|
Did you fix it? I need to do the same. Yesterday I launched a rockfish into the side of my tube, 4 pinholes all in a neat row.
__________________
|
|
|
|
|
09 October 2015, 15:56
|
#9
|
|
Member
Country: USA
Town: Mountain View, CA
Boat name: Six Park
Make: True Kit
Length: 3m +
Engine: Suzuki 6
Join Date: Dec 2014
Posts: 236
|
I haven't, but the supplies from NRS have arrived, and I plan to do it over the weekend. Fingers crossed.
Clifton Hypalon Adhesive Gluing Instructions at NRS.com
__________________
|
|
|
|
|
09 October 2015, 15:58
|
#10
|
|
Member
Country: USA
Town: Mountain View, CA
Boat name: Six Park
Make: True Kit
Length: 3m +
Engine: Suzuki 6
Join Date: Dec 2014
Posts: 236
|
and ... it looks like California rockfish aren't compatible with tubes :-(
__________________
|
|
|
|
|
09 October 2015, 17:22
|
#11
|
|
Member
Country: UK - England
Town: Wild West
Boat name: No Boat
Make: No Boat
Length: under 3m
Join Date: Jan 2008
Posts: 5,305
|
Fist time I've really seen this thread...no way Fishing Hook or Any other Fish "Damage".
Looks like poorly made Tubes to me...& seem delam....Sure they are Hyperlon!?..looks more like it may be PVC from the pics.
If you ever had a play with a piece of decent Hyperlon....it would be a real job to DELIBERATELY push a Hook through..let alone pull one into an inflated tube on the end of a Rod...with all the Flex and stretch in the line ect.
IMO Just a coincidence you'd been out Fishing....and I bet if you fix that small leak,it won't be very long before you get another...elsewhere.
__________________
A clever Man learns by his mistakes..
A Wise Man learns by other people's!
The Road to HELL ..is Paved with "Good inventions!"
|
|
|
|
|
09 October 2015, 18:24
|
#12
|
|
Member
Country: USA
Town: Oakland CA
Length: 3m +
Join Date: Feb 2005
Posts: 6,653
|
Quote:
Originally Posted by ba_fisher
and ... it looks like California rockfish aren't compatible with tubes :-(
|
They're not. A spearfishing buddy of mine always carries a pair of EMT shears to cut the fins off Vermilions he shoots. The spines have a habit of stabbing divers thighs while on stringers, and have caused more than one puncture on inflatables. AFAIK, it's mostly the Vermilions; haven't heard of problems with other varieties of rockfish (though it also wouldn't surprise me; they're all pretty closely related.)
Luck with the repair.
jky
__________________
|
|
|
|
|
09 October 2015, 18:34
|
#13
|
|
Member
Country: UK - England
Town: Leicester
Length: 5m +
Engine: 135hp Mercury
Join Date: Sep 2013
Posts: 1,408
|
Quote:
Originally Posted by Maximus
...it would be a real job to DELIBERATELY push a Hook through..let alone pull one into an inflated tube on the end of a Rod...with all the Flex and stretch in the line ect.
IMO Just a coincidence you'd been out Fishing....and I bet if you fix that small leak,it won't be very long before you get another...elsewhere.
|
Possibly with monofil, but braid has no stretch.
BTW if you fish & haven't tried braid as a mainline it's well worth the change. Far more sensitive to takes & due to its low diameter needs far less lead to hold bottom/stay at depth.
__________________
|
|
|
|
|
09 October 2015, 18:49
|
#14
|
|
Member
Country: USA
Town: S. Carolina
Boat name: D560
Make: Avon
Length: 5m +
Engine: 2016 Merc 115hp CT
Join Date: Aug 2013
Posts: 1,277
|
Quote:
Originally Posted by ba_fisher
|

Inflate the boat to ~200 millibar.
Trace the patch on the boat with a pencil. Center the hole in the patch. Mask around your tracing, leaving a 1/16 - 1/32 inch gap to account for if you don't lay the patch 100% in the middle of the masking tape (no glue = no stick)...excess glue will be removed later.
Sand the patch, sand the boat until dull with 60-100 grit sandpaper. Wipe both surfaces with toluene. Wait 5 min for evaporation. Repeat two more times.
Deflate the boat.
Follow your glue instructions for mixing and application.
1.) When laying up, start at the bottom edge of the patch, lightly laying the patch. STOP WHEN YOU GET TO THE SEAM. DO NOT LAY THE TOP EDGE OF THE MATERIAL YET.
2.) Use your burnishing tool, burnish the seam edge to edge to form a nice 90 degree cliff in the patch
3.) Continue laying the top of the patch down, burnish the whole patch down.
Once you are done, remove the masking tape. Lightly dampen a rag with toluene. Wipe around the patch to remove excess glue. Big globs of glue will need to be lightly rubbed with the toluene rag, then lightly scraped with your burnishing tool.
WEAR A HALF MASK RESPIRATOR WITH ORGANIC VAPOR CARTRIDGES
ONLY GLUE IF THE TEMP IS BETWEEN 55F - 85F , BELOW 65% HUMIDITY
__________________
Richard
Gluing geek since 2007
Opinions and intepretations expressed are solely my own and do not express the views or opinions of my employer
|
|
|
|
|
09 October 2015, 19:02
|
#15
|
|
Member
Country: UK - England
Town: teesside
Boat name: magic
Make: humber 5.5
Length: 5m +
Engine: mariner 115
MMSI: 232012453
Join Date: Apr 2014
Posts: 1,497
|
Quote:
Originally Posted by paintman
Possibly with monofil, but braid has no stretch.
BTW if you fish & haven't tried braid as a mainline it's well worth the change. Far more sensitive to takes & due to its low diameter needs far less lead to hold bottom/stay at depth.
|
i recently changed to braid much better feeling the fishy nibbles and as its thinner can get more on the spool no give when you strike ect ect I wont go back to mono 
__________________
|
|
|
|
|
09 October 2015, 19:21
|
#16
|
|
Member
Country: UK - England
Town: Leicester
Length: 5m +
Engine: 135hp Mercury
Join Date: Sep 2013
Posts: 1,408
|
If you get stuck don't try & pull with your hands, wrap it round something - I use a hammer handle which also doubles as a priest.
I use a mono trace for redgills etc from the weight/french boom to the redgill, but for casting & spinning with plugs/spoons/weighted shads & eels etc I attach the plug directly to the braid with a clip. Doesn't bother the fish at all.
Apologies for the thread hi-jack!
__________________
|
|
|
|
|
09 October 2015, 20:30
|
#17
|
|
Member
Country: USA
Town: Mountain View, CA
Boat name: Six Park
Make: True Kit
Length: 3m +
Engine: Suzuki 6
Join Date: Dec 2014
Posts: 236
|
I'll hijack the thread myself :-)
For rockfishing around here, braided lines are a must. The water is deep, and if the line is snagged in the rocks, which happens a lot, it's really really hard to break the hook off with nylon lines, as they will easily stretch a few feet in 100ft deep water. Breaking off braided lines is fairly simple, but you must wear gloves.
__________________
|
|
|
|
|
09 October 2015, 20:38
|
#18
|
|
Member
Country: USA
Town: Mountain View, CA
Boat name: Six Park
Make: True Kit
Length: 3m +
Engine: Suzuki 6
Join Date: Dec 2014
Posts: 236
|
@Office888, thank you so much for your instructions!
Before seeing your instructions, I was thinking of using a small circular patch that stops right at the seam. I found 3 pin holes. If I patch this way, all the holes will be about 1/2 inches to the edge of the patch.
I called NRS and they recommended that patching is not necessary for my situation, so I should just use Aquaseal Urethane Repair Kit.
So what are the pros and cons with these approaches? Most of all, what would go wrong if a pin hole is too close to the edge of a patch?
__________________
|
|
|
|
|
09 October 2015, 20:53
|
#19
|
|
RIBnet Supporter
Country: Ireland
Length: 4m +
Join Date: Feb 2008
Posts: 14,679
|
Quote:
Originally Posted by willk
but IMO, a small amount of Urethane glue (as used to repair waders and other rubberlike items) will also work
|
Quote:
Originally Posted by ba_fisher
I called NRS and they recommended that patching is not necessary for my situation, so I should just use Aquaseal Urethane Repair Kit[/URL].
|
No sh1t!?!
__________________
I'm sorry, but there IS no Mars Bar.
|
|
|
|
|
10 October 2015, 15:41
|
#20
|
|
Member
Country: USA
Town: Oakland CA
Length: 3m +
Join Date: Feb 2005
Posts: 6,653
|
Quote:
Originally Posted by ba_fisher
|
I use Aquaseal for drysuit and buoyancy compensator repair all the time - works well for that. I have only seen it used on an inflatable once (while it held, it was an ugly repair; mostly due to the guy doing the reapir, I think.)
If you do go the Aquaseal route, make sure you have the clear, unfilled Cotol 240 activator (it looks like water - do not use the "filled" stuff that is an opaque white.) If you don't have it, I have a quart can and I can get some to you. I like using a lighter mix than McNett suggests (up to about a 2-1 Cotol to Aquaseal ratio for getting penetration into fabric.) For your tubes, maybe a 1 - 2 (Cotol to Aquaseal) should be OK. Make sure the repair area is level (as the stuff will run and pool), and use light layers. Activated with Cotol, Aquaseal will cure in anywhere from 10 to 60 minutes (vs over 24 hrs unactivated.) Recoat as soon as the surface becomes tack free (or any time after that.)
Might want to rough up the surface a bit to get some key for the urethane to stick to, and degrease well.
I would think that it would do fine for pinholes if you use a .5" - 1" spot repair per pinhole. Stuff holds pretty well. If it doesn't, you should be able to patch directly over the repair.
Luck;
jky
__________________
|
|
|
|
|
|
| Thread Tools |
Search this Thread |
|
|
|
 Posting Rules
|
You may not post new threads
You may not post replies
You may not post attachments
You may not edit your posts
HTML code is Off
|
|
|
|
 Recent Discussions
 |
|
|
|
|
|
|
|
|
|
|
|
|
|
|
|
|
|
|
|
|
|
|
|
|
|
|
|
|
|
|
|
|
|


 BLACK PIG
 Piglet