|
|
 16 August 2016, 21:40
|
#61
|
|
Member
Country: UK - England
Town: Sheffield
Boat name: Uncle Ray
Make: Osprey
Length: 6m +
Engine: 150hp
Join Date: Nov 2014
Posts: 241
|
Quote:
Originally Posted by shedsmith

Bit late I suppose, have you tried those 5inch scouring discs, scotch Brite on steroids. They are use for stripping paint, they eat it and don't scratch metal or wood, they don't clog, but wear out gracefully. Unless you pick a nail sideways, you are then reminded your using a grinder not a magic sander.
|
 yeah i had a few instances where it nearly took it out of my hands. I've not tried them though maybe for the next build 
__________________
|

|

|
|
17 August 2016, 00:59
|
#62
|
|
Member
Country: Australia
Town: ipswich
Make: Gemini Cat 2 Exsurfr
Length: 3m +
Engine: outboard 30hp
Join Date: Oct 2014
Posts: 36
|
Great for the Barby
__________________
|
|
|
|
|
25 August 2016, 13:06
|
#63
|
|
Member
Country: UK - England
Town: Sheffield
Boat name: Uncle Ray
Make: Osprey
Length: 6m +
Engine: 150hp
Join Date: Nov 2014
Posts: 241
|
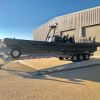
Well it's been a long time since the last progress update, but the boat is finally tubed. Picked it up from SIT a few weeks ago and they have done an amazing job of fitting the tubes, and exactly as per my design. Well chuffed, rigging photos to follow.
__________________
|
|
|
|
|
25 August 2016, 13:10
|
#64
|
|
Member
Country: UK - England
Town: Sheffield
Boat name: Uncle Ray
Make: Osprey
Length: 6m +
Engine: 150hp
Join Date: Nov 2014
Posts: 241
|
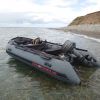
Next it was time to take a saw to the brand new console!! All gauges fitted, vhf, plotter, lowrance down scan and structure scan Inc NMEA network. Rigged up the throttles and spent far too many hours sat inside the console wiring it all up. Very pleased with the end result. All tidy and lots of storage. Just wished I'd purchased more than just black and red tinned wire.
__________________
|
|
|
|
|
25 August 2016, 13:13
|
#65
|
|
Member
Country: UK - England
Town: Sheffield
Boat name: Uncle Ray
Make: Osprey
Length: 6m +
Engine: 150hp
Join Date: Nov 2014
Posts: 241
|
Boat is nearly sorted, first engine test this weekend and we broke down. Seemed to be an electrical issues and turns out I'd wired up the stator wrong :/. Few bits left to sort, bilge, upholstery for the front, screen, stainless surround on the console etc. Off for a week on the south coast of Cornwall this weekend so hoping ive fixed all the gremlins!
__________________
|
|
|
|
|
25 August 2016, 14:00
|
#66
|
|
Member
Country: UK - Wales
Town: N Wales Chester
Boat name: Mr Smith
Make: Humber
Length: 6m +
Join Date: Feb 2009
Posts: 5,238
|
Looks great.
Jockeys look v wide/square, almost like seats
__________________
|
|
|
|
|
25 August 2016, 14:31
|
#67
|
|
Member
Country: UK - England
Town: Sheffield
Boat name: Uncle Ray
Make: Osprey
Length: 6m +
Engine: 150hp
Join Date: Nov 2014
Posts: 241
|
Quote:
Originally Posted by HUMBER P4VWL
Looks great.
Jockeys look v wide/square, almost like seats
|
Cheers, they're not too bad, they taper towards the front so you can still stand over them when needed. Wouldnt have minded them being more rounder but made them myself and it was a first attempt.
__________________
|
|
|
|
|
25 August 2016, 15:37
|
#68
|
|
Member
Country: UK - England
Town: Bromsgrove
Boat name: Kick-Ass !
Make: PAC/Artic 22
Length: 6m +
Engine: 250hp Yamaha
Join Date: Nov 2003
Posts: 3,572
|
Needs shiny engine cowling does that there Osprey 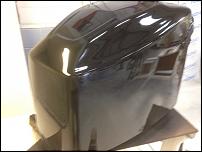 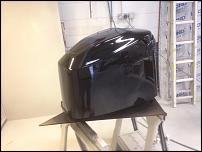
__________________
MY BIGGEST WORRY IS THAT MY WIFE(WHEN I"M DEAD)WILL SELL MY TOY'S FOR WHAT I SAID I PAID FOR THEM.
|
|
|
|
|
25 August 2016, 21:21
|
#69
|
|
Member
Country: UK - England
Town: Sheffield
Boat name: Uncle Ray
Make: Osprey
Length: 6m +
Engine: 150hp
Join Date: Nov 2014
Posts: 241
|
Quote:
Originally Posted by nugent
|
Sent you an email last week Ed 
__________________
|
|
|
|
|
08 April 2018, 10:56
|
#70
|
|
Member
Country: UK - England
Town: Sheffield
Boat name: Uncle Ray
Make: Osprey
Length: 6m +
Engine: 150hp
Join Date: Nov 2014
Posts: 241
|
Longtime since I've updated this, but lots of changes over the last year tweaking things. Thought I'd get the thread updated with some changes. Decided at the BH weekend to update the deck layout. I've wanted to install some more seating for a long time but.it needed to be removable for when we're camping and need the deck space. Did some drawings and mocked this fiberglass frame up. The plan is to fully laminate the ply inside and out. The lid is folding and big enough to house 4 Jerry cans which we normally end up needing on longer trips. Recesed plates will be secured into the deck with captive blind collars to secure. For the top I was going to have a fully upholstered rear bench, funds are meant to be in saving mode atm so I've compromised with some eBay folding rear seats for now, if they look awful I'll swap them out later in the season. Progress pics to follow!
__________________
|
|
|
|
|
08 April 2018, 11:31
|
#71
|
|
Member
Country: UK - England
Town: Sheffield
Boat name: Uncle Ray
Make: Osprey
Length: 6m +
Engine: 150hp
Join Date: Nov 2014
Posts: 241
|
__________________
|
|
|
|
|
08 April 2018, 11:39
|
#72
|
|
Member
Country: UK - England
Town: Sheffield
Boat name: Uncle Ray
Make: Osprey
Length: 6m +
Engine: 150hp
Join Date: Nov 2014
Posts: 241
|
__________________
|
|
|
|
|
08 April 2018, 19:55
|
#73
|
|
Member
Country: UK - Channel Islands
Town: Jersey
Boat name: Jazcabel
Make: Ballistic
Length: 7m +
Engine: Petrol 150
Join Date: May 2017
Posts: 354
|
Quote:
Originally Posted by tom_20000
Tank wouldnt fit under the new side by side console so i decided it should come out. That was terrifying and a nightmare all in one......
Cut around the tank after flushing it with water expecting it to pop out, no such luck.
Next approach was a bit of brute force, didn't budge.
Decided to hook the lifting blocks through the tank and yank the thing clear.....it just lifted the whole boat 
Lots more cutting and i now have half a sunken tank and some rather springy deck.
I plan on removing the remainder, glassing in some supports and then fitting a plastic tank from JayMetal to go under the double console. Only thing is i cant get bigger than 62l under the console which i don't think will last very long with the engine......may need to rethink this...
Anyhow lots of sanding, aching hands and grinding discs later, all the gel is almost keyed and sanded back, lips removed from around the old console. IF anyones got any tips on keying the black deck i'm all ears, looks like its had some kind of coating with sand in it, and it was eating 50grit sanding discs in seconds. |
My ballistic was the same. In the end I had to use a hot air gun and scraper. Took me a week
__________________
|
|
|
|
|
10 April 2018, 10:03
|
#74
|
|
Member
Country: UK - England
Town: Sheffield
Boat name: Uncle Ray
Make: Osprey
Length: 6m +
Engine: 150hp
Join Date: Nov 2014
Posts: 241
|
Quote:
Originally Posted by Chanchan168
My ballistic was the same. In the end I had to use a hot air gun and scraper. Took me a week
|
I was having flashbacks last weekend prepping this bench!
__________________
|
|
|
|
|
10 April 2018, 21:30
|
#75
|
|
Member
Country: UK - Channel Islands
Town: Jersey
Boat name: Jazcabel
Make: Ballistic
Length: 7m +
Engine: Petrol 150
Join Date: May 2017
Posts: 354
|
Quote:
Originally Posted by tom_20000
I was having flashbacks last weekend prepping this bench!
|
Probably the same kind of stuff. It was breaking me trying to get it flat. When I heated it and scraped it, it ended looking like blue glass beads. It was a nightmare.
Thank god its all gone
__________________
|
|
|
|
|
25 April 2018, 00:13
|
#76
|
|
Member
Country: UK - England
Town: Sheffield
Boat name: Uncle Ray
Make: Osprey
Length: 6m +
Engine: 150hp
Join Date: Nov 2014
Posts: 241
|
Few weekends working on this now, glad to be getting into the final stages, for the base at least.
Ply was laminated, thinned resin first building up until it stopped soaking in. 2 layers of glass inside and out.
Only the front will be visible so I've taken less care on the joins on the other pannels
All the 90 angles were sanded or filleted to TRY and eliminate air pockets in the layup.
__________________
|
|
|
|
|
25 April 2018, 00:21
|
#77
|
|
Member
Country: UK - England
Town: Sheffield
Boat name: Uncle Ray
Make: Osprey
Length: 6m +
Engine: 150hp
Join Date: Nov 2014
Posts: 241
|
All layup now completed and fully sealed, air pockets removed, tissue glass over the top and final resin coats
Finishing with flow coat in ral2004 on the outside and a grey inside.
Not used flow coat before, have to say it didn't "flow" quite as much as expected. Suppose I should have thinned it slightly. Fortunately again just the from on show so I'll be getting the sander and polisher out to flat it off and buff up the finish.
Finally tried some vinyl dye on the seats, the white patches aren't in keeping with the rest of the boat and can't afford to pay for full upholstery right now. These were only 145quid for 3, Vs c.700 for a custom bench and backrest. Quite impressed with the finish.
Wondering if I should still do the "lid" of the unit orange or maybe black for constrast to the seat edges. Will have a think.
Will post some more once the finish is sorted. Test fit next and to sink some nuts and plates into the deck to make it all removable.
__________________
|
|
|
|
|
25 April 2018, 11:28
|
#78
|
|
Member
Country: UK - England
Town: Sheffield
Boat name: Uncle Ray
Make: Osprey
Length: 6m +
Engine: 150hp
Join Date: Nov 2014
Posts: 241
|
Anyone know how long to leave the flowcoat before sanding and buffing it out?
__________________
|
|
|
|
|
30 May 2018, 21:32
|
#79
|
|
Member
Country: UK - England
Town: Sheffield
Boat name: Uncle Ray
Make: Osprey
Length: 6m +
Engine: 150hp
Join Date: Nov 2014
Posts: 241
|
Been busy with other things recently but after flatting back the gel it broke through in several places. I should have probably done a few coats of gelcoat before flowcoating but nevermind. Had some paint left from the hull so flatted it back and got the spray gun out.
Top and sea mounts next
__________________
|
|
|
|
|
02 February 2019, 17:13
|
#80
|
|
Member
Country: UK - England
Town: Surrey
Boat name: ocean pro 6.3
Make: Humber
Length: 6m +
Engine: 140hp suzuki
Join Date: Feb 2004
Posts: 824
|
Wondering how this one turned out, amazing work!
__________________
|
|
|
|
|
|
 Posting Rules
|
You may not post new threads
You may not post replies
You may not post attachments
You may not edit your posts
HTML code is Off
|
|
|
|
 Recent Discussions
 |
|
|
|
|
|
|
|
|
|
|
|
|
|
|
|
|
|
|
|
|
|
|
|
|
|
|
|
|
|
|
|
|
|