|
 18 May 2012, 19:58
|
#1
|
|
Member
Country: UK - Wales
Town: St Davids
Boat name: Mellifera
Make: Avon
Length: 4m +
Engine: Outboard
Join Date: May 2010
Posts: 189
|
Crack of doom!
After finally getting my hands on a searider I have been chuffed to bits and have been beavering away for the last two weeks to get it on the water and on my mooring. I have bought Ollyit's project Searider
http://www.rib.net/forum/f8/mr-sr4-p...ate-45217.html
And have tried to carry on the great work that olly has done. I have got plans to do a complete restoration over the winter but i am far too impatient I want to use it this season so since i have done the bare minimum to get the boat in the water:
1/ Flowcoated the transom x2
2/ Mounted the engine and console with nice new shiny stainless bolts
3/ Fitted an elephants trunk
4/ Glued all the bits of loose tube down
I took her out to sea last week and was blown away how different it was from my supersport  but I hadn't quite managed to seal the elephants trunk so it came back out and got another dose of sikaflex!
Launched again last night night and had solved the the elephant trunk leak so took it out for a quick spin, and when I came back in to the harbour noticed water was flooding onto the deck 
A 60cm crack has open up between the deck and the sloping part of the hull. What is the best way to fix it?
What I roughly thought is to sand it back as far as I can, then fill in the gap with gelcoat and run one or two layers of cloth over the seam? Does that sound like it will be strong enough? I though about 20cm either side of the seam as an overlap?
Any guidance and tips would be great as I really want to fix this myself but I am totally new to boat repairs...
__________________
|

|

|
|
18 May 2012, 20:13
|
#2
|
|
Member
Country: UK - England
Town: Royal Wootton Bassett
Length: 8m +
Engine: 250
Join Date: Jul 2008
Posts: 8,041
|
First impression is that the joint between the new deck and the hull has failed, so as a guess and without seeing it you will need to remove the loose material, clean the area and re-fibreglasss and gel/flow coat.
Secondly if the hull is still open for flooding I would close it.
But speak to Olly first as he is a good guy and should be able to help 
__________________
|
|
|
|
|
18 May 2012, 20:53
|
#3
|
|
Member
Country: UK - Wales
Town: St Davids
Boat name: Mellifera
Make: Avon
Length: 4m +
Engine: Outboard
Join Date: May 2010
Posts: 189
|
Thanks Whisper, I have been drooling over your build thread and hope my finished project gets to look half as good as yours did. I spoke to Olly earlier and he suggested i posted up here and see what the general consensus is.
I don't really want to block up the hull as as the boat will be on a mooring and I am sure water will find some way in then i'll be carting around gallons of extra sea But if that is going to be best option then i can re-think that part.
__________________
|
|
|
|
|
18 May 2012, 21:41
|
#4
|
|
Member
Country: UK - England
Town: Up Norf
Make: Avon SR4,Tremlett 23
Length: 4m +
Engine: Yam 55, Volvo 200
Join Date: Apr 2007
Posts: 5,217
|
Same as Whisper, looks like where the deck is glassed down its lifted.
Do you know if someone has replaced the deck at all?
Mine used to live on a mooring with the hull open, I used to get mud and bits of twig and alsorts coming out when I used it.
I blocked mine off in the end but sold it before I got chance to see what it was like.
Done properly it will be fine.
__________________
|
|
|
|
|
18 May 2012, 22:59
|
#5
|
|
Member
Country: Germany
Town: Düsseldorf
Boat name: Ribbi
Make: Ribcraft
Length: 4m +
Engine: Suzuki Dt 55
Join Date: Apr 2011
Posts: 30
|
If you're glassing it yet- what about installing new transom knees in Glassfiber( and over the damage) instead of the typical sst transom fittings of the SR ? You'll have two things done then- repairing und preventing same happens again.
Greetz
Eric
__________________
|
|
|
|
|
19 May 2012, 04:23
|
#6
|
|
Member
Country: UK - England
Town: Up Norf
Make: Avon SR4,Tremlett 23
Length: 4m +
Engine: Yam 55, Volvo 200
Join Date: Apr 2007
Posts: 5,217
|
Quote:
Originally Posted by ragbar

If you're glassing it yet- what about installing new transom knees in Glassfiber( and over the damage) instead of the typical sst transom fittings of the SR ? You'll have two things done then- repairing und preventing same happens again.
Greetz
Eric
|
You'd have to lift the deck and have the knees going down to the hull otherwise your going to have a join in them creating a weak point.
__________________
|
|
|
|
|
19 May 2012, 08:13
|
#7
|
|
Member
Country: France
Town: Côte d'Azur
Boat name: Beaver Patrol
Make: Avon Searider SR4
Length: 4m +
Join Date: Jan 2004
Posts: 5,934
|
I think the trouble here is that Olly might not have used enough fibreglass to bond the new deck in, hence your crack. When I did a 4m Searider deck, I bonded the new deck in from underneath as well as on top which made it a lot more solid.
The good news is that he didn't remove ALL of the old deck material; the area around the bolt in the deck which the the transom knee attaches to is original material. Providing there wasn't any rotten material around here (which I presume there wasn't hence he left it in situ) then that transom knee is going to be pretty solid, despite the cracking around it.
When I had the deck up on the one I was working on I was amazed at how flimsy the actual hull seemed; there was was quite a lot of flex with no deck to stiffen the whole thing up. That's probably why this crack has appeared. I'd be temped to seriously beef up the fibreglass all the way around the edge of the deck where it meets the hull. Make sure you sand/grind back the top of the flowcoat in order to get decent adhesion.
As an extra measure, you could also drill all the way through the deck and hull, and replace the existing knee mounting bolts with bolts that go all the way through (with some big washers and lots of sikaflex) - that would eliminate any worries about how solid or otherwise that area currently is.
__________________
|
|
|
|
|
19 May 2012, 12:34
|
#8
|
|
Member
Country: UK - Wales
Length: no boat
Join Date: Jan 2012
Posts: 1,012
|
It looks like the ss pole attatched to your deck has caused a lifting action, forcing the deck in that area to lift, I would say your idea of overlapping by 20cm is good and would help to stiffen that erea well, although seeing as your eager to get back out I think that could be halfed to 10 cm either side of the crack, and as mentioned in time maybe worth doing all round the deck joining hull erea. This is definatly a job you could do yourself, just don't ad to much hardener when making your mix, about 3% hardener/catalist this time of year should do fine, mixed with about half a pint of resin should give you about ten min working time. So after preping the area with rough sand paper, quickly apply resin at least 10cm either side of crack, then apply your first layer of mat, press the mat down with a cheap brush, then apply a good coat of resin, making sure there's no air bubbles, after saturating the first layer then place another pre-cut section over, pressing that second layer to soak the previous coat, then more resin over that, with one more layer of mat and a final coat of resin should do the job,
All the best with that, she'll last for years.
__________________
|
|
|
|
|
19 May 2012, 18:33
|
#9
|
|
Member
Country: UK - England
Town: Dartmouth
Length: 6m +
Join Date: Feb 2003
Posts: 1,220
|
I'm sorry but that isn't going to cut it. The picture of the crack clearly shows that the area where the deck has been laminated to has not been prepared. You can see the original Avon stippled flowcoat underneath where the new deck laminate has been put down and then failed. A proper bond would only have been achieved with grinding this off back to the laminate with 36gr. and roughing it up with a bit of sandpaper and wetting out a bit of Chop strand isn't going to work. 
|
|
|
|
|
19 May 2012, 19:42
|
#10
|
|
Member
Country: UK - Wales
Town: St Davids
Boat name: Mellifera
Make: Avon
Length: 4m +
Engine: Outboard
Join Date: May 2010
Posts: 189
|
Thanks everyone for input, it is much appreciated. I have been tied up today but did manage to give the area a good sanding to have a better look. I have taken the deck side down past the flowcoat and broken away anything that i could with a big screwdriver! It looks like the bottom side of the crack is the lap where the deck joins the hull. After i took the flowcoat off the hull side of the crack the original orange has started to show through so I think Ribraff is right, the new deck hasn't sheared away or failed but pulled away from the old material as it hasn't bonded. If I were to carry on sanding this area would that be good enough to get a good bond?
As Tim M mentions the hulls must flex to some degree in operation, so would adding thick rubber washers on either end of the transom supports help to dampen any flex and maybe help?
__________________
|
|
|
|
|
19 May 2012, 19:57
|
#11
|
|
Member
Country: UK - England
Town: Dartmouth
Length: 6m +
Join Date: Feb 2003
Posts: 1,220
|
The non-commercial Seariders were not laid up very heavily, the non-flat section in the picture will be flexing a lot, take a look on the outside of the hull at the point where the deck meets the hull, the chances are there'll be stress cracks in this area.
It is going to need grinding back and redoing to prevent this happening again.
Sorry 
|
|
|
|
|
19 May 2012, 20:10
|
#12
|
|
Member
Country: UK - England
Town: PORTSMOUTH
Make: Avon 5.4, Avon 3.4,
Length: 5m +
Engine: Yamaha 90, Merc 30
Join Date: Sep 2003
Posts: 1,976
|
just catching up on this thread, spoke to simon about this yesterday needless to say Im feeling really bad about it all - I seriously believe its to do will the transom knees not fitting the floor and transom perfectly hence sending the force direct to deck and creating this crack just in front it, simon still happy to send up a load of fibreglass matting if you pm your address, I want to help put this right, can we have more pics of the transom and how the supports attached to transom, I seriously suspect to much push/pull on either deck or transom when tightening up transom leg bolts -
__________________
|
|
|
|
|
19 May 2012, 20:20
|
#13
|
|
Member
Country: UK - England
Town: Up Norf
Make: Avon SR4,Tremlett 23
Length: 4m +
Engine: Yam 55, Volvo 200
Join Date: Apr 2007
Posts: 5,217
|
Like Ed said you'd be best off grinding it back and doing it properly, I do both sides whilst your on with it.
Is there any stress cracks or signs of movement on the transom?
__________________
|
|
|
|
|
19 May 2012, 23:29
|
#14
|
|
Member
Country: Germany
Town: Düsseldorf
Boat name: Ribbi
Make: Ribcraft
Length: 4m +
Engine: Suzuki Dt 55
Join Date: Apr 2011
Posts: 30
|
Quote:
Originally Posted by chewy
You'd have to lift the deck and have the knees going down to the hull otherwise your going to have a join in them creating a weak point.
|
That' s right, I forgot the searider' s hull is not made the same way as my RC.
__________________
|
|
|
|
|
20 May 2012, 05:02
|
#15
|
|
Member
Country: UK - England
Town: Up Norf
Make: Avon SR4,Tremlett 23
Length: 4m +
Engine: Yam 55, Volvo 200
Join Date: Apr 2007
Posts: 5,217
|
Quote:
Originally Posted by ragbar
That' s right, I forgot the searider' s hull is not made the same way as my RC.
|
How are the knees on the RC done?
__________________
|
|
|
|
|
20 May 2012, 06:43
|
#16
|
|
Member
Country: UK - Wales
Town: St Davids
Boat name: Mellifera
Make: Avon
Length: 4m +
Engine: Outboard
Join Date: May 2010
Posts: 189
|
Grinding eek!!! Sounds pretty scary.
I will take some pictures of the supports and where they meet the hull and transom today and put them up.
Looking at the hull and transom though I can't see any cracks or fractures, only the one on the deck. The transom that Olly put in is solid as a rock (thumbs)
__________________
|
|
|
|
|
20 May 2012, 07:16
|
#17
|
|
Member
Country: UK - Wales
Town: N Wales Chester
Boat name: Mr Smith
Make: Humber
Length: 6m +
Join Date: Feb 2009
Posts: 5,238
|
Quote:
|
Originally Posted by SimonStDavids
Thanks Whisper, I have been drooling over your build thread and hope my finished project gets to look half as good as yours did. I spoke to Olly earlier and he suggested i posted up here and see what the general consensus is.
I don't really want to block up the hull as as the boat will be on a mooring and I am sure water will find some way in then i'll be carting around gallons of extra sea But if that is going to be best option then i can re-think that part. |
If you're on a swing mooring, 100% close the hole!!!!
Voice of experience. SRs transoms are notoriously low. Sealing it will give you a good inch or so extra freeboard.
When the wind is against the tide your boat will at some point swing stern to waves. This will mean water piles in. You need an auto bilge!!!
Even with one, if the battery is at the rear on deck, rather than in the console, it can get wrecked by a big wave, it shorts and you then have one messy boat and water to the toobs on your return. put your battery in the console, not on deck in a box. Again, sorry voice of experience and three batteries later.
To ensure its sealed, glass it up and fit a bung in it. As you infer, the removable kits leak eventually.
__________________
|
|
|
|
|
20 May 2012, 11:13
|
#18
|
|
Member
Country: UK - Wales
Town: St Davids
Boat name: Mellifera
Make: Avon
Length: 4m +
Engine: Outboard
Join Date: May 2010
Posts: 189
|
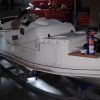
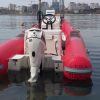
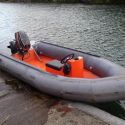
Ok here are the shots of how the supports fix to the transom. The there are three penny washers.
One on the outside of the transom, one on the inside between the transom and the support and the last on the outside of the support.
On the deck it is a similar arrangement but instead of a second penny washer there is a square washer that is about 5 or 6mm thick between the deck and the support.
__________________
|
|
|
|
|
 Posting Rules
|
You may not post new threads
You may not post replies
You may not post attachments
You may not edit your posts
HTML code is Off
|
|
|
|
 Recent Discussions
 |
|
|
|
|
|
|
|
|
|
|
|
|
|
|
|
|
|
|
|
|
|
|
|
|
|
|
|
|
|
|
|
|
|


 Mellifera