|
 29 May 2016, 02:39
|
#1
|
|
Member
Country: Canada
Town: BC
Make: Walker Bay
Length: 6m +
Join Date: May 2016
Posts: 9
|
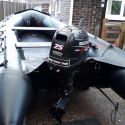
before and after with my Walker bay - assistance with final stain removal
__________________
|

|

|
|
29 May 2016, 06:41
|
#2
|
|
Member
Country: UK - England
Length: 3m +
Join Date: Sep 2008
Posts: 2,762
|
Wow. Thats a fair improvement.
Without wanting to add to your list of chemicals you are now concocting - Fairy Power Spray and Oxalic Acid (separately) are often mentioned round here.
Beware! Normal Bleach + Hydrogen Peroxide... This video shows the reaction between "Normal" bleach and H2O2 - you'd want that outside and away from sourced of combustion. The oxygen is supposed to then react with the 'dirt' the same as it should with oxyBleach.
OxyBleaches are chemically different to normal bleach and as far as I know convert to HydrogenPeroxides in water? Does adding more H2O2 actually just work like mixing it stronger? I'd want to check there is no "normal" bleach component there too (or anything else that might react).
At some point you are going to remove more plasticiser etc than dirt and will shorten the life of the fabric rather than extend it...
__________________
|
|
|
|
|
29 May 2016, 09:57
|
#3
|
|
RIBnet admin team
Country: UK - Scotland
Boat name: imposter
Make: FunYak
Length: 3m +
Engine: Tohatsu 30HP
MMSI: 235089819
Join Date: Sep 2005
Posts: 11,622
|
Surprised you've got as much off as you have. Do you know what caused the stain? I certainly wouldn't recommend mixing chemicals like Shiny's video, you need control - and small variations in concentration or other ingredients can make things go spectacularly...
If acetone had the most success you might want to "step" up the organic solvent scale... MEK, or "gun wash" (used for cleaning spray guns). ** BUT YOUR BOAT IS PVC SO MEK WILL MAKE IT STICKY/TACKY - put it on a cloth and wipe it on in a well ventilated area. **
I quite like your hair bleach idea, but I have never heard of anyone using it. As with all chemicals and tubes - test an out of sight, non structural area first. MAKE SURE ANY ACETONE/MEK DOESN'T GET MIXED WITH THE PEROXIDE - don't even store them together.*
Personally, given the improvement I think I'd live with it rather than waste time, money and effort that might actually weaken the boat though.
*for this reason buying large quantities of these might get you attention from law enforcement.
__________________
|
|
|
|
|
29 May 2016, 14:51
|
#4
|
|
Member
Country: Canada
Town: BC
Make: Walker Bay
Length: 6m +
Join Date: May 2016
Posts: 9
|
thanks- I did not mix chemicals with bleach that's not what I wrote
__________________
|
|
|
|
|
29 May 2016, 16:36
|
#5
|
|
Member
Country: Canada
Town: BC
Make: Walker Bay
Length: 6m +
Join Date: May 2016
Posts: 9
|
__________________
|
|
|
|
|
29 May 2016, 18:20
|
#6
|
|
RIBnet admin team
Country: UK - Scotland
Boat name: imposter
Make: FunYak
Length: 3m +
Engine: Tohatsu 30HP
MMSI: 235089819
Join Date: Sep 2005
Posts: 11,622
|
Quote:
|
thanks- I did not mix chemicals with bleach that's not what I wrote
|
I don't think anyone said you did.
Quote:
Originally Posted by Black Valkyrie

|
Mmm... the "science" on that page is somewhat weak. They don't add bromine they add "brominated compounds" to some plastics as fire inhibitors. I'm not sure if they add these to flexible PVC used in boats, it is common in the electronics industry - it seems unlikely as PVC is pretty fire resistant anyway. However the colour mechanism your link describes doesn't makes sense - it says "as you will recall bromine is a red/brown liquid". These compounds aren't bromine and are typically colourless. Even if they degraded to pure bromine, it is volatile and on a warm day would all disappear.
I think if the colour is "ageing" rather than staining it is much more likely to be the oxidation of bisphenol-A plasticizer that was (and often still is) used to make PVC flexible. I wouldn't expect oxalic acid to work particularly well here (its great at removing rust and other metal ion surface stains, but less effective when the colour is internal to the plastic). Solvents will remove it - but will leave the fabric slightly more brittle/rigid (how bad is hard to predict). Oxidising agents (like peroxide, particularly if UV activated) will eventually turn the coloured Bisphenol-A oxidation products into colourless compounds, but could also turn any remaining Bisphenol-A into the coloured (quinones) form. I think you'll just need to try it (or live with the colour) but in any case its probably a sign the tubes are on their way out. UV protectant and storage will be important to maximise what is left...
__________________
|
|
|
|
|
29 May 2016, 18:24
|
#7
|
|
Member
Country: Canada
Town: BC
Make: Walker Bay
Length: 6m +
Join Date: May 2016
Posts: 9
|
I'm going to give it a shot. FYI the orange / red does appear to match bromine regardless it's all worth a try since it's almost done now
__________________
|
|
|
|
|
31 May 2016, 18:07
|
#8
|
|
Member
Country: Canada
Town: BC
Make: Walker Bay
Length: 6m +
Join Date: May 2016
Posts: 9
|
The very helpful article....
De-Yellowing plastic - the stain isn't permanent after all - Creators Corner - Ex Isle Forums
Quote:
We've all had plastics that have yellowed and won't wash clean. Sometimes it's just a pale gray mouse or keyboard slowly going beige; sometimes it looks like a severe "nicotine staining" and we assume there must be a smoker in that household (I've known nonsmokers to overestimate the satanic evils of smoking, since smokers rarely "lit up" in their homes, yet the stains were all over the house, and quite dark.) A white plastic chassis may turn such a dark brown in hot spots that you may be certain it must be burning, and may even discard it. The staining can often spell the difference between a treasured collector's item or conversation piece and worthless junk. It's not uncommon for perfectly functioning household items to be replaced because they are dingy and ugly: organizers with once-clear plastic drawers, lawn furniture, kitchen appliances... anything visitors might see.
Many of you may have suspected it wasn't environmental, but rather "aging". I've had items that yellowed while sealed in plastic inside never-opened factory original boxes, and identical plastics exposed to identical conditions may differ greatly in yellowing: Most of us have seen two-toned chassis where the top and bottom were dramatically different colors after as little as a year. Game consoles, computers and other electronics devices that get warm are particularly prone to this.
It turns out this yellowing is usually the result of bromine released from flame retardants added in the master batch to facilitate production and later molding. (Bromine, you will recall is a dark reddish brown liquid at room temperature) The loss of bromine doesn't necessarily mean that the plastic itself is deteriorated or unable to give decades of further performance, though a mental illusion often convinces us they feel brittle or rough.
It turns out to be relatively easy to remove these stains with common household materials. You may be surprised how "factory new" some items feel after deyellowing. More than once, I've been surprised, because I'd come to believe an item had been beige to start with, but the cleaning (and internal surfaces) reveal that it was originally white or gray.
ESSENTIAL CONCEPTS
I'm not going to get too deep into the chemistry (which actually dips into quantum mechanics), but I want to make it clear what we are *not* doing. Though the key chemicals are often used as bleaches and cleaners, the process is not bleaching the plastic or removing dirt. It's just mobilizing the bromine, which has migrated to the surface, and forms a stable complex with atmospheric oxygen. (Note that the bromine didn't stain the full thickness of plastic upon manufacture.)
The second key point is that ultraviolet light is CRITICAL to the process. The UV is what actually mobilizes the bromine -- just as heat and UV often contribute strongly to plastic yellowing, but mobilizing the bromine to the surface in the first place. If you use the solution alone, you may not get appreciable effect from soaking plastics for weeks in you basement. Since you only need a day or so of direct sun (or the equivalent in UV lamp or indirect shaded sun), you won't damage the plastic
Stronger is *not* necessarily better. We're really trying to *limit* the reaction, so ther eaction only reacts with the UV-activated bromine (the easy target) reacts, not the plastic. The plastic is much more resistant, but there's thousands or millions of times as much plastic as bromine present.
Daylight UV isn't a problems --these plastics are designed to stand up to sunlight for much more than a day-- but too-strong UV lamps, too much heat (the rate of the undesired side reactions doubles with every 10C rise in temperature), high peroxide concentrations, too much activator (creating too many free radicals), too long an exposure (after most of the bromine but gone) or letting the cleaner completely dry -- all of these may slightly overclean or even damage the surface. I'd suggest keeping the peroxide under 20% or more: 6% (20 volume) works fairly well (and you don't really need gloves) and even 12% is still pretty mild (and is unlikely to react dangerously with many of the incompatible substances on the MSDS warning). Then, if you see just a wee bit more stain that you want to knock off, try a brief UV session (maybe 30 minutes) at high peroxide concentration.
I originally encountered this idea in a blog entry by someone who restored *deeply* yellowed (actually brown) old game consoles and computers by soaking the cases in big plastic trays full of hydrogen peroxide (and a few other chemicals) on their back porch. I was impressed by the results, but it seemed expensive (and rather a hassle) to fill those big containers with chemicals, especially here in New England, where the weather might not cooperate. Who wants to bring big, heavy, sloshy trays of strong chemicals out of the rain, and store them inside the house?
However, the process seems to work equally well if you mix a smaller batch, add a thickener, and simply brush it on. If one activating chemical is lect out of the mixture, it can be stored for weeks, to be activated and brushed on as needed. The objects can be left out if it starts to rain, and rebrushed when the sun comes out. It's easier than painting.
THE RECIPE
500 ml (1 pt) Hydrogen Peroxide(H2O2) diluted to 6-12% (20-40 volumes)
While 3% (10-volume) drugstore peroxide can work, it may take many days of UV exposure. Further, since it is borderline to start with, it may not last very long: you may need a new batch each day. Finally, since hydrogen peroxide breaks down to oxygen and water, the stuff in your bathroom (or store) may be substantially less than the stated 3%. ("10 Volume" means that 1 volume of solution will release 10 volumes of oxygen gas. You could easily jury-rig a measurement test, using, say, a dab of manganese dioxide paste from inside a dead dry-cell or alkaline battery as a catalyst)
For quicker, and likely better, results, use a stronger hydrogen peroxide. I'm personally happy with 6-12%, but some go up to the strongest that is easily obtainable e.g. probably Prochem Urine Rescue, available at many custodial or carpet cleaning suppliers (~$20/gal) or pet supply retailers (Petco, Petsmart) for ~$30/gal. It's about 30-32% or "100 volume". Beauty supply shops (like Sally Beauty in the US/Mex/EUR/JAP) sell hair bleaching peroxide up to at least 40 volume (12%) for a few bucks a pint, but you should examine the ingredients. Avoid any with Terpene (which can eat plastic) and generally avoid organic compounds (crudely: anything whose name doesn't trace to ammonia or the periodic table) with one exception: Tetra Acetyl Ethylene Diamine (see below). If it comes premixed in the peroxide (vs. in a separate packet), your deyellowing solution won't last as long in storage.
To dilute peroxide: initial concentration * initial volume = final concentration * final volume
e.g. 30% * 1L = 6% * 5L, so add 4L water to 1L 30% peroxide solution to get 5L 6% peroxide
Though home use peroxides of over 6% should come with warnings enough, I feel obligated to say:
WARNING: Read the MSDS. Hydrogen peroxide is a strong oxidizer and corrosive to skin, eyes, lungs (if inhaled directly), clothing and wood products. It may react violently with some substances, including acids, bases, metals, metal salts, reducing agents, organic compounds, flammable substances. ONLY USE CLEAN GLASS OR PLASTIC CONTAINERS AND UTENSILS AND PROPER SAFETY GEAR (e.g. gloves and goggles). A dab of the black paste found inside a dead flashlight battery, dispersed in some water, will catalyze hydrogen peroxide to oxygen and water for disposal. Add it carefully/sparingly to avoid splatter/boilover of unreacted peroxide.
2.5-5cc (1/2-1 tsp) Oxy-Clean powder (activator)
This contains a small amount of Tetra Acetyl Ethylene Diamine (TAED) which acts as a catalyst for the hydrogen peroxide in our deyellowing solution. Oxy-clean also has perborates and perchlorates (which is what the TAED is *meant* to catalize) These may add a little something to the deyellowing process, but I never bothered to compare it with pure TAED.
Food Thickener (optional, only use for paste form)
I suggest food thickeners beause they are cheap, available, and shouldn't contain any incompatible contaminants that react with peroxide. I suggest making a roux, slurry or cooking the thickener to paste, as you would with food, before adding peroxide. NEVER heat anything containing hydrogen peroxide on your stove. Make a thick goo, cool, then mix it with the peroxide. I use a magnetic stirrer to avoid putting metal in contact with peroxide, but many report using hand or kitchen blenders to mix the peroxide paste, over months of experiments, so I guess steel, especially stainless, must be okay. I definitely wouldn't even think about an aluminum blade or pan.
Arrowroot, flour, cornstarch, potato starch, xanthan gum, CMC/carboxymethylcellulose, guar gum or food thickeners sold to help older people swallow all work, and are available in grocery or health food stores. I use Xanthan gum, because I bought a big bag for food experiments, but found it a bit slimy for my tastes. A few mil of glycerine really helps Xanthan thicken up.
Proper use
You can dilute the peroxide and mix with thickener weeks in advance. Always store peroxide and its mixtures in a cool dark place in a glass or plastic container, but not on a wood shelf or on paper liner. It may slowly decompose to water and oxygen, especially if the container isn't scrupulously clean. Don't cap it so tightly that it will burst from internal pressure if you forget it.
Set up a place to "sun" the plastic object all day. You can hang it from strongs over a plastic tray to expose all sides, or just lay it down yellow side up. If possible, arrange a loose transparent cover to prevent drying. Make sure pets, children, stupid friends, etc., can't get at it. The reaction will work, but more slowly, in a shaded location with good exposure to clear sky, or on a lightly cloudy day. You may prefer shade in hot climates in summer: the modest heat of the reaction added to the heat of direct summer sun could dry the paste or warp some plastic parts
You can set it up indoors with a UV lamp, but place the lamp at least 18" (50cm) from the tray, so the heat from the lamp doesn't add to the heat from the reaction.
Resist the temptation to deyellow intact electronics. I know some of you will do it anyway, once you've had some practice, but don't say I didn't warn you. (Trained mockers are standing by!) Instead, remove the chassis as much as possible, put sandwich bags over any remaining exposed metal, Remove any logos, stickers or decals (especially aluminum sheet decals or aluminum shielding paint inside some electronic devices, both of which can get quite eaten up and cause splotchiness) -- a heat gun or hair dryer will help you peel them off intact with a sharp razor blade. If you prefer, seal them in situwith wax, hot glue, or even tape (but tape isn't always reliable for this)
Just before use, dissolve the small amount of Oxy-clean in some water then mix that into your goo. Brush it liberally into the yellowed surfaces. You may choose to wrap the piece in clear plastic kitchen wrap to reduce evaporation: drying concentrates the ingredients and can cause splotchiness.
If you've done everything properly, the brushed-on paste should quickly foam a bit under the UV.
I'd try to check in on the progress every few hours, until you get a feel for the strength of you personal recipe. In my experience, a 6-12% peroxide mix should nearly or completely deyellow a chassis in 3-8 hours with no damage if the piece is left from dawn to dusk.
A TRIAL OF TOTAL IMPROVISATION
After a few tries, it becomes very easy. In fact, the reason I wrote this up was because I did a totally slap-dash job this morning that came out fine. I needed to de-yellow the diffuser (cover) of a large fluorescent lamp for a project, but we've only had maybe half a dozen fully sunny days in he last two months. As I was headed out the door, I remembered this would be one of those days, but I didn't have time to mix a batch, find a big enough tray, etc., so this is what I did:
Reasoning that the translucent diffuser would be fairly transparent to UV, and was also not nearly as badly yellowed as an opaque object of similar ugliness, I sprinkled a pinch of oxyclean in a large sheet of plastic wrap, placed the diffuser on top, then sprinkled another pinch of oxyclean. I then folded the saran wrap around the diffuser, put it in a shallow cardboard tray to keep the ends from unfolding, and carried it to the sunniest part of my deck, where I carefully opened one end, and poured in some ordinary 3% peroxide (probably much weaker -- it was old).
In spite of taking so many liberties, each of which weakened the deyellowing effect, the job was mostly done when I got home. Had I not been using old 3%, I would have rinsed it off, to avoid undesired non-UV peroxide reactions that might slowly make the plastic brittle, but since the "3%" was probably more like1-2% to start with, and is probably much less now, I just left it out for tomorrow, to do what it can with the morning sun, if I stagger home in the wee hours tonight.
|
How to Clean & Whiten Yellowed Plastics | RetroFixes
Almost done...


__________________
|
|
|
|
|
31 May 2016, 18:08
|
#9
|
|
Member
Country: Canada
Town: BC
Make: Walker Bay
Length: 6m +
Join Date: May 2016
Posts: 9
|
__________________
|
|
|
|
|
31 May 2016, 18:59
|
#10
|
|
RIBnet admin team
Country: UK - Scotland
Boat name: imposter
Make: FunYak
Length: 3m +
Engine: Tohatsu 30HP
MMSI: 235089819
Join Date: Sep 2005
Posts: 11,622
|
So was that Hair Bleaching gel/cream, then cover with clingfilm (I think you guys call it something like Seran Wrap), leave outside in bright sunlight (how long for?) and just wash it all off?
__________________
|
|
|
|
|
01 June 2016, 00:00
|
#11
|
|
Member
Country: Canada
Town: BC
Make: Walker Bay
Length: 6m +
Join Date: May 2016
Posts: 9
|
yes - it can't dry so has to be covered. left it on for about 6 hours. it removed the lighter pink and orange in about an hour. the worst stains took up to 6. still a few minor ones left but not a big deal. washed it off with water, then dish soap, then 303 to.protect it.
__________________
|
|
|
|
|
01 June 2016, 07:42
|
#12
|
|
Member
Country: UK - Scotland
Town: Glasgow
Length: no boat
Join Date: Jul 2008
Posts: 330
|
Irrespective of the chemical stew you used it looks fantastic. What a difference.

__________________
|
|
|
|
|
01 June 2016, 08:04
|
#13
|
|
Member
Country: UK - England
Town: Retford
Boat name: Spy-sea-one
Make: Excel 435
Length: 4m +
Engine: Suzuki Outboard/25/4
Join Date: Oct 2011
Posts: 7,454
|
i bought a honwave a couple of years ago for the grand kids it had been left out for three years and was well stained i used traffic film remover with success some spots were ingrained but by and large a good result but depends what the staining is i suppose.
cheers
__________________
|
|
|
|
|
01 June 2016, 09:58
|
#14
|
|
Member
Country: UK - England
Town: Cambridgeshire
Boat name: Nimrod II
Make: Aerotec 380
Length: 3m +
Engine: Yam 15 Tohatsu 9.8
Join Date: Nov 2007
Posts: 8,308
|
BV that's a great result for your efforts... I've made similar massive improvements with GRP boats but never an inflatable.
__________________
|
|
|
|
|
 Posting Rules
|
You may not post new threads
You may not post replies
You may not post attachments
You may not edit your posts
HTML code is Off
|
|
|
|
 Recent Discussions
 |
|
|
|
|
|
|
|
|
|
|
|
|
|
|
|
|
|
|
|
|
|
|
|
|
|
|
|
|
|
|
|
|
|


 spy-sea-one