|
|
 20 August 2015, 16:39
|
#1
|
|
RIBnet supporter
Country: UK - England
Town: Warwickshire
Boat name: Impulse
Make: Ribcraft
Length: 5m +
Engine: Suzuki 140
Join Date: Sep 2011
Posts: 1,020
|
AJ's SR4 refurb
I am sure many of you do not want to read another SR4 refurb but this will be the one and only boat refurb from me!
I have owned a Ribcraft 585 for four years which my wife and I enjoy all year round despite the trek to the coast from the Midlands. This boat was my first boat and as my knowledge of boating has grown I look back and realise how lucky I was to purchase a great boat in A1 condition. I will add I did a lot of research before spending my hard earned cash but there is nothing like experience and chatting with like minded folk where I have gained most of my knowledge and heard the horror stories of people less fortunate.
Not being much of a DIYer I have always taken the boat for replacement parts, enhancements and maintenance to the professionals. Hearing and reading about many peoples refurbs got me discussing with Mrs AJ about missing the learning curve of playing with smaller boats, never owning a two stroke engine and wanting a boat to refurb and practice on so in time and if my non DIY skills improved I would feel more confident about taking on this work myself.
So winding back to August 2014, I got married and for a wedding present Mrs AJ had been collaborating with MattH and PeterM asking them to find her a SR4. MattH found one and went to the IoW to check it out, in fact it was the same one he had sold just after one of the many AJ boating stag do’s at the end of 2012.
So they sneakily arranged to get me out of the house and MattH brought it up and they put it in the garage as a surprise (I knew there was a reason why I decided to marry Mrs AJ!).
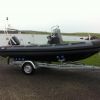
So here it is when I first got it after giving it a good wash and cleaning the tubes up. It is the SR4 deluxe version with the deck mouldings built in 1996 and had a Yam 40 2 stroke which was manual tilt.
The boat was in generally good condition and ready to use and I was well chuffed with my new surprise pressie!
So after staring at it for a couple of weeks, then going on honeymoon where I read through every SR4 rebuild thread on Ribnet for inspiration I came up with a game plan for it.
I hope you enjoy what follows and again I am caveating that I am useless at DIY and lack many of the tools which would have made this easier!!!
__________________
|

|

|
|
20 August 2015, 16:40
|
#2
|
|
RIBnet supporter
Country: UK - England
Town: Warwickshire
Boat name: Impulse
Make: Ribcraft
Length: 5m +
Engine: Suzuki 140
Join Date: Sep 2011
Posts: 1,020
|
The Hull wasn't bad considering the age it did have a number of dings and scratches as you would expect so I thought I would have a go at polishing a test patch. I bought some 2000 grit and starting gently wet and dry sanding. I soon realised I was being a bit soft and needed to go down to a courser grit so back to Halfords and got 1200. After 15 mins I then applied some polish and was impressed with the results
__________________
|
|
|
|
|
20 August 2015, 16:41
|
#3
|
|
RIBnet supporter
Country: UK - England
Town: Warwickshire
Boat name: Impulse
Make: Ribcraft
Length: 5m +
Engine: Suzuki 140
Join Date: Sep 2011
Posts: 1,020
|
So I decided I was going to do this properly and get this boat looking the best I could. It was the hight off summer 18th August 2014 so the next step was to strip it so I could flip it over and start the refurb.
__________________
|
|
|
|
|
20 August 2015, 16:43
|
#4
|
|
RIBnet supporter
Country: UK - England
Town: Warwickshire
Boat name: Impulse
Make: Ribcraft
Length: 5m +
Engine: Suzuki 140
Join Date: Sep 2011
Posts: 1,020
|
Weather was still nice so I decided to put it in the front garden
__________________
|
|
|
|
|
20 August 2015, 16:45
|
#5
|
|
RIBnet supporter
Country: UK - England
Town: Warwickshire
Boat name: Impulse
Make: Ribcraft
Length: 5m +
Engine: Suzuki 140
Join Date: Sep 2011
Posts: 1,020
|
So after sanding with 1200 grit and quickly realised that this would take ages I went back to halyards and I bought 800 and the sanding started.
__________________
|
|
|
|
|
20 August 2015, 16:46
|
#6
|
|
RIBnet supporter
Country: UK - England
Town: Warwickshire
Boat name: Impulse
Make: Ribcraft
Length: 5m +
Engine: Suzuki 140
Join Date: Sep 2011
Posts: 1,020
|
I read it was hard work sanding by hand but didn't realise quite realise how hard work it was and slow progress. I decided to do one section at a time followed by the cutting compound so I saw the results from my hard labour and it was a great way to stay positive through many evenings of sanding.
__________________
|
|
|
|
|
20 August 2015, 16:47
|
#7
|
|
RIBnet supporter
Country: UK - England
Town: Warwickshire
Boat name: Impulse
Make: Ribcraft
Length: 5m +
Engine: Suzuki 140
Join Date: Sep 2011
Posts: 1,020
|
Using a rubber sanding block didn't work for me as it was only hitting the high spots as can be seen in the second right section so I did it all with sand paper and fingers!
__________________
|
|
|
|
|
20 August 2015, 16:49
|
#8
|
|
RIBnet supporter
Country: UK - England
Town: Warwickshire
Boat name: Impulse
Make: Ribcraft
Length: 5m +
Engine: Suzuki 140
Join Date: Sep 2011
Posts: 1,020
|
Now I am making progress half of the hull has been sanded and polished.
Summer had disappeared the evenings had started to loose their light so the boat had to go inside.
__________________
|
|
|
|
|
20 August 2015, 16:51
|
#9
|
|
RIBnet supporter
Country: UK - England
Town: Warwickshire
Boat name: Impulse
Make: Ribcraft
Length: 5m +
Engine: Suzuki 140
Join Date: Sep 2011
Posts: 1,020
|
In the artificial light you can really see the difference the sanding makes to get back to that like new look GRP.
__________________
|
|
|
|
|
20 August 2015, 16:51
|
#10
|
|
RIBnet supporter
Country: UK - England
Town: Warwickshire
Boat name: Impulse
Make: Ribcraft
Length: 5m +
Engine: Suzuki 140
Join Date: Sep 2011
Posts: 1,020
|
So the hull has now been sanded and cutting compound applied.
__________________
|
|
|
|
|
20 August 2015, 16:53
|
#11
|
|
RIBnet supporter
Country: UK - England
Town: Warwickshire
Boat name: Impulse
Make: Ribcraft
Length: 5m +
Engine: Suzuki 140
Join Date: Sep 2011
Posts: 1,020
|
Now to try my luck at filling the hull scratches. I ordered the Gel coat and all the bits I needed from East Coast Fibreglass. I cannot recommend them enough and were happy and patient to answer all my stupid newbie questions.
Over two evenings I masked around all the scratches and nicks i wanted to repair using Duck tape and proceeded to fill them with gelcoat. I used a scraper to level and push off the excess Gelcoat and with the depth of the Duck tape it left it just proud of the surface so once it had dried and shrinks a little I could then sand it flush to the hull.
__________________
|
|
|
|
|
20 August 2015, 16:54
|
#12
|
|
RIBnet supporter
Country: UK - England
Town: Warwickshire
Boat name: Impulse
Make: Ribcraft
Length: 5m +
Engine: Suzuki 140
Join Date: Sep 2011
Posts: 1,020
|
When all of the gel coat work was done, I then polished the hull with 3M Finesse-IT II.
The next bit is controversial but I then applied 3M ultra performance paste wax - This stuff is brilliant I have used it on the Ribcraft and then on my car I have never had a wax last so long. Anyway here is the finished result.
__________________
|
|
|
|
|
20 August 2015, 16:55
|
#13
|
|
RIBnet supporter
Country: UK - England
Town: Warwickshire
Boat name: Impulse
Make: Ribcraft
Length: 5m +
Engine: Suzuki 140
Join Date: Sep 2011
Posts: 1,020
|
Back on the trailer ready for the next bit of work
__________________
|
|
|
|
|
20 August 2015, 16:56
|
#14
|
|
RIBnet supporter
Country: UK - England
Town: Warwickshire
Boat name: Impulse
Make: Ribcraft
Length: 5m +
Engine: Suzuki 140
Join Date: Sep 2011
Posts: 1,020
|
During the many hours/weeks of mindless sanding I was thinking that I didn't want a manual tilt engine I knew the Yam 40 2 stroke was a good mate for these boats but I was struggling to find one for sale. Then up popped on eBay a 2006 40HP Mercury 2 stroke with Power trim. I did a bit of research and these engines are really light weighing in at 73Kgs. So I bought it and MattH cut short his surprise birthday weekend for his Mrs to help me check it out and remove the engine of the sellers current boat.
The engine was in good condition however the tarp that the seller had over the boat and engine had managed to imprint into the cowling and the decals were scratched
__________________
|
|
|
|
|
20 August 2015, 16:58
|
#15
|
|
RIBnet supporter
Country: UK - England
Town: Warwickshire
Boat name: Impulse
Make: Ribcraft
Length: 5m +
Engine: Suzuki 140
Join Date: Sep 2011
Posts: 1,020
|
I contacted Edd (Nugent on here) about the Cowling and he kindly offered to sort it out and put the decals on. Edd did a great job of respraying the cowling
With decals purchased from the U.S.
__________________
|
|
|
|
|
20 August 2015, 16:59
|
#16
|
|
RIBnet supporter
Country: UK - England
Town: Warwickshire
Boat name: Impulse
Make: Ribcraft
Length: 5m +
Engine: Suzuki 140
Join Date: Sep 2011
Posts: 1,020
|
Next job was the ply wood on the back on the transom, it had seen better days and thankfully I have a friend who is a carpenter who sorted me out with a new piece of marine ply and made an exact copy
I bought some West systems epoxy resin which is really nice to work with and added three coats to the marine ply for protection
__________________
|
|
|
|
|
20 August 2015, 17:00
|
#17
|
|
RIBnet supporter
Country: UK - England
Town: Warwickshire
Boat name: Impulse
Make: Ribcraft
Length: 5m +
Engine: Suzuki 140
Join Date: Sep 2011
Posts: 1,020
|
Back to GRP work again this time focussing on the transom
The transom had two sets of holes one for the Yam 40 that I had removed which wasnt PTT. The other holes had been blocked off well from a previous engine. Thankfully the new Mercury 40 matched the original set of holes so it was just a case of drilling out the wooden dowels used to fill them and then blocking up the old Yam holes.
__________________
|
|
|
|
|
20 August 2015, 17:01
|
#18
|
|
RIBnet supporter
Country: UK - England
Town: Warwickshire
Boat name: Impulse
Make: Ribcraft
Length: 5m +
Engine: Suzuki 140
Join Date: Sep 2011
Posts: 1,020
|
Back to sanding again to prepare the transom this was a another milestone the exterior of the boat was finally done I HATE SANDING!!!
__________________
|
|
|
|
|
20 August 2015, 17:03
|
#19
|
|
RIBnet supporter
Country: UK - England
Town: Warwickshire
Boat name: Impulse
Make: Ribcraft
Length: 5m +
Engine: Suzuki 140
Join Date: Sep 2011
Posts: 1,020
|
For a break from sanding, the old holes were filled with Sikaflex and I bought hard wood wooden dowels which I then grooved they were slightly larger than the holes and were coated in Sika and then hammered into the holes and allowed to go off.
__________________
|
|
|
|
|
20 August 2015, 17:04
|
#20
|
|
RIBnet supporter
Country: UK - England
Town: Warwickshire
Boat name: Impulse
Make: Ribcraft
Length: 5m +
Engine: Suzuki 140
Join Date: Sep 2011
Posts: 1,020
|
The dowels were just a few mm short so to allow a generous amount of gel coat to be added on each side.
__________________
|
|
|
|
|
|
 Posting Rules
|
You may not post new threads
You may not post replies
You may not post attachments
You may not edit your posts
HTML code is Off
|
|
|
|
 Recent Discussions
 |
|
|
|
|
|
|
|
|
|
|
|
|
|
|
|
|
|
|
|
|
|
|
|
|
|
|
|
|
|
|
|
|
|