|
 24 September 2017, 18:12
|
#1
|
|
Member
Country: France
Town: Faget Abbatial
Make: Zodiac
Length: 4m +
Engine: oars
Join Date: Sep 2017
Posts: 26
|
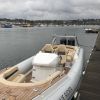
Zodiac 2250 Hypalon cone replacement
Hi, I have saved an old hypalon Zodiac 2250 from the 1970's from the dump. The rubber cone on the back of the port tube is dead. I have sourced new cones but does anyone have any experience replacing cones? Looks like a tricky job. I have no experience of repairing hypalon. Any tips?
Also does anyone have experience of the valves of that period which seem to fill the side tubes and the bow tube at the same time which you turn to "navigation" to lock them off. Maybe this is standard but I am new to sibs.
Thanks
__________________
|

|

|
|
24 September 2017, 18:16
|
#2
|
|
Member
Country: USA
Town: S. Carolina
Boat name: D560
Make: Avon
Length: 5m +
Engine: 2016 Merc 115hp CT
Join Date: Aug 2013
Posts: 1,277
|
Quote:
Originally Posted by Oilystairs

Hi, I have saved an old hypalon Zodiac 2250 from the 1970's from the dump. The rubber cone on the back of the port tube is dead. I have sourced new cones but does anyone have any experience replacing cones? Looks like a tricky job. I have no experience of repairing hypalon. Any tips?
Also does anyone have experience of the valves of that period which seem to fill the side tubes and the bow tube at the same time which you turn to "navigation" to lock them off. Maybe this is standard but I am new to sibs.
Thanks
|
The cone will take a professional to replace.
The valves though, you just need some zodiac z2846 inserts and z2847 caps.
For approximate adjustment of the intercommunciating valve cup, seat the nut, then back it off by two turns.
__________________
Richard
Gluing geek since 2007
Opinions and intepretations expressed are solely my own and do not express the views or opinions of my employer
|
|
|
|
|
24 September 2017, 19:02
|
#3
|
|
Member
Country: France
Town: Faget Abbatial
Make: Zodiac
Length: 4m +
Engine: oars
Join Date: Sep 2017
Posts: 26
|
Richard, thanks for the advice. For the valves, I have the old caps and inserts, should I replace them even if they seem ok? When you say seat the nut, do you mean tighten it up say finger tight (with a socket on an extension bar). Finally I greased the cup with some lithium grease to improve airtightness. Is that a good idea? Thanks
__________________
|
|
|
|
|
25 September 2017, 07:23
|
#4
|
|
Member
Country: UK - Scotland
Town: Aberdeenshire
Boat name: Sula
Make: Ribcraft 4.8m
Length: 4m +
Engine: Tohatsu 70hp + aux
MMSI: 235087213
Join Date: Jun 2007
Posts: 4,531
|
__________________
Is that with or without VAT?
|
|
|
|
|
25 September 2017, 17:56
|
#5
|
|
Member
Country: USA
Town: S. Carolina
Boat name: D560
Make: Avon
Length: 5m +
Engine: 2016 Merc 115hp CT
Join Date: Aug 2013
Posts: 1,277
|
Quote:
Originally Posted by Oilystairs
Richard, thanks for the advice. For the valves, I have the old caps and inserts, should I replace them even if they seem ok? When you say seat the nut, do you mean tighten it up say finger tight (with a socket on an extension bar). Finally I greased the cup with some lithium grease to improve airtightness. Is that a good idea? Thanks
|
Yes, greasing is recommended.
Also yes, tighten until the nut stops, then loosen by 2 turns.
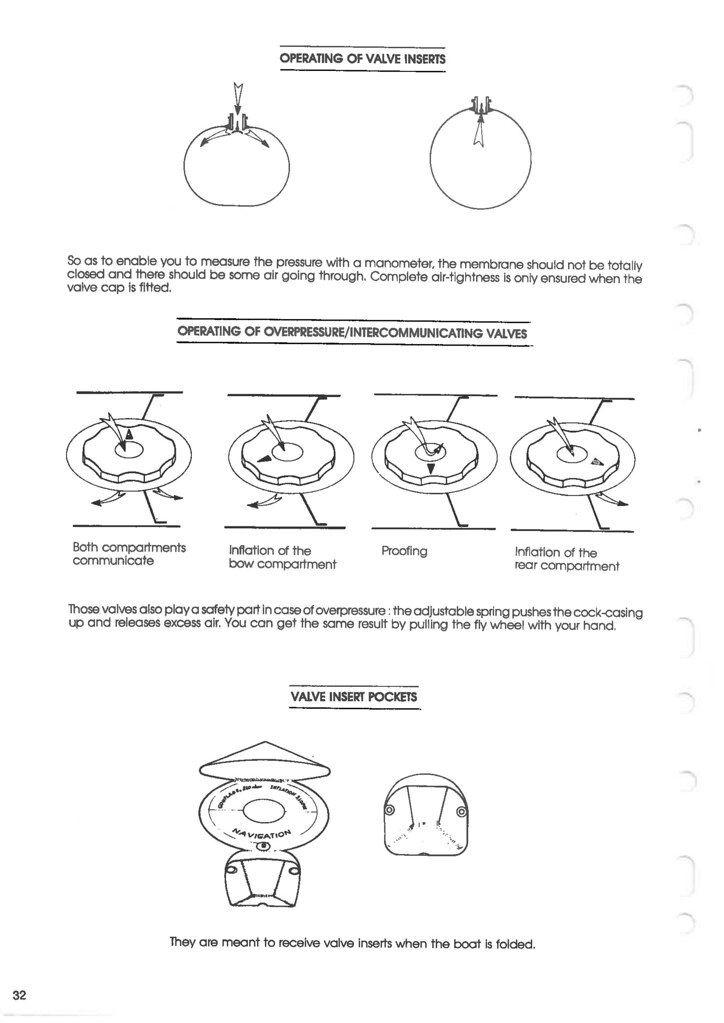
See below, documentation for servicing the intercommunicating valves you will find useful.
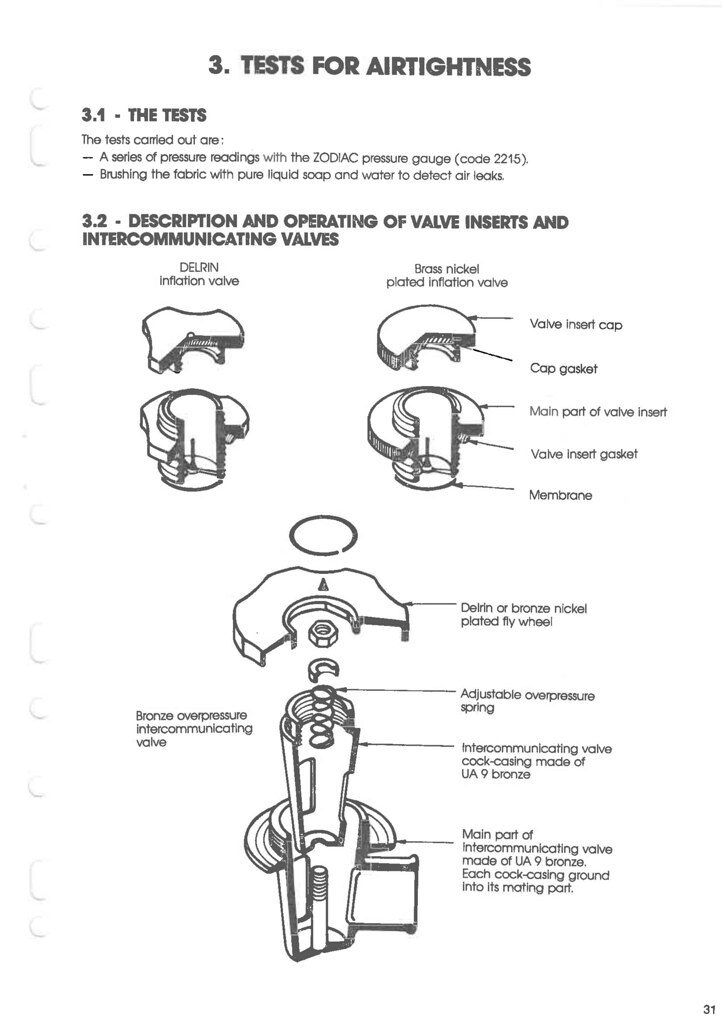 1985 Service, IC valve_Page_1 1985 Service, IC valve_Page_1 by anirich888, on Flickr
 1985 Service, IC valve_Page_2 1985 Service, IC valve_Page_2 by anirich888, on Flickr
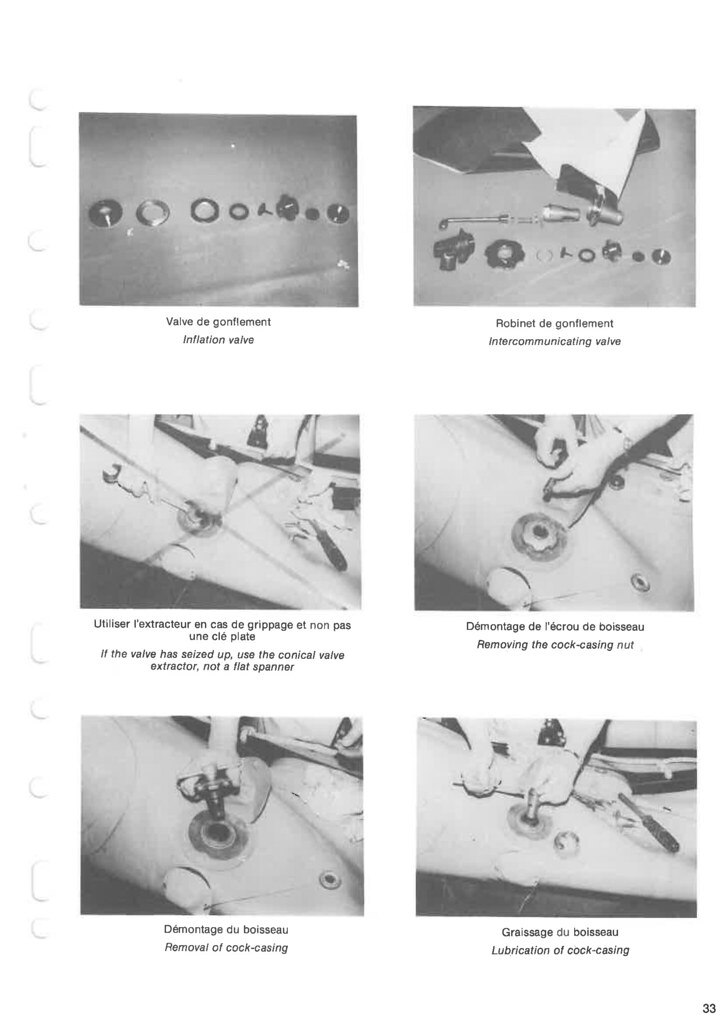 1985 Service, IC valve_Page_3 1985 Service, IC valve_Page_3 by anirich888, on Flickr
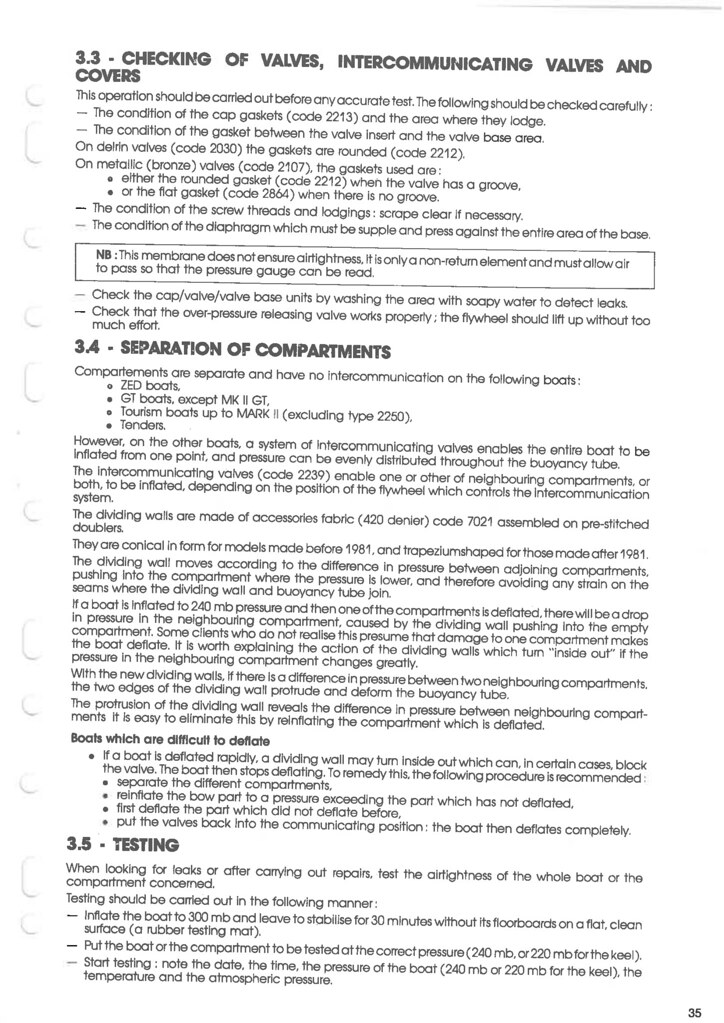 1985 Service, IC valve_Page_5 1985 Service, IC valve_Page_5 by anirich888, on Flickr
__________________
Richard
Gluing geek since 2007
Opinions and intepretations expressed are solely my own and do not express the views or opinions of my employer
|
|
|
|
|
26 September 2017, 06:52
|
#6
|
|
Member
Country: France
Town: Faget Abbatial
Make: Zodiac
Length: 4m +
Engine: oars
Join Date: Sep 2017
Posts: 26
|
Many thanks to Office888 and Spartacus. Very helpful information
__________________
|
|
|
|
|
02 October 2017, 01:16
|
#7
|
|
Member
Country: USA
Town: Alaska
Length: 4m +
Join Date: Sep 2017
Posts: 27
|
Now is there a way to adjust the arrow so it points true? I used a sharpie to mark the 100% open and 100% closed
__________________
|
|
|
|
|
02 October 2017, 01:41
|
#8
|
|
Member
Country: USA
Town: Connecticut
Make: Zodiac
Length: 6m +
Engine: Undecided
Join Date: Nov 2009
Posts: 777
|
It is hard to get the arrow 100% set on 12 o'clock position to be fully open and 6 o clock fully closed. can be off by a small amount based on how exact positioning is of components internally in the tube.
__________________
|
|
|
|
|
02 October 2017, 14:11
|
#9
|
|
Member
Country: France
Town: Faget Abbatial
Make: Zodiac
Length: 4m +
Engine: oars
Join Date: Sep 2017
Posts: 26
|
Hi again, I removed the cone from the tube using a heat gun and a blunt screwdriver to ease open the seam. The new ones I sourced fit well. One question though; on the inside of the tube, the main seams and the cone were glued normally and the seam overlaps are bonded using what looks like sikaflex caulk/mastic. Does anyone have any idea how to remove this as the heat doesn't seem to soften it much. I'll post a photo
__________________
|
|
|
|
|
02 October 2017, 14:12
|
#10
|
|
Member
Country: France
Town: Faget Abbatial
Make: Zodiac
Length: 4m +
Engine: oars
Join Date: Sep 2017
Posts: 26
|
This is a photo if the inside of the old cone showing the white caulk
__________________
|
|
|
|
|
02 October 2017, 15:10
|
#11
|
|
Member
Country: USA
Town: S. Carolina
Boat name: D560
Make: Avon
Length: 5m +
Engine: 2016 Merc 115hp CT
Join Date: Aug 2013
Posts: 1,277
|
Quote:
Originally Posted by Oilystairs
Hi again, I removed the cone from the tube using a heat gun and a blunt screwdriver to ease open the seam. The new ones I sourced fit well. One question though; on the inside of the tube, the main seams and the cone were glued normally and the seam overlaps are bonded using what looks like sikaflex caulk/mastic. Does anyone have any idea how to remove this as the heat doesn't seem to soften it much. I'll post a photo
|
Use a grinder with a small stone bit. You will need to sand the material before gluing anyways.
__________________
Richard
Gluing geek since 2007
Opinions and intepretations expressed are solely my own and do not express the views or opinions of my employer
|
|
|
|
|
02 October 2017, 16:30
|
#12
|
|
Member
Country: France
Town: Faget Abbatial
Make: Zodiac
Length: 4m +
Engine: oars
Join Date: Sep 2017
Posts: 26
|
Thank you. That is tough stuff
__________________
|
|
|
|
|
02 October 2017, 21:04
|
#13
|
|
Member
Country: UK - Scotland
Town: Aberdeenshire
Boat name: Sula
Make: Ribcraft 4.8m
Length: 4m +
Engine: Tohatsu 70hp + aux
MMSI: 235087213
Join Date: Jun 2007
Posts: 4,531
|
That caulk looks like 'no more nails'. Jeez, it never ceases to amaze me the extent some folk will take for a cheap fix!
Take your time, preparation is everything. 
__________________
Is that with or without VAT?
|
|
|
|
|
02 October 2017, 23:31
|
#14
|
|
Member
Country: USA
Town: S. Carolina
Boat name: D560
Make: Avon
Length: 5m +
Engine: 2016 Merc 115hp CT
Join Date: Aug 2013
Posts: 1,277
|
Quote:
Originally Posted by spartacus
That caulk looks like 'no more nails'. Jeez, it never ceases to amaze me the extent some folk will take for a cheap fix!
Take your time, preparation is everything. |
It's probably factory mastic, used to prevent seepage.
Sikaflex 221
__________________
Richard
Gluing geek since 2007
Opinions and intepretations expressed are solely my own and do not express the views or opinions of my employer
|
|
|
|
|
10 October 2017, 20:31
|
#15
|
|
Member
Country: France
Town: Faget Abbatial
Make: Zodiac
Length: 4m +
Engine: oars
Join Date: Sep 2017
Posts: 26
|
Hi, I have successfully replaced the first cone on the port tube and the bow and port tube are holding air perfectly. The starboard cone is seeping so I am halfway through replacing that and tidying up several old repairs where the patches were starting to peel on the corners (including the zodiac labels) I am photographing the second cone in stages to help future members of this forum. The main "trick" which has been invaluable has been wrapping the cone in polythene to stop it touching the freshly glued inside of the tube as you insert through the aperture. Once placed into position, it is possible to carefully ease the polythene out and secure the gluing. I'll post photos once it is all finished.
__________________
|
|
|
|
|
10 October 2017, 20:40
|
#16
|
|
Member
Country: France
Town: Faget Abbatial
Make: Zodiac
Length: 4m +
Engine: oars
Join Date: Sep 2017
Posts: 26
|
I am also fixing the inflatable keel which has a burst seam (not the ends so I think it is repairable). I literally pulled the whole thing out from the floor of the boat really easily and I was wondering if hypalon glue should be used to glue it back in to the boat or whether something like sikaflex might hold better? The whole area seemed to be a magnet for grime and sand
__________________
|
|
|
|
|
12 October 2017, 14:35
|
#17
|
|
Member
Country: France
Town: Faget Abbatial
Make: Zodiac
Length: 4m +
Engine: oars
Join Date: Sep 2017
Posts: 26
|
So here is my step by step cone replacement for my Zodiac Mk2 from the late 70's - the cones were very perished and were badly leaking:
Previously I had sourced the right type of cone for the material of my boat (in my case Hypalon), some polythene sheeting (left overs from a polytunnel cover) and some hypalon to use as a cuff as well as the usual glueing materials of course.
Firstly you need to remove the old cuff between the tube end and the old cone - this is a simple matter of using the heat gun and a pair of pliers to pull the cuff off. Use the old cuff as a template to cut out a new cuff to put back on later.
Secondly using the heatgun again and a blunt screwdriver, carefully ease the tube end away from the old cone on the inside of the tube. At the lip of the old cone on the inside of the tube end is some nasty hard white mastic that you need to force your way through with the screwdriver.
Use a knife and dremel, clean up the inside of the tube end and remove all the old glue and mastic, then clean out the tube with an old hoover.
Prepare the new surfaces to glue - sand the new cone (up to the bevel) with 80 grit paper and do the same to the inside of the tube. Wipe all of it down with solvent.
Using the cuff as a model, cut out a much wider (perhaps 2 inches wider) piece of thick polythene that will entirely cover the new cone's area that will be glued. This is to stop the inside of the end of the tube and the cone from coming into contact once the glues are applied while the cone is slid into the tube. Have a practice before glueing so you know how hard it will be to remove the polythene once it comes time for glued assembly.
Start the glueing process as you would with any repair respecting the humidity and temperature requirements of your glue.
Once the glue has gone off, secure the strip of polythene around the glue on the new cone and secure the polythene on the outer edge (the bit towards the point of the cone) only with a piece of selotape. Squash the cone and slide it through the end of the tube aperture and manoeuvre the cone into as good a position as possible. Carefully undo the selotape and start to ease the polythene out through the gap. It will take some force and some wiggling to get the polythene out and it might catch in some places but with plenty of wiggling, cursing and forcing, the polythene will come out and the cone will be set into a perfect position.
Using a roller or screwdriver handle, push all surfaces of the tube end on to the cone to be sure the glue has taken and then start preparing to glue on the new cuff on to the outside of the new cone and the end of the tube.
__________________
|
|
|
|
|
12 October 2017, 14:39
|
#18
|
|
Member
Country: France
Town: Faget Abbatial
Make: Zodiac
Length: 4m +
Engine: oars
Join Date: Sep 2017
Posts: 26
|
Cone replacement part 2
I left 24 hours to allow the glue to set inside the tube before glueing on my new cuff. Here are two more photos
__________________
|
|
|
|
|
 Posting Rules
|
You may not post new threads
You may not post replies
You may not post attachments
You may not edit your posts
HTML code is Off
|
|
|
|
 Recent Discussions
 |
|
|
|
|
|
|
|
|
|
|
|
|
|
|
|
|
|
|
|
|
|
|
|
|
|
|
|
|
|
|
|
|
|


 Sula
Sula