Go Back   RIBnet Forums > RIB talk > Inflatable boats - SIBs and folding RIBs
Click Here to Login

Reply
 
Thread Tools Search this Thread
 
Old 07 April 2015, 13:31   #1
Member
 
Country: UK - England
Town: Cambridgeshire
Boat name: Nimrod II
Make: Aerotec 380
Length: 3m +
Engine: Yam 15 Tohatsu 9.8
Join Date: Nov 2007
Posts: 8,305
Transom wheel problem - new plastic 30mm axle bore wheels needed?

Stick with this... I get to the point eventually!!

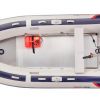
Last year right at the end of the season I fitted some used Trem launch wheels to my Zodiac 340 Acti-V... not used the boat since then. Just set it up to examine after winter storage and find I've done something stupid... fitted the wheels in apparently the most suitable place but the outboard tiller catches the wheels when raised and prevents a hard right turn.

They are this type as fitted to another ribnetters SIB and are rated to 180kg ...

http://www.rib.net/forum/attachment....2&d=1416590468

The normal/cheaper Trem design (and many other makes) doesn't have that extra "button" near the bottom of the transom so are only rated 100kg and it's this button that's giving me trouble in relocating the legs further out on the transom.

Mine is an air floor and fitting the legs at a similar height to that in the image brings the inside end of the button bolt and nut where it will chafe on the back of the air floor which presses very hard against the transom at that level... apart from the immediate position I have it in now where the air floor is held a little off the transom due to an existing bracket. Hence me fitting the legs at this slightly inward position so there was no chance of the floor rubbing through on the nut.

So the only way to fit the legs far enough out so they miss the tiller is to either leave off the button which downrates the legs by 80kg and really don't want to do that.... or to raise them 30-40mm so then the button will fit with its inner nut above and clear from the air floor... but the problem then is the top of the tyre is so close to the underside of the boat floor I'm worried about it rubbing through the fabric (have had this nearly happen before).

Seems the only way to set the legs higher on the transom retaining the button is to fit smaller diameter wheels. Quite happy to do that as we've had legs before with the smaller tyres before and it's never been a problem with rough ground etc.

But I can't find anywhere smaller rubber tyre plastic wheels with a 30mm bore which I need.

Any thoughts appreciated!
__________________
Fenlander is offline   Reply With Quote
Old 07 April 2015, 14:26   #2
Member
 
paddlers's Avatar
 
Country: UK - England
Town: Sticks, N.Yorks
Boat name: Tamanco
Make: Honwave 3.5AE
Length: 3m +
Engine: Tohatsu Outboard
Join Date: May 2012
Posts: 1,167
That's the back of my Honwave with the aluminium floor. The wheels came from Honwave & l'm pretty sure that stud came with a length of M8 threaded bar that I had to cut to length. I would be tempted to replace the bar with either a countersunk or allen key style M8 stainless bolt cut to the right length & siliconed/locktighted in to avoid any proudness inside rubbing on the airfloor. There's quite a bit of leverage on that stud when going over rough ground.
__________________
paddlers is offline   Reply With Quote
Old 07 April 2015, 14:44   #3
Member
 
Country: UK - England
Town: Cambridgeshire
Boat name: Nimrod II
Make: Aerotec 380
Length: 3m +
Engine: Yam 15 Tohatsu 9.8
Join Date: Nov 2007
Posts: 8,305
Thanks you've given me an idea that hadn't crossed my mind...

As I had the Trem set second hand I had no idea the buttons might have a thread in them with the studding screwed in... assumed they were machined from one piece.

If I can undo the button off the stud like you say I can put a nice smooth headed s/s coach bolt through from the inside. It will need very careful cutting to length so the button tightens OK but should be do-able.

Failing that I could drill right through the button slightly over a coach bolt dia and have a nut on the outside which would be slightly easier once the drilling went OK... if not quite so neat.

Like you say there is a fair amount of leverage on that bottom button which is why I don't want to leave it off and rely solely on the top leg mounts. With the way we use our SIB we'll often set it up a good few minutes walk from the sea/slip then trundle it down on bumpy semi-unmade roads. We put all the kit in at the stern to ease the weight for the person lifting/pulling it by the front handle so there is a fair weight on the transom leg fittings.

BTW hope you don't mind me linking your image... it was one of the first to come up on google that showed the transom wheel style clearly.
__________________
Fenlander is offline   Reply With Quote
Old 07 April 2015, 15:12   #4
Member
 
paddlers's Avatar
 
Country: UK - England
Town: Sticks, N.Yorks
Boat name: Tamanco
Make: Honwave 3.5AE
Length: 3m +
Engine: Tohatsu Outboard
Join Date: May 2012
Posts: 1,167
I found mine locked onto the stud so well I had a 4" stainless handle welded on so I could push them down easier after launching. They sit just above the transom in the up position.Click image for larger version

Name:	Flywheel 001.jpg
Views:	359
Size:	181.9 KB
ID:	104248
__________________
paddlers is offline   Reply With Quote
Old 07 April 2015, 15:20   #5
Member
 
paddlers's Avatar
 
Country: UK - England
Town: Sticks, N.Yorks
Boat name: Tamanco
Make: Honwave 3.5AE
Length: 3m +
Engine: Tohatsu Outboard
Join Date: May 2012
Posts: 1,167
Your welcome with the picture. My set came with a detailed sticker for the transom that dictated exactly where the holes were to be drilled but I bought the boat engine & wheels new all at the same time so would have been disappointed if they didn't fit!
__________________
paddlers is offline   Reply With Quote
Old 07 April 2015, 20:53   #6
Member
 
Country: Other
Town: Povoa S Iria Lisbon Port
Boat name: Açores
Make: Ocean Bay
Length: 3m +
Engine: Suzuki 15 hp
Join Date: Oct 2014
Posts: 69
hello,

had the same problem, when installing mine....

so this picture could eventually help you...

https://youtu.be/uGv93vGvLGM
__________________
Antonio is offline   Reply With Quote
Old 11 April 2015, 07:55   #7
Member
 
Country: UK - England
Town: Cambridgeshire
Boat name: Nimrod II
Make: Aerotec 380
Length: 3m +
Engine: Yam 15 Tohatsu 9.8
Join Date: Nov 2007
Posts: 8,305
Just as a matter of interest this was the initial position for the transom wheels which turned out to restrict the outboard movement. With hindsight they do look to far towards the centre but as in my OP is was the only place where the nuts on the lower "button" attachments didn't rub the rear of the air floor...
Attached Thumbnails
Click image for larger version

Name:	Initial posn transom wheels.jpg
Views:	2352
Size:	99.8 KB
ID:	104359  
__________________
Fenlander is offline   Reply With Quote
Old 11 April 2015, 10:21   #8
Member
 
Country: UK - England
Town: Sussex
Boat name: Bombard
Make: Aerotec 380
Length: 3m +
Engine: Mercury Mariner 15hp
Join Date: Jul 2010
Posts: 3,401
David, regarding the bore - I've made a few sets of launch wheels/engine trolleys over the years and I have a box full of various PVC and aluminium pipes, Delrin bushes, off cuts tubular spacers etc - I've always found something or a combination to shim out different axles to fit different bores - just an idea if you cannot find the exact match.
__________________
Max... is offline   Reply With Quote
Old 11 April 2015, 11:40   #9
Member
 
Country: UK - England
Town: Cambridgeshire
Boat name: Nimrod II
Make: Aerotec 380
Length: 3m +
Engine: Yam 15 Tohatsu 9.8
Join Date: Nov 2007
Posts: 8,305
Thanks Max. Thankfully I didn't need to swap the wheels as...

Paddlers that was the answer to my problem as soon as you mentioned the lower buttons had studding screwed into them rather than machined from solid... so leading to the idea of a countersunk s/s bolt fitted from the inside.

When I took the stud from the buttons I thought for my circumstance it would be easier and stronger if I drilled out the button and fitted a nut on the outside.

That's what I did so the countersunk heads inside are just below the transom surface and covered with a bit of waterproof tape so presenting a completely smooth surface to the back of the air floor. The buttons with nuts on don't look too bad and I decided just to "fill" the adj old holes with another countersunk bolt and nut on the outside with a grey plastic domed nut cover which blends it in with the transom.

I properly filled the abandoned upper bracket holes in the transom and painted so they are invisible.

The pics of old/new mount positions show how little I had to move the wheels to stop the outboard hitting... annoying I didn't get it right first time!
Attached Thumbnails
Click image for larger version

Name:	Zodiac Trem 1.jpg
Views:	332
Size:	51.3 KB
ID:	104363   Click image for larger version

Name:	Zodiac Trem fit 2.jpg
Views:	297
Size:	231.9 KB
ID:	104364  
__________________
Fenlander is offline   Reply With Quote
Old 11 April 2015, 13:15   #10
Member
 
paddlers's Avatar
 
Country: UK - England
Town: Sticks, N.Yorks
Boat name: Tamanco
Make: Honwave 3.5AE
Length: 3m +
Engine: Tohatsu Outboard
Join Date: May 2012
Posts: 1,167
Nice job.

On mine they look as though they're still much closer to the tubes than your secondary fitting. Mine also would interfere with the towing eyes which came factory fitted with the eye inside the transom.

Hopefully if someone else tries this process they'll find this thread and save them drilling a few extra holes.
__________________
paddlers is offline   Reply With Quote
Old 11 April 2015, 16:05   #11
Member
 
Country: UK - England
Town: Cambridgeshire
Boat name: Nimrod II
Make: Aerotec 380
Length: 3m +
Engine: Yam 15 Tohatsu 9.8
Join Date: Nov 2007
Posts: 8,305
Yes they are still a little more narrow set than some. They are as wide as you can have them on my Zodiac though or when you swing them up the wheels (well actually the end of the axle part of the leg with its sharp R-clip) would hit the boat tube fabric.

They came to me on a small Avon and you can see how wide set they were on that as the tube ends and cone taper was so short after the transom the wheels were swinging up about halfway along the taper so loads more clearance.... see image.
Attached Thumbnails
Click image for larger version

Name:	Avon Trem wheels.jpg
Views:	355
Size:	179.6 KB
ID:	104368  
__________________
Fenlander is offline   Reply With Quote
Old 13 November 2017, 19:09   #12
Member
 
Country: UK - England
Town: manchester
Make: domino
Length: 3m +
Join Date: Aug 2015
Posts: 21
Does anybody know which company makes these heavy duty wheels I have a set fitted to my 5 meter humber sib. But unfortunately I have lost one of the buttons from the bottom. So I need to email the manufacturer to see if they can supply one for me

Thanks Colin
__________________
colinley is offline   Reply With Quote
Old 18 November 2017, 15:50   #13
Member
 
Country: UK - England
Town: Holsworthy, Devon
Make: Honwave T40
Length: 4m +
Engine: Honda BF20
Join Date: Jan 2017
Posts: 5
Hi Colin,

They are made by a company called Trem but I’m not sure where they are located. Most Honwave dealers stock them though.
If you get stuck message me & I’ll make you one.

Dave.
__________________
Davey64 is offline   Reply With Quote
Old 18 November 2017, 18:24   #14
Member
 
Country: UK - England
Town: manchester
Make: domino
Length: 3m +
Join Date: Aug 2015
Posts: 21
Thanks alot Dave I appreciate that a lot. I'll try and email my local honwave dealer. But if they can't help I'll give you a shout

Thanks again

Colin
__________________
colinley is offline   Reply With Quote
Reply


Posting Rules
You may not post new threads
You may not post replies
You may not post attachments
You may not edit your posts

BB code is On
Smilies are On
[IMG] code is On
HTML code is Off
Trackbacks are Off
Pingbacks are Off
Refbacks are Off


All times are GMT. The time now is 04:39.


Powered by vBulletin® Version 3.8.8 Beta 1
Copyright ©2000 - 2024, vBulletin Solutions, Inc.