Reply
 
Thread Tools Search this Thread
 
Old 14 August 2009, 13:43   #21
Member
 
Country: Canada
Town: British Columbia
Make: Gemini
Length: 4m +
Engine: 40hp 2 str
Join Date: Oct 2003
Posts: 2,151
DO NOT PUT PORTABLE GAS TANKS IN AN ENCLOSED BOX !!!

PORTABLE gas tanks will always emit fuel vapours and if you trap most of those vapours in a box you will be sitting atop a huge fireball in waiting. Keep the portable fuel tanks in an open air environment. Search for "Jerry Cans" through the archives in this & the RIBs & RIBBING forums for some alternative ideas.
__________________
prairie tuber is offline   Reply With Quote
Old 14 August 2009, 14:11   #22
Member
 
Country: Canada
Town: GTA
Make: QS 330 airdeck
Length: 3m +
Engine: 15hp Johnson 2-strke
Join Date: Jul 2009
Posts: 92
Quote:
Originally Posted by prairie tuber View Post
DO NOT PUT PORTABLE GAS TANKS IN AN ENCLOSED BOX !!!

PORTABLE gas tanks will always emit fuel vapours and if you trap most of those vapours in a box you will be sitting atop a huge fireball in waiting. Keep the portable fuel tanks in an open air environment. Search for "Jerry Cans" through the archives in this & the RIBs & RIBBING forums for some alternative ideas.
It depends on the design, as you'd have to have "fresh air" anyways for the gas tank.
You have to drill a hole for the fuel line and that hole has to be big ahough to accept the primer bulb....one can always make another hole in the front of the box for even greater ventilation....
__________________
oujakov is offline   Reply With Quote
Old 14 August 2009, 15:00   #23
Member
 
Country: Canada
Town: GTA
Make: QS 330 airdeck
Length: 3m +
Engine: 15hp Johnson 2-strke
Join Date: Jul 2009
Posts: 92
Quote:
Originally Posted by oujakov View Post
I know even easier solution for the reinforcement, where one doesn't even require any hard work to do.
I'll post it later
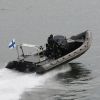
As I promised, here it is.

Items required:
1. One inflatable boat.
2. One synthtic rachet tightener.

Follow the instructions from the picture below.
Use rachet to loose or tighten the support. Once tightened up, keep it that way.

Ask me for clarification if required.
Attached Thumbnails
Click image for larger version

Name:	transom reinforcement.JPG
Views:	248
Size:	24.8 KB
ID:	44856  
__________________
oujakov is offline   Reply With Quote
Old 14 August 2009, 16:55   #24
Member
 
Country: USA
Town: Chandler AZ
Boat name: undecided
Make: Zodiac
Length: 3m +
Engine: 76 Johnson 14.999hp
Join Date: Aug 2009
Posts: 11
Quote:
Originally Posted by oujakov View Post
Nice pictures, beer is THE ultimate "glue" between the man and his home project! Can't do nothing with no beer.

Your boat must be PVC, as I can see Stabond. I used several times on my boats. I like it a lot.......or you have hypalon boat with PVC bottom?

I see you have older Johnson 15 with electrostart. Looks to be late 70's-early 80's model.
I have 1988 Johnson 15.
Here is the very nice link for the repairs and maintenance of these motors. But very likely you already know about it.

http://www.sschapterpsa.com/ramblings/Ramblings.html (rumbling #82 and up)


BTW the pics album is reversed, you have the latest pics last.
Hey, my boat is PVC, my Johnson is a 1976, thanks for the repair link. Was trying to find some good online info. The picture album is in order although confusing. The oldest pictures of the boat inflated on in the pool were the first day I bought it. The second day the floor fell out of it, and hence the following repairs were made.
__________________
teamAssassin is offline   Reply With Quote
Reply

Thread Tools Search this Thread
Search this Thread:

Advanced Search

Posting Rules
You may not post new threads
You may not post replies
You may not post attachments
You may not edit your posts

BB code is On
Smilies are On
[IMG] code is On
HTML code is Off
Trackbacks are Off
Pingbacks are Off
Refbacks are Off


All times are GMT. The time now is 05:22.


Powered by vBulletin® Version 3.8.8 Beta 1
Copyright ©2000 - 2024, vBulletin Solutions, Inc.