Reply
 
Thread Tools Search this Thread
 
Old 06 April 2009, 09:02   #1
Member
 
Country: UK - England
Town: Devon
Boat name: Junk at the moment
Make: Avon
Length: 3m +
Engine: Yamaha 4hp 2t
Join Date: Jul 2008
Posts: 52
Re:A4 valves

I am going to have to replace the A4 valves in my Avon.

So I have discussed the valve situation with a couple of suppliers,and they have said that the easiest way to remove the valves,is to heat them up with a heat gun.
Obviously they are the experts but has anyone on here actually done this ?
Doesnt it burn the hypalon ?

Any advice please

MIke
__________________
mike13401 is offline   Reply With Quote
Old 06 April 2009, 09:19   #2
Member
 
Ribshop's Avatar
 
Country: UK - England
Town: River Hamble
Length: 6m +
Join Date: Oct 2005
Posts: 726
Its fairly simple, just take you time heat up slowly and evenly around the valve and keep an eye on the material that surrounds the valve to make sure you don’t over heat and cause bubbling. You are going to be covering up the few inches around the old valve anyway if you are fitting the new ones on a doubler patch.

Good luck
__________________
RIB REPAIRS | RE-TUBES | RE-FIT - OUTBOARD SERVICING - ONLINE SHOP FOR RIB & TOHATSU PARTS .
Phone: 01489 556800 www.rib-shop.com
Ribshop is offline   Reply With Quote
Old 06 April 2009, 15:51   #3
Member
 
Country: USA
Town: Oakland CA
Length: 3m +
Join Date: Feb 2005
Posts: 6,653
Mike;

I'm guessing the advice given you was to remove the donut of material the valve is mounted to, and not just to remove and replace the valve alone.

Just want to make sure you know what you're getting into: Remove the valve and donut (hypalon circle with the valve cutout), glue in new donut with new valve attached.

This is not, I think, a matter of unscrewing the old valve and screwing a new one in. The valve retaining ring does not fit through the opening for the valve, hence the donut.

jky
__________________
jyasaki is offline   Reply With Quote
Old 29 August 2009, 13:25   #4
Member
 
Country: USA
Town: Connecticut
Make: Avon FRB380
Length: 3m +
Engine: Tohatsu 6hp
Join Date: Aug 2009
Posts: 74
A4 valve replacement

I'm also planning on replacing some A4 valves in a couple of old Redcrests I have. Is just using an outside donut patch sufficient, or does an internal patch need to be used as well?

I'll be putting in new C7 valves.
__________________
entropy is offline   Reply With Quote
Old 29 August 2009, 14:43   #5
Member
 
Ribshop's Avatar
 
Country: UK - England
Town: River Hamble
Length: 6m +
Join Date: Oct 2005
Posts: 726
The outside patch is fine, if you want a price for shipping to the states just drop me an email
__________________
RIB REPAIRS | RE-TUBES | RE-FIT - OUTBOARD SERVICING - ONLINE SHOP FOR RIB & TOHATSU PARTS .
Phone: 01489 556800 www.rib-shop.com
Ribshop is offline   Reply With Quote
Old 30 August 2009, 21:23   #6
Member
 
Country: UK - England
Town: telford
Make: shakespeare
Length: 6m +
Engine: 150 optimax
Join Date: May 2008
Posts: 300
whats wrong with the valves you have mike, its a lot easier to fit new seals and stems to your old valves than replace with new ones, where are they leaking from?
__________________
markg is offline   Reply With Quote
Old 12 September 2011, 15:57   #7
Member
 
Country: Canada
Town: Lake Country
Make: avon tender
Length: 3m +
Engine: Outboard electric
Join Date: Sep 2011
Posts: 6
How did the valve replacement work out. I am in the same situation. 1972 redcrest with shot diaphragms. I am going to replace the a4 with the c7.
__________________
IAmABug is offline   Reply With Quote
Old 12 September 2011, 20:37   #8
Member
 
martini's Avatar
 
Country: UK - Channel Islands
Town: jersey
Boat name: Martini II
Make: Arctic 28/FC470
Length: 8m +
Engine: twin 225Opti/50hp 2t
MMSI: 235067688
Join Date: Jun 2005
Posts: 3,030
I've just done the same on an old Avon, replaced the A4's with C7's.

New valves supplied with ready made doubler patches from Ribshop. They do a kit with most things you need, glue etc.

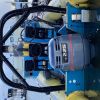
In addition you'll need a heat gun to warm up the old patch, it'll then peel off quite easily. The hole that's left needs to be opened up slightly larger to accommodate the new valve. You might want some kind of power tool to remove all the old glue and bits of valve that get left behind, the little piece of sandpaper that comes in the kit will require patience and elbow grease, not supplied
__________________
martini is offline   Reply With Quote
Old 12 September 2011, 21:01   #9
Member
 
Country: Canada
Town: Lake Country
Make: avon tender
Length: 3m +
Engine: Outboard electric
Join Date: Sep 2011
Posts: 6
How did you prevent the glue sticking both halves of the tubes together? And I assume you just cut around the existing valve first hey.
__________________
IAmABug is offline   Reply With Quote
Reply


Posting Rules
You may not post new threads
You may not post replies
You may not post attachments
You may not edit your posts

BB code is On
Smilies are On
[IMG] code is On
HTML code is Off
Trackbacks are Off
Pingbacks are Off
Refbacks are Off


All times are GMT. The time now is 15:28.


Powered by vBulletin® Version 3.8.8 Beta 1
Copyright ©2000 - 2024, vBulletin Solutions, Inc.