|
|
 02 December 2008, 12:15
|
#1
|
|
Member
Country: UK - Channel Islands
Town: Alderney
Length: no boat
Join Date: Sep 2006
Posts: 3,047
|
New custom SIB build (5m workboat)
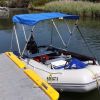
We have started on a new build this week, a combined safety/workboat.
The base craft is a Quicksilver 530 heavy duty, originally it was going to be in green but time constraints and stock have meant it is a red one (still, that should make it faster  ).
We are, over the next week or so, going to be:-
+ Making up a bow cover,
+ Fitting two bow boxes for anchor etc.,
+ Making up a seat/box for batteries etc.,
+ Making up bespoke pockets to hold rescue equipment etc.,
+ Supplying safety equipment, tool box and signal gear,
+ Fitting a temporary A frame with antenna and nav light,
+ Fitting a temporary tiller outboard.
The boat will eventually have a stand up console and a remote 15HP four stroke (tuned down 20).
__________________
|

|

|
|
02 December 2008, 12:17
|
#2
|
|
Member
Country: UK - Channel Islands
Town: Alderney
Length: no boat
Join Date: Sep 2006
Posts: 3,047
|
Step one - fully inflate the tubes without the floor so that layout can be marked and modifications to the floor panels made.
__________________
|
|
|
|
|
02 December 2008, 16:22
|
#3
|
|
Member
Country: USA
Town: Oakland CA
Length: 3m +
Join Date: Feb 2005
Posts: 6,653
|
Quote:
Originally Posted by malthouse

originally it was going to be in green but time constraints and stock have meant it is a red one (still, that should make it faster ). |
It would be faster still if you put flames on the side.
jky
__________________
|
|
|
|
|
02 December 2008, 23:58
|
#4
|
|
Member
Country: Other
Town: Lima-Peru
Boat name: Nautile
Make: Sea Rider 450 Rib
Length: 4m +
Engine: Tohatsu 5/18/30 HP
Join Date: Sep 2007
Posts: 1,998
|
Hello...
Is this QS 530 a ply, aluminum, composite, panel floor sib ? Which one ? If aluminum can give you a interesting modification been doing down here to hold better; weight, mates, gear and of course a future stand up console. Once modified, holds better than factory delivered.
Happy Sibbing
__________________
|
|
|
|
|
03 December 2008, 00:20
|
#5
|
|
RIBnet admin team
Country: UK - England
Town: The wilds of Wiltshire
Boat name: Dominator
Make: SR5.4
Length: 7m +
Engine: Yam 85
MMSI: 235055163
Join Date: Jul 2005
Posts: 13,054
|
Quote:
Originally Posted by jyasaki
It would be faster still if you put flames on the side.
jky
|
Along with a whale tail,neons underneath and with an SSR number in unintelligible script?
__________________
Need spares,consoles,consumables,hire,training or even a new boat?
Please click HERE and HERE and support our Trade Members.
Join up as a Trade member or Supporter HERE
|
|
|
|
|
03 December 2008, 07:09
|
#6
|
|
Member
Country: UK - Channel Islands
Town: Alderney
Length: no boat
Join Date: Sep 2006
Posts: 3,047
|
Quote:
Originally Posted by Locozodiac
Hello...
Is this QS 530 a ply, aluminum, composite, panel floor sib ? Which one ? If aluminum can give you a interesting modification been doing down here to hold better; weight, mates, gear and of course a future stand up console. Once modified, holds better than factory delivered.
Happy Sibbing
|
It is the aluminium floor version. 
__________________
|
|
|
|
|
03 December 2008, 11:40
|
#7
|
|
Member
Country: UK - Channel Islands
Town: Alderney
Length: no boat
Join Date: Sep 2006
Posts: 3,047
|
We have now spliced in bridles fore and aft and attached a line to each.
The floor is coming on well and all the marking out is proving on the button. 
__________________
|
|
|
|
|
03 December 2008, 11:55
|
#8
|
|
Member
Country: Other
Town: Principalite d'Chaos
Boat name: The Nashers Revenge!
Make: Windsor Brothers
Length: 6m +
Engine: Optimax 225
MMSI: "Mmmmm SI" she said!
Join Date: Jan 2004
Posts: 4,828
|
Malthouse
You really get to do some good stuff.
Nasher
__________________
|
|
|
|
|
03 December 2008, 12:00
|
#9
|
|
Member
Country: UK - Channel Islands
Town: Alderney
Length: no boat
Join Date: Sep 2006
Posts: 3,047
|
Quote:
Originally Posted by Nasher
You really get to do some good stuff.
|
It may not be as exciting as some work, but we really enjoy it. The finished boat will turn heads I think.
I am just worried that the flames on the side might melt the handles. 
__________________
|
|
|
|
|
03 December 2008, 17:29
|
#10
|
|
Member
Country: Other
Town: Lima-Peru
Boat name: Nautile
Make: Sea Rider 450 Rib
Length: 4m +
Engine: Tohatsu 5/18/30 HP
Join Date: Sep 2007
Posts: 1,998
|
Quote:
Originally Posted by malthouse
It is the aluminium floor version. |
Can you provide a neat pic of any bottom floor panel to see. Are QS using lateral rivets to secure aluminum stripes/small boards to alum panel ?
Happy Sibbing
__________________
|
|
|
|
|
03 December 2008, 18:08
|
#11
|
|
RIBnet supporter
Country: UK - England
Town: Hants
Length: 8m +
Engine: 300hp plus
Join Date: Sep 2007
Posts: 3,072
|
How and where do you intend to secure the anchor line to the craft?
__________________
|
|
|
|
|
03 December 2008, 19:19
|
#12
|
|
Member
Country: UK - Channel Islands
Town: Alderney
Length: no boat
Join Date: Sep 2006
Posts: 3,047
|
Quote:
Originally Posted by Locozodiac
Can you provide a neat pic of any bottom floor panel to see. Are QS using lateral rivets to secure aluminum stripes/small boards to alum panel ?
Happy Sibbing
|
The Ali floors are made up of rows of what amounts to tongue and groove slats, bound together into panels by a side runner. Each slat is extruded and is made of multiple box section, the whole assembly is very strong and light but a pig to modify. 
__________________
|
|
|
|
|
03 December 2008, 19:22
|
#13
|
|
Member
Country: UK - Channel Islands
Town: Alderney
Length: no boat
Join Date: Sep 2006
Posts: 3,047
|
Quote:
Originally Posted by C2 RIBS
How and where do you intend to secure the anchor line to the craft?
|
Hi Ian, In this particular craft a very long anchor line has been specified so we have two boxes up front. One box has a U bolt secured through the box and through the floor, this will the be backup securing point for the warp. The other box will hold the anchor and chain.
This is almost done and I will try and get a photo before the bow "tent" is fitted so you can see the two boxes.
__________________
|
|
|
|
|
04 December 2008, 14:35
|
#14
|
|
Member
Country: Other
Town: Lima-Peru
Boat name: Nautile
Make: Sea Rider 450 Rib
Length: 4m +
Engine: Tohatsu 5/18/30 HP
Join Date: Sep 2007
Posts: 1,998
|
Alum Slat Panel Reinforcement
Quote:
Originally Posted by malthouse
The Ali floors are made up of rows of what amounts to tongue and groove slats, bound together into panels by a side runner. Each slat is extruded and is made of multiple box section, the whole assembly is very strong and light but a pig to modify. |
If your alum floor panels are the standard ones to most Asian sibs as you describe them, then some alum slats are riveted to lateral side runner (joinner) you can not modify the fllor, but can reinforce it better. If your alum panel is factory riveted with just 8 rivets on each side per panel (white dots) and rest of slats are lying against rivetted ones, why not add on 4 rivets (red dots) to each alum slat. Complete each remaining 4/5 alum boards per sib.
Get yourself a nice electrical drill and 5 mm drilling, replace existing ones by 4.8 mm x 12 mm rivets, if your floor is very thick use 4.8 x 15 mm. This will give extra slat/side runner rigidity. Keep in mind that each alum slat not riveted will tend with heavy weight, mates, scuba gear equipment, center console or whatever on floor top, tend to slight arc/bend slats towards floor fabric. The only way to endure a horizontal floor is rivetting each alum slat. In my particular case have replaced 3.8/4.0 mm factory rivets by 4.8 x 12 mm better quality new rivets, now superb floor rigidity on each panel through out all floor extension.
Place good quality tape (3M) on total extension of each floor panel runner, drill hole, replace/put new rivets and apply a second tape same extension on top of all rivets, will protect better salt laying arounf floor fabric.
Depending on the slat wide, you could place just a central rivet, if wanting more heavy duty use/abuse apply 2 lateral rivets per slat. This rivetting add on can be applied to any sib floor, just get the right tools, drill machine and rivetting tool, don't but a cheapo asian rivetting machine, won't last one complete panel floor work, buy Stanley or equivalent good UK tool. As this reinforcement procedure involves lot of work, better have a nice cold beer while doing it. "Thums-Up" !! Happy Drilling & Rivetting.
Check pics for better understanding
Happy Sibbing
__________________
|
|
|
|
|
04 December 2008, 16:49
|
#15
|
|
Member
Country: USA
Town: San Diego
Make: zodiac futura mk2
Length: 4m +
Engine: Nissan 40 plus
Join Date: Oct 2008
Posts: 269
|
a different method
I'm really intrigued by the whole stand up console aspect of the project. Definitely look forward to seeing more pics! From the original description of the floor construction I got the impression the slats are not solid, but hollow extruded sections like those on my Zodiac. Are they connected together at all along the long sides? Either way, I had some issues with bolting heavier loads down to my aluminum zodiac floor. The hollow sections of the floor aren't all that thick. Even with backing plates I had issues with flexing around the edges of the mounting arrangement. So I have used aluminum plates that run across the floor and then bolt into backing plates in the hollow floor section. The panel end cap covers the plates and is captured by the side rails. A really strong method of attaching loads to thin wall flooring sections that takes advantage of the side rail strength. Not like I'm all that bright, but thought I might share a method of transfering loads from the floor to the rails. Been launching over waves to reach surfspots and wakeboarding with a pole and the floor isn't flexing... so far!
backing plates

wakeboard pole

custom console bench with tank and battery (no surface plate across for the bench as it's supports directly contact the backing plates)

bench mount point (old gas tank)

__________________
|
|
|
|
|
04 December 2008, 17:05
|
#16
|
|
RIBnet admin team
Country: UK - Scotland
Boat name: imposter
Make: FunYak
Length: 3m +
Engine: Tohatsu 30HP
MMSI: 235089819
Join Date: Sep 2005
Posts: 11,622
|
Quote:
Originally Posted by malthouse
We have now spliced in bridles fore and aft and attached a line to each.
|
i'm being thick - what load is the white line down each side intended to take (ie. direction of pull?)
__________________
|
|
|
|
|
04 December 2008, 17:34
|
#17
|
|
Member
Country: Poland
Town: Kolobrzeg
Join Date: Dec 2002
Posts: 9
|
Hello All, can you suggest best way to lift a QS 530 with alu/flor and engine ca 260/270kgs. Ryszard
__________________
|
|
|
|
|
04 December 2008, 17:37
|
#18
|
|
Member
Country: UK - Channel Islands
Town: Alderney
Length: no boat
Join Date: Sep 2006
Posts: 3,047
|
Quote:
Originally Posted by kelson
I'm really intrigued by the whole stand up console aspect of the project. Definitely look forward to seeing more pics!
... hollow extruded sections like those on my Zodiac....
|
We will add the pics as we can, hopefully every little change. 
Yes, the floor is extruded aluminium with sides bolted on and then runners that interlock and brace the whole (main) floor area.
The main difference I can see from your photos is that the Quicksilver's floor has very many uprights in the extrusion, in fact it is nearly impossible to put a bolt through without clipping one.
__________________
|
|
|
|
|
04 December 2008, 17:39
|
#19
|
|
Member
Country: UK - Channel Islands
Town: Alderney
Length: no boat
Join Date: Sep 2006
Posts: 3,047
|
Quote:
Originally Posted by Ryszard
Hello All, can you suggest best way to lift a QS 530 with alu/flor and engine ca 260/270kgs. Ryszard
|
Hi Ryszard, how are you.
I have fitted lifting eyes to the front floor sections and eyes to the transom and had that tested for lifting before, but if it were a realistic option I would lift from the transom and with a sling under the 2nd floor panel.
__________________
|
|
|
|
|
04 December 2008, 17:41
|
#20
|
|
Member
Country: UK - Channel Islands
Town: Alderney
Length: no boat
Join Date: Sep 2006
Posts: 3,047
|
Quote:
Originally Posted by Polwart
i'm being thick - what load is the white line down each side intended to take (ie. direction of pull?)
|
They are just stowed there for now, one is a bow painter and one is a stern line. Both are attached via bridles.
__________________
|
|
|
|
|
|
 Posting Rules
|
You may not post new threads
You may not post replies
You may not post attachments
You may not edit your posts
HTML code is Off
|
|
|
|
 Recent Discussions
 |
|
|
|
|
|
|
|
|
|
|
|
|
|
|
|
|
|
|
|
|
|
|
|
|
|
|
|
|
|
|
|
|
|


 White Noise