Reply
 
Thread Tools Search this Thread
 
Old 15 February 2014, 10:18   #61
Member
 
The Gurnard's Avatar
 
Country: UK - Scotland
Town: Stirling
Boat name: The Gurnard
Make: Quicksilver
Length: 4m +
Engine: mariner 25hp 2s
Join Date: Jul 2013
Posts: 1,653
Quote:
Originally Posted by kaman View Post
Having studied a few YouTube videos of similar Honwaves on the move in the chop the splash up at the rear comes up to the underside of the rear carry handles.


I have found the sea is in constant change ..even in a calm day. From my experience of SIBS..they are "wet" boats so expect water over the sides. It doesn't remain at a level below the side trims on the boats..not on my boats anyhoo. That is why it is also important to have a means of bailing it out with a bucket or self bailers etc.

I dont have any photos of waves coming over the sides..but this photo shows a bit of spray being thrown up on a calm day..with no swell or white caps. The front of my boat on the plane is a lot highter than the rear end ..so I suspect you might get waves hitting..not only your bracket but also your engine cover.

A big wave.. hitting that size of surface area.. plus the leverage of the side arm mounted to a ply transom ... might just burst the wood ?
As mentioned..I could very well be wrong.. but satisfy yourself that everything is ok..in safe waters first.


Bass Stalker..its a 3.3 Mariner 2 strokes. Standard shaft..and it pushes it along great at displacement speed.. ideal for trolling lures for mackerel or pollack .. oh..and I sometimes accidentally get sea trouts too... although they are always put back
__________________
The Gurnard is offline   Reply With Quote
Old 15 February 2014, 10:43   #62
Member
 
A1an's Avatar
 
Country: UK - Scotland
Town: Fort William
Make: Ribcraft 585
Length: 5m +
Engine: Yamaha F115
Join Date: Mar 2012
Posts: 2,896
RIBase
A couple of observations for the OP.....


Does the bracket touch the tubes at any point? It won't take long to rub through the tube material.

The other is, why port side? Wouldn't it be better starboard so the tiller is within comfortable reach?

From what I can see you would need to sit on the port tube to operate the aux and coupled with the overhanging weight of the engine I suspect you will have too much weight on one side of the boat.
__________________
There is a place on this planet for all of Gods creatures.........right next to my tatties and gravy.
A1an is offline   Reply With Quote
Old 15 February 2014, 10:55   #63
Member
 
The Gurnard's Avatar
 
Country: UK - Scotland
Town: Stirling
Boat name: The Gurnard
Make: Quicksilver
Length: 4m +
Engine: mariner 25hp 2s
Join Date: Jul 2013
Posts: 1,653
Quote:
Originally Posted by A1an View Post
The other is, why port side? Wouldn't it be better starboard so the tiller is within comfortable reach?
I suspect that the answer is because the fuel on off and gear lever would then be out of reach..so easier to have the tiller on the outside.

Its also worth the OP remembering that it is easy to attach things in a stationary environment..but it wouldnt be so easy holding the aux off the side of the boat to slot it into an arm ..when everything is bouncing around in a swell. Man and engine overboard because of loss of balance ..could be worst case senario
__________________
The Gurnard is offline   Reply With Quote
Old 15 February 2014, 15:46   #64
Member
 
Join Date: Jul 2011
Posts: 874
Thanks for the feedback guys. Good to look at things from a different perspective!
I mounted it on the port side as I sit on the starboard tube when operating the main 20hp engine.
With my 18 stone, fuel tank and large box on the starboard side it elevates the port side higher out of the water thus assisting engine clearance from the water.
If it were mounted starboard the additional weight would push the mount and engine down even closer to the water when on the move.
Also I steer the main engine with my left hand sitting on my box or on the tube, so sitting on the port tube steering left handed is not a problem as the engine is close enough to hand to effectively steer.
In fact the tiller would have hit me in the back/side if I had mounted it starboard side.

It is my intention to mount the engine as close to the tube as is possible without it rubbing.
The propeller is way low enough not to hit the tube.......... you def don't want that!!!
Also by mounting it as close to the tube as possible it will keep the engine power head partially mounted over the tube, less exposed to waves.
The engine can also be slightly tilted to further protect it from waves.
It is not my intention to be flying along at WOT with the little Suzuki being thrashed about on the mount, I don't think the tilt mechanism would last too long.
I have taken onboard comments of veteran poster Wilk and will use two lugs on the Suzuki engine bracket to tension a ratchet strap around the propeller shaft to stop it bobbing up and down.
Within 300 yards of port where I launch 95% of the time I'm idling along with the 20hp trolling some lures or drifting or just get anchored up in a favourable spot.
For anyone who knows the coastline around the Mull of Galloway the will know that you can't row a SIB against the exceptionally strong tides.
It is my intention to have the aux mounted should I have a break down.
Then I would drop it down and go at slow displacement speeds and probably troll back to port.
I intend to fully / cautiously test things.
However if it is going to hit the water I will keep the aux safety wrapped and strapped inside the Sib and in the event of needing it in an emergency I will attach the sleeved mounting bracket and the aux.
I fancy my chances mounting a 12.5kg aux in a chop over trying to wrestle a 54kg main engine into the Sib with a view to fixing it or mounting the aux to the transom.
Time will tell if it has been a worthwhile project........?
At least it ain't cost me anything.......... all been done with scrap off cuts from work and in company time with company tools ssssssshhhhhh!!!!!
__________________
kaman is offline   Reply With Quote
Old 15 February 2014, 16:32   #65
Member
 
The Gurnard's Avatar
 
Country: UK - Scotland
Town: Stirling
Boat name: The Gurnard
Make: Quicksilver
Length: 4m +
Engine: mariner 25hp 2s
Join Date: Jul 2013
Posts: 1,653
Quote:
Originally Posted by kaman View Post
For anyone who knows the coastline around the Mull of Galloway the will know that you can't row a SIB against the exceptionally strong tides.
Yup... I agree entirely ..the tide race off the Mull of Galloway is not a place for an engine breakdown ..with no an auxilliary to keep you out of it.

This is the tide race on a calm day. My brother and his friend in their kayaks give a sense of scale to the standing waves.

Certainly not a place for the faint of heart in a SIB if the wind gets up against tide.

Good tope fishing area though


__________________
The Gurnard is offline   Reply With Quote
Old 15 February 2014, 18:04   #66
Member
 
Join Date: Jul 2011
Posts: 874
Quote:
Originally Posted by The Gurnard View Post

Yup... I agree entirely ..the tide race off the Mull of Galloway is not a place for an engine breakdown ..with no an auxilliary to keep you out of it.

This is the tide race on a calm day. My brother and his friend in their kayaks give a sense of scale to the standing waves.

Certainly not a place for the faint of heart in a SIB if the wind gets up against tide.

Good tope fishing area though
Gurnard, your pics show a similar situation to the one I described when i opened this thread. Wind whipped up with receeding tide a chop whipped up due to tide and wind refracting back off the cliff. We were 400 yards from shore couldn't anchor in the chop, my old man was rowing away like blazes but we were still leaving the west coast of Scotland with the racing tide - heading for Belfast at an alarming rate!
When these situations arise you can always head to the other side of the peninsula and fish in Luce bay - that's if you can get ashore!
Luce bay is 3/4 land locked and seldom gets too outrageous unless the wind coming from the south. Excellent tope fishing there too........ not a great idea landing an angry tope in a SIB tho as I found out a few years back!
I unhook them at the side of the boat now!
__________________
kaman is offline   Reply With Quote
Old 16 February 2014, 08:24   #67
Member
 
Country: UK - England
Town: Essex
Make: Quicksilver
Length: 4m +
Engine: 30hp
Join Date: Feb 2014
Posts: 132
This is all very interesting and helpful. Thanks guys. I will be very interested at how the bracket works. At first I thought genius but with everyones heads put together i'm unsure. Proofs in the pudding. I hope it works. I now just wonder if it will remain at the right height to keep sucking in water, else it will obviously overheat. I think there must be a way of having an articulating bracket that can go around the transom wheels and still be out the stern. Going to have a play around today and see what I can come up with. I think seagull have a removable aux mount with a dovetailed housing. I wonder if this could work in some way. They are really expensive though! Hmmm
__________________
The Bass Stalker is offline   Reply With Quote
Old 16 February 2014, 20:15   #68
Member
 
simon23's Avatar
 
Country: UK - England
Town: liverpool
Make: tohatsu6.1 one desig
Length: 6m +
Engine: mariner 125hp
Join Date: Jan 2012
Posts: 357
Do one legged ducks swim in circle?
__________________
simon23 is offline   Reply With Quote
Old 17 February 2014, 12:14   #69
Member
 
Country: UK - England
Town: St Ives
Boat name: Jessy
Make: Seago
Length: under 3m
Engine: honda 2.3
Join Date: Jan 2014
Posts: 29
Probably.
__________________
jep49 is offline   Reply With Quote
Old 17 February 2014, 12:33   #70
Member
 
Join Date: Jul 2011
Posts: 874
Quote:
Originally Posted by simon23 View Post
Do one legged ducks swim in circle?
Lol!
You quack me up!
Just like a plane that looses one of its engines in flight I suppose - it flies around in circles too.
Quack quack!
__________________
kaman is offline   Reply With Quote
Old 17 February 2014, 12:36   #71
Member
 
Country: UK - Scotland
Boat name: Wildheart
Make: Humber/Delta Seasafe
Length: 5m +
Engine: Merc 60 Clamshell
MMSI: 235068449
Join Date: Apr 2007
Posts: 4,671
Couple of observations from experience:

Quote:
Originally Posted by Harrys Game View Post
I have a block mounted behind the jockey set which appears to be suited to just this purpose.I am thinking about a good old seagull,
Seagull - Open design like my old Johnson 2 & 4Hp engines (both of 1960something vintage design).

Never underestimate how little brine it takes to short an HT lead.....

I'm in the process of re - designing my A- frame to allow me to fit a slightly bigger sealed case Aux.


Quote:
Originally Posted by Wild_Bill View Post
so I'll keep the trolling motor lashed to the deck until it's needed. I'll pull up the gas motor if something happens to it and put it in the boat and then drop the electric motor in place and go.
I also used to do that (with a petrol burner) until I did a trial run of trying to dig out & fit the aux in a slightly lumpy sea..... All I'll say is make sure it's tied on before you fit!

Quote:
Originally Posted by The Gurnard View Post
..they are "wet" boats so expect water over the sides.
...even if they are, my rib is pretty dry but the spray off the main engine is enough to soak the Aux on a calm day.....
__________________
9D280 is offline   Reply With Quote
Old 20 February 2014, 20:29   #72
Member
 
Join Date: Jul 2011
Posts: 874
Quote:
Originally Posted by kaman View Post
I do like 'Kamans' bracket though. Might be worried if the sea got big in case a wave caught it, but I would never plan to be out in those sorts of conditions, although waves do get big very quickly off shore I have found out.

Not done anything more with the bracket lately but I'm nightshift this week and plan to do the following modifications to it.

Cut through the 50mm box section - cutting unit in half.
Weld a sleeve into the half to which the engine mounts.
Drill two holes in the box section on the half that mounts to transom.
Drill the sleeve with two corresponding holes
M8 stainless bolts to be used to secure both halves of the unit together.
Trim down engine mounting plate to improve clearance from the water.
Paint with hardened grey marine paint.

I've had a few concerns during this project.
Most have been resolved apart from that regarding the water clearance of the unit.
I am satisfied that the unit and transom are robust enough to do the job.
At present the engine mounting plate measures 150mm (15cm) top to bottom.
50mm (5cm) of this is in the 50mm square box section which sits above the top of the tube.
This leaves 100mm (10cm) sticking downwards - potentially in the way of the splish splash waves.
The overall diameter of the tubes are 450mm (45cm).
Having studied a few YouTube videos of similar Honwaves on the move in the chop the splash up at the rear comes up to the underside of the rear carry handles.
This unit is mounted slightly higher than the top edge of the rear carry handle.
As I sit at the opposite side of the boat (right) when using the Honwave this slightly tilts the boat to the right elevating the auxiliary engine side (left) upwards and further clear of the water.

The aux engine and main engine both short shafts.
The aux has been deliberately mounted approx 120mm higher than the main to aid water clearance.
As I will be transferring my weight to the left tube when using the aux this has the affect of tilting the Honwave to the left, lowering the aux into the water.
I often go out with a mate but they tend to sit on the seat up front which has a custom made leather cushion.
As they tend to sit in the middle they have no affect on the camber of the Honwave.

I can alter the height of the aux mount by building it up and trimming the lower edge to improve water clearance further at a later date if need be.

Worst case scenario if it does not work to plan and I can't leave the aux mounted whilst out at sea.
I will wrap and strap the aux down inside the Honwave along with the engine mounting plate.
I will clip on a safety lanyard to the aux to prevent it going over the side when clamping it onto the aux mount.
This way I will have a readily available back up as in my opinion there is no way you can lift a 50kg plus motor into a Sib at sea, and all but the simplest of repairs have to be done on dry land.
Time and sea trialing will tell.

I will post pictures of finished mods in the next fortnight or so do some trials and take it from there, fingers crossed!
Been doing some work on the aux out rigger bracket.
I have cut the box section bar and welded a sleeve into the engine mounting plate half.
This section is now fully detachable.
Im sure the engine and bracket will have enough water clearance on calm days as it is.
However when there's a swell or chop it may get wet/drag on waves.
Don't want this so I think im going to weld another section of box metal about 6 inches above the outrigger on top of the existing box section.
This will serve to carry the engine up out of the water and out of well out of harms way.
With the sleeved detachable engine mounting section, I will be able to vary the engines carrying position by drilling various holes in the the two different horizontal box sections.
This will allow me to slide the engine in towards the tube or out over the water and at two different heights.
A bit hard to put into words but I will post pics when complete.
__________________
kaman is offline   Reply With Quote
Old 20 February 2014, 21:02   #73
Member
 
Join Date: Jul 2011
Posts: 874
Bracket

A couple of doodles of what I was meaning in my previous post.
Nothing to scale but just to give an idea of what I was waffling on about.
Sleeved section to be secured into bracket with 2 x m8 stainless bolts.
Engine to be secured at all times to transom with safety rope........ Just to be safe!
I will get pics of finished item on in the next two weeks or so.
Attached Thumbnails
Click image for larger version

Name:	image.jpg
Views:	267
Size:	53.4 KB
ID:	91336  
__________________
kaman is offline   Reply With Quote
Old 20 February 2014, 21:04   #74
Member
 
Join Date: Jul 2011
Posts: 874
Bracket

Another doodle to illustrate my waffling
Attached Thumbnails
Click image for larger version

Name:	image.jpg
Views:	300
Size:	57.7 KB
ID:	91337  
__________________
kaman is offline   Reply With Quote
Old 21 February 2014, 00:52   #75
Member
 
Join Date: Jul 2011
Posts: 874
Quote:
Originally Posted by kaman View Post
Another doodle to illustrate my waffling
Adapt and overcome that's my philosophy!

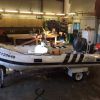
Just adding the finishing touches to the out rigger whilst on my Nightshift.
Should be good to go in the morning.
Will post pictures in due course.

Again feel free to give your views.
It's good to see things from another perspective.

I have already been alerted to a couple of my oversights by fellow Ribnet members.

Ultimately I would have realised them whilst sea trialing tho!
Not good.

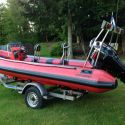
Just ordered some very large square stainless m12 washers to harness the m12 through transom securing bolts.

These will be sealed on the outside / water side of the transom section with sika flex.

The finished product is going to look a lot different from my original attempt.

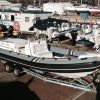
Due to the Honwave having a very thick/robust transom I am confident that I can engineer / re-engineer this bracket to hold an auxiliary power source for my Sib.

Im not going to be blasting about at WOT with an auxiliary thrashing about on my bracket,

I will launch for fishing with my 20hp and troll 12 - 15 miles south then back, no more than 2.5 miles from shore.

Too far to row against a strong tidal surge.

Queue the ready waiting 2.5 hp auxiliary.

Fingers crossed anyway!!!!

I honestly don't think my Tohatsu 20hp is likely to malfunction any time soon but it only takes a poly bag to shear a pin and your screwed!
__________________
kaman is offline   Reply With Quote
Old 21 February 2014, 10:40   #76
Member
 
Country: UK - Scotland
Town: Glasgow
Boat name: snagglepuss
Make: Shetland
Length: 6m +
Engine: 90 hp Outboard
Join Date: Nov 2011
Posts: 562
Quote:
Originally Posted by Poly View Post
I'm not convinced that a tiny aux on a boat this size doesn't lead you into a false sense of security.

Close proximity to cliffs with a Lee shore, conditions where it is apparently too choppy to anchor - 2.5hp on an infrequently used engine, that you will have to get in position and started (having probably wasted a minute doing the obvious checks on the main engine) when things go wrong on a small boat it happens quickly.

for the 30 seconds it would take to start a small aux I prefer to have one and not need it than need one and not have it. I also dont often find myself in that scenario and there have been a few occasions where I have taken mine on other peoples sibs where I was v grateful for having it with me.
__________________
clydeoutboards is offline   Reply With Quote
Old 21 February 2014, 11:05   #77
Member
 
Country: UK - England
Town: Oop North
Length: 3m +
Join Date: Jul 2013
Posts: 327
What's the smallest, in weight/dimensions, 2 stroke outboard?
__________________
stray is offline   Reply With Quote
Old 21 February 2014, 12:03   #78
Member
 
Join Date: Jul 2011
Posts: 874
Sleeved revised edition

Took a couple of pics of the trimmed down bracket with the sleeve fitted.
This one shows the engine mounting plate removed and sitting in a position where it will be carried when engine is on the Sib and the aux is not being used.
I will weld another piece of box metal on top of the outrigger to carry the engine in the position illustrated.
The lowest part of the engine will be 50mm above the top of the tube whilst in this position.
The engine whilst in this position will be carried mainly over the top of the tube with only a small section overhanging the water.
This should keep it well up out of the way of splashes.
To use the aux I will undo the two bolts and attach it in the lower position, bolts back in and use.
Aux will be secured at all times with a lanyard to prevent it going over the side.
Attached Thumbnails
Click image for larger version

Name:	image.jpg
Views:	271
Size:	174.9 KB
ID:	91341  
__________________
kaman is offline   Reply With Quote
Old 21 February 2014, 12:06   #79
Member
 
Join Date: Jul 2011
Posts: 874
Sleeved revised edition

The bracket fitted back together in a position ready for engine use.
Attached Thumbnails
Click image for larger version

Name:	image.jpg
Views:	254
Size:	131.6 KB
ID:	91342  
__________________
kaman is offline   Reply With Quote
Old 22 February 2014, 23:13   #80
Member
 
Join Date: Jul 2011
Posts: 874
Quote:
Originally Posted by kaman View Post
The bracket fitted back together in a position ready for engine use.
Had another play with outrigger bracket today.
I have now decided on the final design!
Outrigger engine mounting plate to which engine clamps to be cut in half, I intentionally made it on the large side so I could play around with different set ups.
This will leave a very small engine mounting plate overhanging sib tube, but also serve to reduce the risk of the plate/engine catching on waves.
Surplus plate to be welded / bolted to the top of they outrigger 50mm box section - see pic!
This will serve as an extra transom, to mount engine to.
As this mount is close to the transom engine bearing stresses placed on transom greatly reduced whilst the Sib is on the move.
As can be seen from pic engine carried high clear of the water and on the inside of tube, well within harms way.
Engine to be attached to transom with lanyard at all times!
When needed engine to be unclamped from outrigger and clamped to the removable outrigger engine plate which overhangs left hand Sib tube.
Attached Thumbnails
Click image for larger version

Name:	image.jpg
Views:	306
Size:	96.6 KB
ID:	91390  
__________________
kaman is offline   Reply With Quote
Reply


Posting Rules
You may not post new threads
You may not post replies
You may not post attachments
You may not edit your posts

BB code is On
Smilies are On
[IMG] code is On
HTML code is Off
Trackbacks are Off
Pingbacks are Off
Refbacks are Off


All times are GMT. The time now is 06:58.


Powered by vBulletin® Version 3.8.8 Beta 1
Copyright ©2000 - 2024, vBulletin Solutions, Inc.