I feel a set of Beachmaster wheels calling me, but I would need to find a good way of attaching them to the transom so that they are easily removable.
The suggested solution on the Beachmaster web site involves leaving 8 short studs protruding from the transom. I wouldn't be happy with this for a few reasons: I would be concerned about chafing the end cones while the boat is packed up; having 8 nuts to do each time is about 6 fixings too many; it would always be a bodge.
I two have that feeling, I wonder if we can save each other some money?
I also feel the same way re removal, I have not finished on the thought process yet, but have been thinking of having a blank with the same foot print to cover the studs when packing away the boat (Avon Rover 310), When useing the wheels I'd use wing nuts and when packing the boat up I would use dome nuts.
If it won't be too hard to remove and replace them, why not use a couple of big wingnuts and bolts all the way through to hold the moving assembly to the backing plate? That cuts you from 8 bolts to 4.
However, I notice in the folded pics the tyre would be hitting the bolt by doing that, so you'd have to work out if you could lock them up in a slightly lower position.
__________________
Need spares,consoles,consumables,hire,training or even a new boat?
Please click HERE and HERE and support our Trade Members.
plate on the transom withe two tee slots in place of the bottem bolts and a catch at the top?
four protex bolts in from the sides?
chewing gum and crazy glue?
__________________
But I may be talking Rubbish.
Expurt is a drip under pressure, and the difference between an Amateur and a proffesional is getting paid.
You could do away with four of the bolts by making a plate which fixes permanently to the transom. The plate would have a dog's leg bend in it so that the top of the wheel mounting can slide below it. You may need to slot the lower holes depending on the tightness of your fit under the plate. If you have a big vise, bending a piece of plate is easy enough. Instructions if necessary.
Alternatively, stick a bit of tube over the bolt ends when folding up and don't fret about it.
I had thought of something along those lines, but hadn't worked out the details of the "bolts". Zodiac/Bombard use something similar for the lower fixing on their launching wheels - I was going to search for something suitable but can't for the life of me think what it might be called!
As a development of prairie tuber's solution (with the slots the right way up) how about three of those fixings plus one threaded insert in the transom to take a thumb bolt? That way it's positively secured with only one removable part per wheel, and minimal protrusions.
How about drilling slightly oversize holes for the bolts. Sealing the holes on the inside with epoxy then drilling to the correct diameter for the bolts you will be using. Then install stainless steel t nuts on the inside of the transom. I have used this method for mounting other accessories and tacked the t nut down with a little epoxy to keep it from coming off when removing the bolts. When you install the wheels a bolt with a rubber washer seals the holes. When the wheels are removed a shorter bolt with washer seals the holes without extending past the transom inside the boat or you could install the t nut in a slightly counter sunk hole in the transom and then seal with epoxy obviating the need for the sealing washer. If you dont want to use as many bolts go with a larger size. Just a suggestion.
I'm thinking slots in the bracket and threaded inserts (probably not tee nuts though) in the transom with dome headed bolts. The bolts stay in place all the time and will only need a couple of turns each with an allan key to fit or remove the wheels.
Slots in the mounting bracket, as per prairie tuber's drawing. M8 stainless threaded inserts in the transom - something like this with some sikaflex or resin to make sure that damp doesn't get into the transom. Then M8 stainless button head bolts to fix the wheels to the transom.
Are inserts a sensible way to go? Or do I really need to bolt through the transom? I could take a similar approach, but using some threaded stainless tube instead with short button head bolts on the inside to keep things tidy.
Go through the transom, essential. Make life easy, drill the transom, properly seal the wood to prevent water ingress, use bolts or screws with heads easy to hold, use penny washers and wingnuts inside. If you want to use the boat without the wheels just slip the bolts through the holes and spin on the wingnuts. Easy.
Stop fekkin about JK.
I'd rather do a bit more fekkin about at this stage, to avoid fekkin about every time I use the boat!
As far as I am concerned, the key to getting the most out of an inflatable is to make life easy - hence the airdeck, high speed inflator, easily manageable 2 stroke engine. I'd like attaching and removing the wheels to be as near to effortless as possible, otherwise I may as well stick with the standard Zodiac wheels which work perfectly well but aren't as convenient as they might be. I definitely don't want a load of wing nuts on the inside of the transom either.
Quote:
Originally Posted by jwalker
JK, just a thought, you might want to swat up on drillin oles...
Oh, don't worry. I'll be getting someone else to do that!
I'd rather do a bit more fekkin about at this stage, to avoid fekkin about every time I use the boat!
As far as I am concerned, the key to getting the most out of an inflatable is to make life easy -
Absolutely, that's why I suggested a simple bolt and wingnut. Simplicity being the essence of good design. No tools required. Only one hole to line up to get the bolt in instead of faffin about trying to align four of them while someone else holds the boat high enough for you to faff. Been there, done it. It'll be them wingnuts not bling enough, admit it...
I don't really do bling, but I certainly don't like the idea of lots of sticky out bits on the inside of the transom waiting to open up my leg.
No need for anyone to lift the boat at all as the wheels can be attached before it's inflated. And that's made even easier if it can all be done from the outside of the transom.
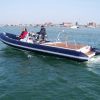
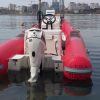
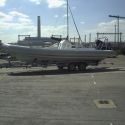
Ha ha,but if you are a fisherman like me ,i do this with my transom wheels,wheels are different,they just bolt off,and then i cover the transom with a couple of bags to stop tubes getting punctured which one has,doh,been repaired tho,some picks
I know this is an old thread but I was looking for a way to make the wheels removable for my Avon sib when I found out that Beachmasters now have quick release wheels listed on their website. Anyone tried them yet?


 White Noise