Reply
 
Thread Tools Search this Thread
 
Old 02 September 2013, 13:47   #1
Member
 
jbavvo's Avatar
 
Country: UK - England
Town: Peterborough
Boat name: Swift Sarah
Make: Avon SR4
Length: 4m +
Engine: Mariner 30hp
Join Date: Oct 2012
Posts: 35
Leaking floor valve and patched tube

Hi all, I've seen several articles about repairing inflatables and just wanted to confirm what I'm doing is right before I start.

Firstly, the inflatable keel on my YAM deflates within about 10 minutes now. I did the soapy water test and it's definitely coming from the valve.


I've read that it could just be mucky and removing the valve and cleaning it with soapy water could just fix it. Alternatively it could need replacing. Does this sound right? And if so, should I try cleaning it first before replacing, or just do it in one go?

Either way I'll need a valve spanner. Is there a cheaper/DIY option, or is it worth paying the £12 for the proper tool? I believe it's the BRAVO 2001 valve.

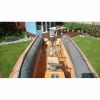
Secondly, there's a patch on the rear sponson which has just started leaking in the last month or two (think it may have been the summer heat/pressure).


As you can see, it's pretty minor. And it takes over a week to go around 70% firm. Is there a way of resealing the edge, or using sealant on the inside? I'd rather not remove and replace the patch if I can avoid it.

Any advice greatly received!
__________________
jbavvo is offline   Reply With Quote
Old 02 September 2013, 13:55   #2
Member
 
Country: UK - England
Town: bicester
Length: no boat
Engine: outboard only
Join Date: Feb 2009
Posts: 913
before you try to remove the valve try the following,You will need the proper tool or make one ,
1/ undo the valve about 3/4 of a turn,
2/ inflate to the correct preasure then quickly tighten the valve,
3/ cos you will have lost some pressure re-inflate to the correct preasure and check for leaks if it still leaks, sorry the valve should be re-placed.
Doing the above has saved me the job of replacing the valve, what happens is when the boat is made some times the rubber inside crunchs up ,by slackening the valve and inflating you (hopefully) straighten out that rubber ,
__________________
uncle al is offline   Reply With Quote
Old 02 September 2013, 14:01   #3
Member
 
jbavvo's Avatar
 
Country: UK - England
Town: Peterborough
Boat name: Swift Sarah
Make: Avon SR4
Length: 4m +
Engine: Mariner 30hp
Join Date: Oct 2012
Posts: 35
Quote:
Originally Posted by uncle al View Post
before you try to remove the valve try the following,You will need the proper tool or make one
Thanks, sounds like a good place to start. Any advice on making a tool?
__________________
jbavvo is offline   Reply With Quote
Old 02 September 2013, 15:19   #4
Member
 
Country: UK - England
Town: bicester
Length: no boat
Engine: outboard only
Join Date: Feb 2009
Posts: 913
all I did was find a bit of metal pipe and cut to fit,it was still better than the factory one, the factory one (merc/mar) was thin steel which bent easily.
__________________
uncle al is offline   Reply With Quote
Old 02 September 2013, 18:35   #5
Member
 
Locozodiac's Avatar
 
Country: Other
Town: Lima-Peru
Boat name: Nautile
Make: Sea Rider 450 Rib
Length: 4m +
Engine: Tohatsu 5/18/30 HP
Join Date: Sep 2007
Posts: 1,998
Is it an air leak side of outter valve or through middle pin ? If outter, same procedure recommended by Uncle Al. If inner push valve pin open and air blast with compressor, probably have debris, sand particles located between silicone round gasket and inner valve neck. If removing air valve, try sitting on same fabric marked position previously stretched as to sit well tight.

Happy Boating
__________________
Locozodiac is offline   Reply With Quote
Old 02 September 2013, 19:00   #6
Member
 
jbavvo's Avatar
 
Country: UK - England
Town: Peterborough
Boat name: Swift Sarah
Make: Avon SR4
Length: 4m +
Engine: Mariner 30hp
Join Date: Oct 2012
Posts: 35
Quote:
Originally Posted by Locozodiac View Post
Is it an air leak side of outter valve or through middle pin ?
It's leaking from around the outside (mainly from top and bottom). Thanks, I'll give it a go.

Any advice on the leaking patch?
__________________
jbavvo is offline   Reply With Quote
Old 03 September 2013, 00:00   #7
Member
 
Country: Australia
Town: Adelaide
Length: no boat
Join Date: Sep 2008
Posts: 84
The best solution for the patch is to remove the old patch and clean and apply a new patch. If you attempt to try and solve the problem by applying more adhesive or a new patch over the top this will just mask the original issue, and the air will just find the next weakest point along the patch.

The only other issue is the size of the patch, which could be hiding quite a sizeable hole or tear (you should be able to feel the size of the damage). IThe repair looks like a professional job. It's just that the adhesive is giving way.

Any professional repair shop would replace the patch without question - it's the only sure way of providing a good fix.
__________________
Simon
Australian Zodiac Repairer
www.inflatableboatrepairs.com.au
S4Simon is offline   Reply With Quote
Old 03 September 2013, 00:06   #8
Member
 
Country: Australia
Town: Adelaide
Length: no boat
Join Date: Sep 2008
Posts: 84
Re: the valve. If the air is coming from under the collar then it looks as though the adhesive holding the valve in has had it. Which would mean removing the valve completely, cleaning the affected areas, and if the valve is still in good condition, re install valve. Tricky job but do-able.

Here's hopng the valve just needs reseating as stated above.
__________________
Simon
Australian Zodiac Repairer
www.inflatableboatrepairs.com.au
S4Simon is offline   Reply With Quote
Old 09 October 2013, 09:40   #9
Member
 
jbavvo's Avatar
 
Country: UK - England
Town: Peterborough
Boat name: Swift Sarah
Make: Avon SR4
Length: 4m +
Engine: Mariner 30hp
Join Date: Oct 2012
Posts: 35
Sorted the leaking floor valve. I bought the tool, removed the valve and cleaned with Fairy Liquid, put it back together and tightened it back up - it's now perfect and holds 100%.

Cheers for the help.
__________________
jbavvo is offline   Reply With Quote
Old 09 October 2013, 21:44   #10
Member
 
bingosucks's Avatar
 
Country: UK - England
Town: Nuneaton
Boat name: ribbit
Make: ring
Length: 6m +
Engine: opti 150
Join Date: Oct 2011
Posts: 557
You need to use a he
__________________
bingosucks is offline   Reply With Quote
Old 09 October 2013, 21:46   #11
Member
 
bingosucks's Avatar
 
Country: UK - England
Town: Nuneaton
Boat name: ribbit
Make: ring
Length: 6m +
Engine: opti 150
Join Date: Oct 2011
Posts: 557
Heatgun to remove the patch an inner patch is prob req too search the threads i had some brill advice. Its not hard to patch you just need patience
__________________
bingosucks is offline   Reply With Quote
Old 10 October 2013, 09:10   #12
Member
 
jbavvo's Avatar
 
Country: UK - England
Town: Peterborough
Boat name: Swift Sarah
Make: Avon SR4
Length: 4m +
Engine: Mariner 30hp
Join Date: Oct 2012
Posts: 35
Quote:
Originally Posted by bingosucks View Post
Heatgun to remove the patch an inner patch is prob req too search the threads i had some brill advice. Its not hard to patch you just need patience
Cheers. I'm going to hold off repairing the patch for now. The air leak is minimal and I no longer trailer it, just pack it down. If it gets any worse I'll tackle it over the winter.
__________________
jbavvo is offline   Reply With Quote
Reply

Thread Tools Search this Thread
Search this Thread:

Advanced Search

Posting Rules
You may not post new threads
You may not post replies
You may not post attachments
You may not edit your posts

BB code is On
Smilies are On
[IMG] code is On
HTML code is Off
Trackbacks are Off
Pingbacks are Off
Refbacks are Off


All times are GMT. The time now is 18:25.


Powered by vBulletin® Version 3.8.8 Beta 1
Copyright ©2000 - 2024, vBulletin Solutions, Inc.