|
|
 04 April 2011, 18:26
|
#41
|
|
Member
Country: UK - England
Town: durham
Boat name: Moo
Make: Cobra
Length: 7m +
Engine: 250 Yamaha
Join Date: Oct 2010
Posts: 26
|
1.25 is the standard pitch for M8 if memory serves. You are right the kit is expensive, however the insert itself is very cheap. Given the portability of your damaged component I would be tempted to call a couple of local engine reconditioners. For a fee I am sure they would insert one for you if they use them.
You could always ask your local Wurth rep for a demonstration!
I have had surprising success with stud extractors in the past, the conical LH threaded type. This, if succesful would be cheaper still.
I look forward to hearing how it goes.
__________________
|

|

|
|
04 April 2011, 21:22
|
#42
|
|
Member
Country: Other
Town: Principalite d'Chaos
Boat name: The Nashers Revenge!
Make: Windsor Brothers
Length: 6m +
Engine: Optimax 225
MMSI: "Mmmmm SI" she said!
Join Date: Jan 2004
Posts: 4,828
|
I've had exactly the opposite with stud extractors, or 'easyouts' as they are sometimes called.
The bigger ones are OK, but down at this size I find they tend to snap off leaving you with a much harder lump of metal stuck in the old stud that is far too hard to drill out.
I'll get my jig made this coming weekend and get the centres drilled out to 6.3mm before going any further. You never know, I might be lucky enough to be able to get the rest of each stud out by collapsing them in on themselves.
Nasher.
__________________
|
|
|
|
|
04 April 2011, 21:45
|
#43
|
|
RIBnet admin team
Country: UK - England
Town: The wilds of Wiltshire
Boat name: Dominator
Make: SR5.4
Length: 7m +
Engine: Yam 85
MMSI: 235055163
Join Date: Jul 2005
Posts: 13,054
|
I'd helicoil 1st-you can still timesert after. I've had a couple of nasty incidents with old timeserts on Suzuki bike engines where they've corroded in between the timesert and the head and the whole thing came out as one piece, bolt still in timesert.
If you can drill a decent size pilot hole in the broken bolts, it may be worth trying a trick I found worked.Freeze it using spray then use the drill on hammer action whilst extending the pilot hole (use a cheap nasty and even a blunt drill bit, it'll blunt it very fast anyway)
You may find the stud will start to wind in slightly. It's a simple job to remove it with a dot punch then.
__________________
Need spares,consoles,consumables,hire,training or even a new boat?
Please click HERE and HERE and support our Trade Members.
Join up as a Trade member or Supporter HERE
|
|
|
|
|
05 April 2011, 12:56
|
#44
|
|
Member
Country: UK - England
Town: durham
Boat name: Moo
Make: Cobra
Length: 7m +
Engine: 250 Yamaha
Join Date: Oct 2010
Posts: 26
|
I once new a chap who could reliably drill out the centre of a stud and then peel out the remains of the thread with narrow nose pliers. Mind you he was a magician in the workshop. He could even smoke a cigarette from start to finish without removing it from his mouth, nor any ash falling off the end - impressive stuff!
__________________
|
|
|
|
|
05 April 2011, 19:13
|
#45
|
|
Member
Country: Other
Town: Principalite d'Chaos
Boat name: The Nashers Revenge!
Make: Windsor Brothers
Length: 6m +
Engine: Optimax 225
MMSI: "Mmmmm SI" she said!
Join Date: Jan 2004
Posts: 4,828
|
Quote:
Originally Posted by Flotsam

I once new a chap who could reliably drill out the centre of a stud and then peel out the remains of the thread with narrow nose pliers.
|
That's what I mean by collapsing it in on itself.
I've managed to do it on M12 bolts once or twice, but nothing this small.
The trick is to open the hole out to just under the size of the bottom diameter of the thread, then collapse the rest into the centre with a punch.
Can't say I can do it reliably though 
More by luck than anything.
Nasher.
__________________
|
|
|
|
|
09 April 2011, 19:43
|
#46
|
|
Member
Country: Other
Town: Principalite d'Chaos
Boat name: The Nashers Revenge!
Make: Windsor Brothers
Length: 6m +
Engine: Optimax 225
MMSI: "Mmmmm SI" she said!
Join Date: Jan 2004
Posts: 4,828
|
PVC fabric doesn't like being glued around compound curves - Fact.
Last weekend I managed to get a patch on the rear corner of one side of the deck, which was a pig to do as it involved trying to glue the patch over a compound curve.
In the end I cut some darts out if it and hoped for the best.
I used the Grey material instead of the correct off-white colour as it is much thinner, and coped with a small amount of stretching and compressing unlike the thicker correct colour material.
I pumped it up Tuesday evening and it stayed up OK until today, but I decided it would be best to add some mechanical strength over the top in a true 'belt and braces' fashion.
First images are the initial patch that sealed the cracks in the top surface, and the leaks along the seam made brittle by petrol leaking on it.
The final pic shows the strengthening piece added over the top, and the start of the patch on the other deck half.
The strenghtening piece is mirrored underneath.
Nasher.
__________________
|
|
|
|
|
09 April 2011, 19:53
|
#47
|
|
Member
Country: Other
Town: Principalite d'Chaos
Boat name: The Nashers Revenge!
Make: Windsor Brothers
Length: 6m +
Engine: Optimax 225
MMSI: "Mmmmm SI" she said!
Join Date: Jan 2004
Posts: 4,828
|
On the engine front I've made up a drilling jig to accurately drill out the broken bolts.
I used the cylinder head to mark the position of the holes, then turned up some guides in my lathe before tack welding them to the plate.
So far I've drilled a pilot hole down the centre of each bolt.
Now I'll open the holes up in the jig in my Pillar drill in a couple of stages, and at each stage I'll bolt the jig back on the engine to open out the holes.
There is no way I'd have managed to drill down the centre of these bolts without the jig.
I already have the M8 x 1.25mm helicoils, but as can be seen I need to spend some time cleaning up the face of the block before it can all be bolted back together.
Nasher.
__________________
|
|
|
|
|
09 April 2011, 20:53
|
#48
|
|
Member
Country: Finland
Town: Helsinki
Boat name: SR 5.4
Make: Avon
Length: 4m +
Engine: Toh1 3,5 Yam 90/2S
Join Date: Oct 2009
Posts: 919
|
Nice job with the patching, not to mention the work on the engine! What glue did You use?
__________________
fun on a boat is inversely proportional to size...sort of anyway
|
|
|
|
|
09 April 2011, 22:49
|
#49
|
|
Member
Country: Other
Town: Principalite d'Chaos
Boat name: The Nashers Revenge!
Make: Windsor Brothers
Length: 6m +
Engine: Optimax 225
MMSI: "Mmmmm SI" she said!
Join Date: Jan 2004
Posts: 4,828
|
Thanks C-NUMB.
The glue I used is Apollo 2-part, which I purchased from The Rib Shop along with the fabric.
I've not used it before, but it appears to have stuck well etc.
Most of the work is in the preparation, plus making sure the temperature is right and the humidity is low.
I also used a hairdrier to warm the material slightly, and prepared the surface with a couple of treatments of Acetone to make the surface tacky before applying the primer coat of glue.
Nasher.
__________________
|
|
|
|
|
10 April 2011, 18:20
|
#50
|
|
Member
Country: Other
Town: Principalite d'Chaos
Boat name: The Nashers Revenge!
Make: Windsor Brothers
Length: 6m +
Engine: Optimax 225
MMSI: "Mmmmm SI" she said!
Join Date: Jan 2004
Posts: 4,828
|
Finishing off sorting out the broken bolts went well today.
Using my jig all three bolts drilled out to 8.3mm OK, the tapping drill size for an M8 Helicoil.
The block is now ready for the head to go back on, but I stopped short of doing it as I think it would be sensible to get some fresh High Tensile bolts.
Nasher.
__________________
|
|
|
|
|
16 April 2011, 17:29
|
#51
|
|
Member
Country: Other
Town: Principalite d'Chaos
Boat name: The Nashers Revenge!
Make: Windsor Brothers
Length: 6m +
Engine: Optimax 225
MMSI: "Mmmmm SI" she said!
Join Date: Jan 2004
Posts: 4,828
|
It runs
Quite sweetly too actually, and as can be seen it pumps water VERY well after I cleared the tell tale hole out again.
We're not sure now which cover to clean up and use.
Both the smaller Nashers and myself think the earlier cover which is a different colour to the rest of the engine looks better because of the contrast.
Nasher.
__________________
|
|
|
|
|
16 April 2011, 17:36
|
#52
|
|
Member
Country: Other
Town: Principalite d'Chaos
Boat name: The Nashers Revenge!
Make: Windsor Brothers
Length: 6m +
Engine: Optimax 225
MMSI: "Mmmmm SI" she said!
Join Date: Jan 2004
Posts: 4,828
|
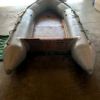
I've also now finished the repairs on the deck, which holds air well and the different coloured patches don't look too out of place.
Need to paint the transom, do some more cleaning, and get some more glue before adding some wear patches.
The lads want me to make up some stencils and add 'The Nippers Revenge' to the tubes in the same font as we have 'The Nashers Revenge' on the RIB. Does the flexible naming paint stick really well, or not? Bearing in mind the boat will be deflated and rolled up each time it's used.
The transom has fittings attached which are in the images, I'm presuming they are for a set of wheels.
Anyone know any different?
Or know what make of wheels they are for?
And another question for those that already run one of these boats.
We have a 12l and a 20l fuel tank that we'll use depending on circumstances.
Where do others place them? And how do you have them strapped down?
Nasher
__________________
|
|
|
|
|
16 April 2011, 20:05
|
#53
|
|
Member
Country: UK - England
Town: Bucks
Boat name: Blue & Ding Dong
Make: Ribeye,SR4 & Bombard
Length: 6m +
Engine: 115,50 & 15Hp Yams
Join Date: Feb 2004
Posts: 3,252
|
job well done 
I have used the flexible paint on mine & after 4 or 5 years its just fine,
I have the zodiac wheels that fit these fitting & work very well.
I sold my 22lt tank & got a 12lt one I strap to the transon its more than adiquot for a day out & if in dout & stick a 5lt ready can under the front bow bag.
Nick
__________________
|
|
|
|
|
16 April 2011, 20:16
|
#54
|
|
Member
Country: UK - England
Town: Enfield/Switzerland
Boat name: Zonneschijn II/Vixen
Make: Shakespeare/Avon
Length: 7m +
Engine: Evin' 175 DI /Yam 90
MMSI: 235055605
Join Date: May 2006
Posts: 1,436
|
Quote:
Originally Posted by Nasher
It runs
Nasher. |
nice job nasher
__________________
|
|
|
|
|
17 April 2011, 06:52
|
#55
|
|
Member
Country: Finland
Town: Helsinki
Boat name: SR 5.4
Make: Avon
Length: 4m +
Engine: Toh1 3,5 Yam 90/2S
Join Date: Oct 2009
Posts: 919
|
Nice job!
Maybe best place for the tank is to have it strapped down under the bench, stuff tends to move around in this type of boat. I would use the original zodic wheels, but their expensive.
The one i had was crap, very difficult to detach when boat was in water.
IMHO there is a minor design flaw in the way the lower fastening point is attached to the transom(picture number 2). There is a seal for preventing the water to get in to the the boat
but the hole drilled into the plywood for the fitting does not have much of protection from water. I know its marine grade plywood but still would have designed it differently. I sealed mine with a tiny amount of sika after making sure the transom was dry.
Wonder would auto mobile vinyl spray paint work on PVC for lettering, maybe?
__________________
fun on a boat is inversely proportional to size...sort of anyway
|
|
|
|
|
17 April 2011, 07:50
|
#56
|
|
Member
Country: UK - England
Boat name: Angel-B
Make: Ex Y boat
Length: 3m +
Engine: Suzuki 9.9HP
Join Date: Apr 2007
Posts: 594
|
I have my 12 litre fuel tank strapped against the transom.
I have four lacing straps on the transom - I can't find a photo on the web, but they are the stainless equivalent of these:
http://www.allenbrothers.co.uk/item_...d_id=84&id=538
With one webbing strap around the tank horizontally and one vertically.
Cheers
Chris
__________________
|
|
|
|
|
22 April 2011, 20:22
|
#57
|
|
Member
Country: Other
Town: Principalite d'Chaos
Boat name: The Nashers Revenge!
Make: Windsor Brothers
Length: 6m +
Engine: Optimax 225
MMSI: "Mmmmm SI" she said!
Join Date: Jan 2004
Posts: 4,828
|
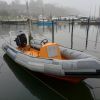
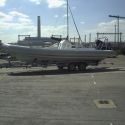
Big day tomorrow.
It's going in the water for the first time
Added the wear patches on the tops of the tubes this morning which covers the couple of Pin pricks on the Starboard tube.
For the time being we've decided to strap the fuel tank down where the seat should be located. We didn't get a seat with the boat so the mounting points aren't being used anyway.
The engine hasn't had a coat of paint yet, but that can wait until after I'm happy it runs OK out on the water.
I've changed the gearbox oil this morning and added a kill switch that actually works.
Not sure where to drop it in yet, may try Fareham creak tomorrow afternoon. We want somewhere sheltered as I'm not confident about the engine yet, and I want us to be able to paddle back if we have to.
You never know, after all this work on their SIB the smaller Nashers may let me have some time off to put the RIB in the water 
If all goes well I'll be really chuffed, as without taking into account my time, the total outlay to date is under £500.
Nasher.
__________________
|
|
|
|
|
23 April 2011, 08:45
|
#58
|
|
Member
Country: UK - Wales
Town: N. Pembrokeshire
Boat name: Various
Make: RIBs & Hovercraft
Length: 9m +
Engine: Outboards
MMSI: Various
Join Date: May 2009
Posts: 1,358
|
Quote:
Originally Posted by Nasher
Big day tomorrow.
It's going in the water for the first time |
Hope you have fun....it's looking great!
|
|
|
|
|
23 April 2011, 09:30
|
#59
|
|
Member
Country: UK - England
Town: Poole
Boat name: Exodus
Make: Tohatsu
Length: 7m +
Engine: Evinrude 150
Join Date: May 2007
Posts: 275
|
As ever Mr N that looks like a seriously good job you've done on that. Good luck today, you know it'll be absolutely fine.
__________________
Only two things are infinite, the universe and human stupidity, and I'm not sure about the former --- Albert Einstein
|
|
|
|
|
23 April 2011, 20:30
|
#60
|
|
Member
Country: Other
Town: Principalite d'Chaos
Boat name: The Nashers Revenge!
Make: Windsor Brothers
Length: 6m +
Engine: Optimax 225
MMSI: "Mmmmm SI" she said!
Join Date: Jan 2004
Posts: 4,828
|
Well, that went well
The engine performed really well, and didn't miss a beat.
We went up past Porchester and into Portsmouth Harbour then back again before the lads went out for a spin by themselves.
After adding a bit more air to the deck, and raising the angle of the engine a notch, the little 9.9 got the boat up on the plane with the three of us in quite quickly, and without even resorting to full throttle skimmed us along at over 14 knots at one point. (Took the hand held GPS along for a laugh).
Nasher.
__________________
|
|
|
|
|
|
 Posting Rules
|
You may not post new threads
You may not post replies
You may not post attachments
You may not edit your posts
HTML code is Off
|
|
|
|
 Recent Discussions
 |
|
|
|
|
|
|
|
|
|
|
|
|
|
|
|
|
|
|
|
|
|
|
|
|
|
|
|
|
|
|
|
|
|


 White Noise
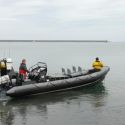 Alca Torda
 Razorbill
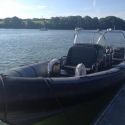 Tystie