|
 02 June 2016, 02:17
|
#1
|
|
Member
Country: USA
Town: Southern California
Length: 3m +
Join Date: May 2016
Posts: 65
|
Could not install the stringers on my new Bombard
Hey folks. I was/am extremely excited to get my new Bombard Typhoon 420 boat! I'm normally pretty good with these things but I seriously could not get these stringers to go in.
I read the manual. The only thing I did do is add starch as it suggested. I'll check out some videos online to maybe see if I'm doing anything wrong. I watched a video by the company/seller install these within 60 seconds. I spent an hour and got no where.
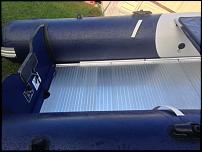
One concerned I had was that no matter what I did, there was always 2 pieces of the floor lifted. If I stepped on the aluminum, the wood would start to rise. I made sure every single piece was wedged and still couldn't get it to go. I've included some pics (link) and you can see that it's almost like some pieces we're inverted as you could see the stringer would fit flush on 1 but not on the other.
Anyone have any tips or tricks? I know it'll break in and get easier, but honestly quite frustrating. If it weren't for the neighbors there may have been some flying cardboard pieces.
Imgur: The most awesome images on the Internet
__________________
|

|

|
|
02 June 2016, 04:57
|
#2
|
|
Member
Country: UK - England
Town: aintree
Boat name: megus
Make: avon s400
Length: 4m +
Engine: 20hp yamaha
Join Date: Sep 2013
Posts: 48
|
could be wrong but stringer looks to be downside up.
__________________
|
|
|
|
|
02 June 2016, 05:07
|
#3
|
|
Member
Country: USA
Town: Southern California
Length: 3m +
Join Date: May 2016
Posts: 65
|
Quote:
Originally Posted by stevo

could be wrong but stringer looks to be downside up.
|
Hi Stevo.
Thanks for the reply! I should have been more clear. Both are installed incorrectly, I was simply trying to show the angle of the floor pieces. The first picture is the piece closest to the transom. I think it's angling down due to the tight fit. I even think my manual says to stick an ore or stringer under it to make it easier.
I will try that, but it was beyond difficult. I'm looking at multiple videos online and i see people doing it in seconds or a minute or 2. I couldn't get one stringer in as the floor would never sit flush. I'm going to try again this weekend, hopefully with better results. I'm just new to this and maybe thought there was something major I'm missing. I think I had it inflated to about 50%, so I'm going to try maybe 25-30% to see if that helps.
Another set of hands this weekend may help as well.
__________________
|
|
|
|
|
02 June 2016, 06:10
|
#4
|
|
Member
Country: UK - England
Town: Sticks, N.Yorks
Boat name: Tamanco
Make: Honwave 3.5AE
Length: 3m +
Engine: Tohatsu Outboard
Join Date: May 2012
Posts: 1,166
|
40-50% inflation and I get the Mrs to tug upwards on the tube and mine go straight in. I've not had much success with the paddle under the tube method !
__________________
|
|
|
|
|
02 June 2016, 07:20
|
#5
|
|
Member
Country: UK - England
Town: Up North and right a bit
Make: XS500/Merc340/Bic245
Length: 5m +
Engine: Mar 60/20/3.5/Hon2.3
Join Date: Sep 2013
Posts: 1,065
|
No magic tips I'm afraid. Not much comfort now but it is good they are an impossibly tight fit when new.
I only inflate tubes just sufficient to hold a bit of shape and align floorboards as straight as possible. I push stringer down onto floor in a near vertical position with the groove located over the tongue. Pushing the stringer down helps further align floor, then rotate outwards toward the tubes and stringer should snap into place.
Stringers in your pics look to be the right way up and same as on my Zoom.
__________________
|
|
|
|
|
02 June 2016, 08:17
|
#6
|
|
Member
Country: UK - England
Town: Retford
Boat name: Spy-sea-one
Make: Excel 435
Length: 4m +
Engine: Suzuki Outboard/25/4
Join Date: Oct 2011
Posts: 7,454
|
a long piece of wood holding all the floor level i find best then you can concentrate on fitting the stringers and they are tight to push in.
cheers
__________________
|
|
|
|
|
02 June 2016, 13:02
|
#7
|
|
Member
Country: USA
Town: S. Carolina
Boat name: D560
Make: Avon
Length: 5m +
Engine: 2016 Merc 115hp CT
Join Date: Aug 2013
Posts: 1,277
|
Quote:
Originally Posted by Jlomb436
Hey folks. I was/am extremely excited to get my new Bombard Typhoon 420 boat! I'm normally pretty good with these things but I seriously could not get these stringers to go in.
I read the manual. The only thing I did do is add starch as it suggested. I'll check out some videos online to maybe see if I'm doing anything wrong. I watched a video by the company/seller install these within 60 seconds. I spent an hour and got no where.
One concerned I had was that no matter what I did, there was always 2 pieces of the floor lifted. If I stepped on the aluminum, the wood would start to rise. I made sure every single piece was wedged and still couldn't get it to go. I've included some pics (link) and you can see that it's almost like some pieces we're inverted as you could see the stringer would fit flush on 1 but not on the other.
Anyone have any tips or tricks? I know it'll break in and get easier, but honestly quite frustrating. If it weren't for the neighbors there may have been some flying cardboard pieces.
Imgur: The most awesome images on the Internet |
Inflate the boat to full pressure (If you're jumping on the footpump, you've hit the right pressure)... If you don't have a pressure gauge, you should be able to push on the tube and not have it give. Tight is right.
Leave it that way for a day. It will stretch out the material.
Then deflate it down and assemble your floorboards. Use the "teepee" approach.
After the floorboards are flat, the tough part is wiggling the stringer in place. It sometimes helps to put a block of wood or paddle underneath the boat on the side you are installing the stringers on. Make sure they are aligned with the protecting pads.
Mate the edges, then pivot the angled side of the stringer in place, so it sits in the slot against the PVC floor doubler where the tube connects to the PVC flooring. Then install the other side.
__________________
Richard
Gluing geek since 2007
Opinions and intepretations expressed are solely my own and do not express the views or opinions of my employer
|
|
|
|
|
03 June 2016, 00:46
|
#8
|
|
Member
Country: USA
Town: Southern California
Length: 3m +
Join Date: May 2016
Posts: 65
|
Thank you everyone! I'm going to inflate it and throw it in the garage. Hopefully the crickets stay at bay. I'll also try the oar trick. This was mentioned in my manual, but the instructions we're terrible. Once I saw it online it makes complete sense. Then I'll try assemble again on Saturday (in the Marina parking lot) to see how successful I am. No pressure!
Thanks again for your suggestions and wisdom.
__________________
|
|
|
|
|
03 June 2016, 06:16
|
#9
|
|
Administrator
Country: UK - England
Town: Brighton
Length: 3m +
Join Date: May 2000
Posts: 7,106
|
I would practice this at home again rather than at the marina if possible.
I had a Zodiac with a similar setup and getting the stringers in was definitely an acquired skill. Getting them out again required brute force and cursing to the day I sold it!
__________________
|
|
|
|
|
03 June 2016, 06:46
|
#10
|
|
Member
Country: USA
Town: Southern California
Length: 3m +
Join Date: May 2016
Posts: 65
|
I actually think I'm going to do that. Hoping some fo the techniques I've learned pay off...
__________________
|
|
|
|
|
03 June 2016, 08:59
|
#11
|
|
Member
Country: UK - England
Town: Cambridgeshire
Boat name: Nimrod II
Make: Aerotec 380
Length: 3m +
Engine: Yam 15 Tohatsu 9.8
Join Date: Nov 2007
Posts: 8,297
|
Agree with all of the above. When I bought a new Honwave with alloy floor the dealer advised me to inflate without the floor in for 24hrs as it would be impossibly tight new out of the bag.
I have always favoured the "oar under floor" tip and on that Honwave it made the difference between not too bad and without oars a challenge that was very amusing for onlookers at the slipway.
__________________
|
|
|
|
|
03 June 2016, 09:24
|
#12
|
|
Member
Country: UK - England
Town: Bristol
Boat name: Salty Cheeks
Make: Honwave
Length: 3m +
Engine: 20hp 2stroke Mariner
Join Date: Mar 2014
Posts: 485
|
Quote:
Originally Posted by Fenlander
Agree with all of the above. When I bought a new Honwave with alloy floor the dealer advised me to inflate without the floor in for 24hrs as it would be impossibly tight new out of the bag.
I have always favoured the "oar under floor" tip and on that Honwave it made the difference between not too bad and without oars a challenge that was very amusing for onlookers at the slipway.
|
+1with this way,also a spray bottle with diluted washing up liquid sprayed on the edges and stringers helped me
__________________
|
|
|
|
|
03 June 2016, 13:04
|
#13
|
|
Member
Country: USA
Town: Point Blank,TX
Boat name: Just Blown
Make: Achilles 2 of them
Length: 3m +
Engine: Yam 8&15hp Nissan 15
Join Date: Oct 2015
Posts: 43
|
hit it with some aeorospace 303 and your boards will slide in like butta. Yeah baby just like butta. Works everytime.
__________________
|
|
|
|
|
06 June 2016, 05:03
|
#14
|
|
Member
Country: USA
Town: Southern California
Length: 3m +
Join Date: May 2016
Posts: 65
|
Gents,
This was a night and day difference. THANK you for your suggestions. I inflated it for about 48 hours, used soapy water, and used a rubber hammer to get the bow piece tucked in nicely. 3 of the pieces went in within seconds. The last I struggled with for about 2 minutes. Got out the oar, threw it under there and it snapped right in.
How did people live without the help of the internet? Anyway, thanks again.
Without starting another thread, does anyone have any suggestions on how to move the boat while in it's bag? I may get some low low dolly on wheels. I asked as I only dragged the bag maybe 3 feet and it's already tearing at the bottom.
__________________
|
|
|
|
|
06 June 2016, 07:30
|
#15
|
|
Member
Country: UK - England
Town: Retford
Boat name: Spy-sea-one
Make: Excel 435
Length: 4m +
Engine: Suzuki Outboard/25/4
Join Date: Oct 2011
Posts: 7,454
|
get a light weight sack barrow with 4 wheels then you can either stand up with it and push about could also carry you engine with a slight mod or lay on 4 wheels and pull around.
cheers
__________________
|
|
|
|
|
06 June 2016, 08:54
|
#16
|
|
Member
Country: UK - England
Town: Cambridgeshire
Boat name: Nimrod II
Make: Aerotec 380
Length: 3m +
Engine: Yam 15 Tohatsu 9.8
Join Date: Nov 2007
Posts: 8,297
|
I can lift my lightweight airfloor on my own short distances but it's too awkward to carry far and my most willing assistant is the sack truck below. Folds down to hang on the garage wall or store in the car and trundles the packed SIB about nicely.
__________________
|
|
|
|
|
06 June 2016, 21:20
|
#17
|
|
Member
Country: USA
Make: AB
Length: 3m +
Engine: outboard, 40hp
Join Date: Feb 2016
Posts: 97
|
I used to have a ally floor and same problems above. It was also very heavy in the bag so I built a simple launch dolly with 2 wheel barrow wheels and 2 bunks and some galvanized piping from the hardware store. It had a long hitch that I used to pull out of the water with the truck.
After I put the boat in the bag I then put the bag on top of the dolly to move around. Worked great because it was also up higher to get in and out of the truck.
The dolly was so simple and being threaded pipe I could take it all apart so it wasn't too big.
__________________
|
|
|
|
|
 Posting Rules
|
You may not post new threads
You may not post replies
You may not post attachments
You may not edit your posts
HTML code is Off
|
|
|
|
 Recent Discussions
 |
|
|
|
|
|
|
|
|
|
|
|
|
|
|
|
|
|
|
|
|
|
|
|
|
|
|
|
|
|
|
|
|
|


 spy-sea-one