I was lucky enough to receive a Garmin Echo 151 fishfinder from my brother for Christmas.

After a couple of beers I read through the suitably vague instructions from Garmin. There's a fairly detailed step by step guide on the main unit and wiring to battery, but nothing on the transducer itself.
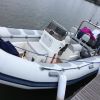
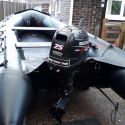
I'm fitting this to a Ribcraft 4.8. I'm thinking that I'll run the wiring to the transducer under the deck via the witches hat near the drain well. Hate opening that damn thing up to run new wiring, but there's a cord in place for the purpose to haul through odds and ends. It does mention that you can drill a hole in the transom near the top for a tidier finish. Good or bad idea, or simply run it over the top of the transom?
Lastly the tranducer. I know this should be fitted as close as possible to the centre line of the boat and the transducer should be slightly lower than stepped hull section. I assume the transducer can be quick released? Only reason I mention this, is I've recovered the boat on more tha couple of times from sand in relatively shallow water rather than wait another couple of hours for the tide to change, and I don't want to risk damaging the unit as I winch onto the trailer.
Picture of the transom for reference. Reckon I could run the cable down next to the main engine saddle.


 Sula
Sula

 spy-sea-one

 BLACK PIG
 Piglet