|
|
 14 August 2004, 23:31
|
#1
|
|
Member
Country: UK - England
Town: Devon
Boat name: White Ice
Make: Ranieri
Length: 5m +
Engine: Suzuki 115hp
Join Date: Jul 2002
Posts: 5,015
|
Yamaha Impeller change
Who do you trust to service your outboard?
Like me, you may think that your dealer does a good job... I thought his £310 charge was OK for a service, but when you look at what's done: change 6x spark plugs, change gearbox oil, change a fuel filter, change all anodes and grease all points... that's a bit pricey... specially when one vital component is missed.
My problems started in May with intermittent overheat alarms. Once at about 42kts running through a rough sea, then this week at 38kts in calm water, then later the same day at 33kts in calm water. Each time the engine was fine after slowing down.
Knowing that no impeller had been itemised on the service bill, I decided to replace it before looking at any other source of the fault. And because this comes up quite often as a question, I kept a photographic record of the process...
|

|

|
|
14 August 2004, 23:35
|
#2
|
|
Member
Country: UK - England
Town: Devon
Boat name: White Ice
Make: Ranieri
Length: 5m +
Engine: Suzuki 115hp
Join Date: Jul 2002
Posts: 5,015
|
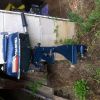
1. Remove gearbox. There are seven bolts - six are obvious, but the seventh is hidden under the anode. So firstly remove the rubber plug from on top of the leg to reveal a hole into which a 12mm socket can be inserted (pic1). Then the hidden bolt is visible (red arrow in pic2). Once the gearbox is loose, disconnect the pitot tube (you'll need a friend or helper!) and place gearbox on your best kitchen chair!
|
|
|
|
|
14 August 2004, 23:38
|
#3
|
|
RIBnet supporter
Country: Iceland
Town: Reykjavik
Boat name: Cheesee
Make: Seaquel 600 XS
Length: 6m +
Engine: Mercury 275 Verado
Join Date: Aug 2003
Posts: 1,959
|
Sad to hear about your impeller problem Richard, I agree with you it is worth changing it at least every other year especially if used in salty water even though you run it on fresh water when you take the boat out of water. I changed the impeller every other year. Our seas has quite high salt level.
Bogi
|
|
|
|
|
14 August 2004, 23:45
|
#4
|
|
Member
Country: UK - England
Town: Devon
Boat name: White Ice
Make: Ranieri
Length: 5m +
Engine: Suzuki 115hp
Join Date: Jul 2002
Posts: 5,015
|
Cheers Bogi.
I'm going to go on for a bit more about this... 
OK, here's the labelled diagram!
|
|
|
|
|
14 August 2004, 23:50
|
#5
|
|
Member
Country: UK - England
Town: Devon
Boat name: White Ice
Make: Ranieri
Length: 5m +
Engine: Suzuki 115hp
Join Date: Jul 2002
Posts: 5,015
|
Right then. Top tip - don't damage the input shaft! 
The bit we're interested in is inside the pump housing, so undo the four bolts and lift it off. This will reveal the impeller housing which is held on with an alloy washer pressed over a plastic washer. These need to be removed, and they're a pig. I used a hacksaw and cut the alloy washer off very carefully. The plastic one can then be removed, and then the thrust washers (2x flat and 1x sprung). This leaves the impeller housing free to be slid up the input shaft. Take v. careful note of the order in which things come off!
Pic 1 shows the alloy and plastic washers.
Pic 2 shows all the components removed.
|
|
|
|
|
14 August 2004, 23:57
|
#6
|
|
Member
Country: UK - England
Town: Devon
Boat name: White Ice
Make: Ranieri
Length: 5m +
Engine: Suzuki 115hp
Join Date: Jul 2002
Posts: 5,015
|
Time to inspect the old components... what a sorry story!
Pic 1: The impeller base plate is scored and so won't make a watertight seal
Pic 2: The old impeller in it's housing looks innocent enough until removed...
Pic 3: Big crack in old impeller
Pic 4: Crack on other side
|
|
|
|
|
15 August 2004, 00:03
|
#7
|
|
Member
Country: UK - England
Town: Devon
Boat name: White Ice
Make: Ranieri
Length: 5m +
Engine: Suzuki 115hp
Join Date: Jul 2002
Posts: 5,015
|
Some good advive i got from the dealer was to buy a "pump kit", not just an impeller. This included a new impeller, impeller housing, base plate, pump base plate, pump housing inner and outer o-rings, plastic washer and alloy washer. I needed these. It also included a full set of bolts and a base gasket. I didn't need these. The kit cost £95 and the impeller only was £22. Hmmm.....
Anyway, next job was to fit the new impeller into the new impeller housing.
What a struggle. Top tip - delegete this job! Oh yeah, and make sure that the impeller keyway is the right way up, and the impeller blades "bend" the right way.
|
|
|
|
|
15 August 2004, 00:09
|
#8
|
|
Member
Country: UK - England
Town: Devon
Boat name: White Ice
Make: Ranieri
Length: 5m +
Engine: Suzuki 115hp
Join Date: Jul 2002
Posts: 5,015
|
Once the impeller is in its housing, the next job is to re-assemble the pump. This bit was so awkward that there won't be any photos, sorry! We fitted the impeller and housing over the input shaft, fitted the thrust washers and a new plastic and alloy retaining washer, then had to hold the gearbox upside down so that the pump housing could be slid up to the input shaft and offered up to the impeller housing without dropping the o-rings from inside it. Once assembled, get the bolts in place, and now hold the gearbox the correct way up and torque the bolts.
|
|
|
|
|
15 August 2004, 00:13
|
#9
|
|
Member
Country: UK - England
Town: Devon
Boat name: White Ice
Make: Ranieri
Length: 5m +
Engine: Suzuki 115hp
Join Date: Jul 2002
Posts: 5,015
|
Ready to re-assemble now...
|
|
|
|
|
15 August 2004, 00:16
|
#10
|
|
Member
Country: UK - England
Town: Devon
Boat name: White Ice
Make: Ranieri
Length: 5m +
Engine: Suzuki 115hp
Join Date: Jul 2002
Posts: 5,015
|
Smoke and mirrors again as we struggle to re-attach the pitot tube then fit a couple of bolts whilst holding the gearbox up to the engine.
Then, as if by magic, it's back together again. Pic shows fitting the "hidden" bolt before re-attaching the anode.
|
|
|
|
|
15 August 2004, 00:17
|
#11
|
|
Member
Country: UK - England
Town: Devon
Boat name: White Ice
Make: Ranieri
Length: 5m +
Engine: Suzuki 115hp
Join Date: Jul 2002
Posts: 5,015
|
Finally, add water and enjoy.
|
|
|
|
|
15 August 2004, 09:55
|
#12
|
|
Member
Country: UK - England
Town: Paignton, Devon
Make: Chinook and Viking
Length: 7m +
Engine: 150 Etec + 125 Merc
Join Date: Jul 2003
Posts: 526
|
We always at least check the impeller every year when we do a service and generally unless the engine has done very few hours we change it. Alot of people forget about checking the wear plate or pump housing for scores and gooves, which can be as much of a problem as a worn out impeller.
Well done for remembering the bolt under the trim tab  . You wouldn't believe how many people come in complaining because their gearbox is stuck on and no amount of hammering has freed it off  .
|
|
|
|
|
15 August 2004, 10:11
|
#13
|
|
Member
Country: UK - England
Town: Devon
Boat name: White Ice
Make: Ranieri
Length: 5m +
Engine: Suzuki 115hp
Join Date: Jul 2002
Posts: 5,015
|
Hi Paul,
Just wondered if the Yamaha water pump is better or worse than any other to service? I thought that it's really badly designed (from a service point of view) and if the Yamaha design engineer had been present I would have had some choice words for him!
|
|
|
|
|
15 August 2004, 10:52
|
#14
|
|
Member
Country: UK - England
Town: Paignton, Devon
Make: Chinook and Viking
Length: 7m +
Engine: 150 Etec + 125 Merc
Join Date: Jul 2003
Posts: 526
|
They are all pretty much the same to work on. The main problems are the different types of gearbox mounting and shift shaft attachment which can be a real pain to re-align when re-building box to engine, especially the medium sized Jhonson/Evinrudes  .
The Mercruiser Alpha 1 gen2 type water pump (also used in the Merc/Mariner engines) is a bit nicer to dissasemble/reassemble as the impeller fits into the housing alot easier and you don't have to struggle for ages trying to get all the bades in. Plus the impeller cup (where the impeller runs inside) is not separate from the housing and tends to last for ages without any sign of wear.
|
|
|
|
|
15 August 2004, 11:25
|
#15
|
|
Member
Country: UK - England
Town: Bucks
Boat name: Blue & Ding Dong
Make: Ribeye,SR4 & Bombard
Length: 6m +
Engine: 115,50 & 15Hp Yams
Join Date: Feb 2004
Posts: 3,252
|
Big hand to you Richard, well done for sharing that with us.
Are you saying that your service did not include checking the impeller?
It dose seem to be very expensive for what you had done!
I have just changed the plugs, gear oil & new fuel filter!
Very little cost & time, it's good to get to know your engine for when it all goes pear shape!
Nick
__________________
|
|
|
|
|
15 August 2004, 11:40
|
#16
|
|
Member
Country: UK - England
Town: Devon
Boat name: White Ice
Make: Ranieri
Length: 5m +
Engine: Suzuki 115hp
Join Date: Jul 2002
Posts: 5,015
|
Quote:
|
Originally Posted by Nick Hearne
Are you saying that your service did not include checking the impeller?
|
I asked the dealer if they would change the impeller during the service. They said: "We will inspect the impeller and if it is worn, we will replace it. We won't fit any unnecessary parts". I said to them "I'm quite happy to replace the impeller regardless of visual condition".
Engine service was 31-03-04 and first sign of a problem was 07-06-04.
Now having stripped the pump, I realise that to go through the process of stripping it and then not to replace the impeller is ridiculous - in fact the alloy and plastic washers can't be removed without at least some deformation, and more likely destruction. So I don't believe the impeller was actually checked at all.
|
|
|
|
|
15 August 2004, 18:25
|
#17
|
|
Member
Country: USA
Town: Los Angeles
Boat name: The Boot
Make: Avon SR4
Length: 4m +
Engine: 2000 Tohatsu 50
Join Date: Jul 2004
Posts: 155
|
Quote:
|
Originally Posted by tue
Alot of people forget about checking the wear plate or pump housing for scores and gooves, which can be as much of a problem as a worn out impeller.
|
Tue,
how can scores and groves in the impeller housing and lower plate effect the performance of the impeller?
Adam
__________________
|
|
|
|
|
15 August 2004, 18:42
|
#18
|
|
Member
Country: Ireland
Town: Dublin
Boat name: WIZARD
Make: REDBAY 7.4
Length: 7m +
Engine: OPTI 225
Join Date: Aug 2002
Posts: 417
|
Tue,
how can scores and groves in the impeller housing and lower plate effect the performance of the impeller?
Adam
The water pressure leaks around the side of the impeller vanes...... IE the impeller also seals on each side and not just the blade tips...... This type of ware can effect the pressure the most.
__________________
NOT THE SHARPEST KNIFE IN THE DRAWER
|
|
|
|
|
15 August 2004, 20:03
|
#19
|
|
Member
Country: UK - England
Town: Fareham
Length: 6m +
Join Date: Sep 2003
Posts: 7,866
|
Thanks for sharing with us you maintenance procedures on changing one of the most critical items that can be acheived by a good DIYer. I will also attempt the replacement of my Yam impellor in the comming months!
What type of waterproof grease did you use on the splines of the drive shaft and gear selector? All the manual says is Yamaha grease A (water-resistance grease) pt. number 90890-69911. I'm too lazy to ask the local dealer and thought you might be able to let me know?
Andy
__________________
|
|
|
|
|
15 August 2004, 20:08
|
#20
|
|
Member
Country: UK - England
Town: Devon
Boat name: White Ice
Make: Ranieri
Length: 5m +
Engine: Suzuki 115hp
Join Date: Jul 2002
Posts: 5,015
|
Quote:
|
Originally Posted by Hightower
What type of waterproof grease did you use on the splines of the drive shaft and gear selector? All the manual says is Yamaha grease A (water-resistance grease) pt. number 90890-69911. I'm too lazy to ask the local dealer and thought you might be able to let me know?
Andy
|
Just Quicksilver stuff... I'll go have a look if I've left the tube in the garage! (or you could scan the barcode off the piccy!)
|
|
|
|
|
|
 Posting Rules
|
You may not post new threads
You may not post replies
You may not post attachments
You may not edit your posts
HTML code is Off
|
|
|
|
 Recent Discussions
 |
|
|
|
|
|
|
|
|
|
|
|
|
|
|
|
|
|
|
|
|
|
|
|
|
|
|
|
|
|
|
|
|
|