Go Back   RIBnet Forums > RIB talk > Engines & props
Click Here to Login

Reply
 
Thread Tools Search this Thread
 
Old 03 June 2012, 10:17   #1
Member
 
Glow's Avatar
 
Country: UK - England
Town: Lancashire
Boat name: Trigger Happy
Make: Bombard Aerotec
Length: 3m +
Engine: Tohatsu 20hp
MMSI: 235907196
Join Date: Apr 2012
Posts: 202
Mercury 6hp 2 Stroke advice please

Hello chaps,

I had my little SIB out last weekend with my 1997 Mercury motor running sweetly all day, running smoothly and pumping water ok. Before I put it away I thought I would start it and run off any fuel left in the carb, unfortunately it wouldnt start.

I got it home and checked both cylinders for a spark, nothing

I removed what I believe is the kill switch lead, (yellow and black wire with a bullet connector) still nothing. I suspected this first as the motor was running so well prior to shutting down.

When I removed the HT leads from the coils, there was a lot of nasty looking grease inside the coils, I have cleaned this out with electrical cleaner spray and put the connectors back in, the leads appear ok as do the plugs.

I guess it would be unlikely that both coils would fail at the same time, before I take it to a repair shop, has anyone any suggestions as to what I could try to identify the faulty component/s?

Thanks in advance for any advice, I am gutted that I cant get out this weekend.
__________________
Glow is offline   Reply With Quote
Old 03 June 2012, 11:27   #2
Member
 
MKII_CGT's Avatar
 
Country: Australia
Town: Sydney
Make: Zodiac
Length: 3m +
Join Date: May 2012
Posts: 104
What did the spark plugs look like?
__________________
CURRENT PROJECT // MKII C GT
MKII_CGT is offline   Reply With Quote
Old 03 June 2012, 11:36   #3
Member
 
Glow's Avatar
 
Country: UK - England
Town: Lancashire
Boat name: Trigger Happy
Make: Bombard Aerotec
Length: 3m +
Engine: Tohatsu 20hp
MMSI: 235907196
Join Date: Apr 2012
Posts: 202
Here are pics of the plugs, dirty HT lead connector and side of motor showing bullet connector that I unplugged to check killswitch.
Attached Thumbnails
Click image for larger version

Name:	Spark plug 2.jpg
Views:	214
Size:	146.4 KB
ID:	68782   Click image for larger version

Name:	Spark plug.jpg
Views:	287
Size:	124.2 KB
ID:	68783   Click image for larger version

Name:	outboard.jpg
Views:	328
Size:	148.9 KB
ID:	68784   Click image for larger version

Name:	HT lead.jpg
Views:	273
Size:	113.4 KB
ID:	68785  
__________________
Glow is offline   Reply With Quote
Old 03 June 2012, 11:43   #4
Member
 
MKII_CGT's Avatar
 
Country: Australia
Town: Sydney
Make: Zodiac
Length: 3m +
Join Date: May 2012
Posts: 104
Have you cleaned them up at all or is that exactly how they were when removed?
__________________
CURRENT PROJECT // MKII C GT
MKII_CGT is offline   Reply With Quote
Old 03 June 2012, 11:58   #5
Member
 
MKII_CGT's Avatar
 
Country: Australia
Town: Sydney
Make: Zodiac
Length: 3m +
Join Date: May 2012
Posts: 104
It's either fouled plugs (but they look okay) kill/stop switch, stator/trigger, Cdi/switch box. It's the process of elimination now.... Chase all wiring make sure connections are solid, remove any grime or corrosion, get a voltage meter to test the stator.

Found this on another forum:

First unplug both stop wires (black with yellow stripe), going to the stop button and the emergency stop switch.

Then retry to see if the plugs are firing.

If not, you need a peak voltage meter to measure the voltages coming form the stator and trigger (could also be done by measuring the resistance, however peakvoltage is more accurate). If the stator and trigger are o.k., you need to replace the switchbox.

__________________
CURRENT PROJECT // MKII C GT
MKII_CGT is offline   Reply With Quote
Old 03 June 2012, 12:03   #6
Member
 
MKII_CGT's Avatar
 
Country: Australia
Town: Sydney
Make: Zodiac
Length: 3m +
Join Date: May 2012
Posts: 104
http://www.cdielectronics.com/downlo...14-4952A30.pdf
__________________
CURRENT PROJECT // MKII C GT
MKII_CGT is offline   Reply With Quote
Old 03 June 2012, 12:11   #7
Member
 
Glow's Avatar
 
Country: UK - England
Town: Lancashire
Boat name: Trigger Happy
Make: Bombard Aerotec
Length: 3m +
Engine: Tohatsu 20hp
MMSI: 235907196
Join Date: Apr 2012
Posts: 202
Thanks for that, some good placed to start. Thats how the ignition leads where when I disconnected them, prior to cleaning. The plugs looked clean, I will check them again when I have cleaned and checked everything.

One thing I did find, on the other side of the motor there was a thin pushrod that came off when I took the cover off. I found a pic of the same outboard on google and highlighted a component.

I am not sure what the part is that I have circled in the pic but when I put the push rod back on at weekend I didnt put it back on the same place as I wasnt sure where it had come from.

It doesnt look like its related but obviously I will put that right and check everything before going any further.

Thanks again for the advice
Attached Thumbnails
Click image for larger version

Name:	outboard pic.jpg
Views:	659
Size:	93.9 KB
ID:	68788  
__________________
Glow is offline   Reply With Quote
Old 03 June 2012, 12:33   #8
RIBnet Supporter
 
willk's Avatar
 
Country: Ireland
Length: 4m +
Join Date: Feb 2008
Posts: 14,682
I'm not sure, but I reckon that's your "in gear" protector rod - it stops you starting the motor while in gear - it certainly would explain your problem!

__________________
willk is offline   Reply With Quote
Old 03 June 2012, 12:36   #9
Member
 
MKII_CGT's Avatar
 
Country: Australia
Town: Sydney
Make: Zodiac
Length: 3m +
Join Date: May 2012
Posts: 104
Quote:
Originally Posted by willk View Post
I'm not sure, but I reckon that's your "in gear" protector rod - it stops you starting the motor while in gear - it certainly would explain your problem!
That could be the problem!
__________________
CURRENT PROJECT // MKII C GT
MKII_CGT is offline   Reply With Quote
Old 03 June 2012, 18:40   #10
Member
 
Glow's Avatar
 
Country: UK - England
Town: Lancashire
Boat name: Trigger Happy
Make: Bombard Aerotec
Length: 3m +
Engine: Tohatsu 20hp
MMSI: 235907196
Join Date: Apr 2012
Posts: 202
Well I tried it this afternoon (in the rain) and it is trying to fire, I couldnt get it started but it is sparking. I will give it all a good clean over tomorrow including the coils etc, and try again with some fresh juice.

Thanks for all your help
__________________
Glow is offline   Reply With Quote
Old 03 June 2012, 20:57   #11
Member
 
Country: UK - Wales
Town: West Wales
Make: Vipermax 5.8, SR4.7
Length: 5m +
Engine: 150 Opti, F50EFi
Join Date: Sep 2005
Posts: 6,299
The start in gear protection doesn't cut the ignition circuit, it locks the recoil mechanism, so the motor can't be turned.
__________________
Downhilldai is offline   Reply With Quote
Old 03 June 2012, 21:11   #12
Member
 
MKII_CGT's Avatar
 
Country: Australia
Town: Sydney
Make: Zodiac
Length: 3m +
Join Date: May 2012
Posts: 104
Quote:
Originally Posted by Glow
Well I tried it this afternoon (in the rain) and it is trying to fire, I couldnt get it started but it is sparking. I will give it all a good clean over tomorrow including the coils etc, and try again with some fresh juice.

Thanks for all your help
Make sure you throw a fresh set of plugs in it.
__________________
CURRENT PROJECT // MKII C GT
MKII_CGT is offline   Reply With Quote
Old 03 June 2012, 21:34   #13
Redbay supporter
 
wiLlfish's Avatar
 
Country: UK - England
Town: onn de moov
Boat name: bote
Make: kevvin
Length: 4m +
Engine: jett dryve
Join Date: Jan 2010
Posts: 455
Quote:
Originally Posted by Glow View Post
in the rain:
Dats itt.

Itts wot wee corl a winstonn mowtor

Itts blakk an itt downt werk wen itts raynin.

Giv itt sum sunshyne an breeve sum spliff smowke innto de ayr boks an itt wil bee orlrite
__________________
fuk mee crismus leeve wiv noe ankul tagg

Wher doo I beegin?😃
wiLlfish is offline   Reply With Quote
Old 04 June 2012, 19:36   #14
Member
 
Glow's Avatar
 
Country: UK - England
Town: Lancashire
Boat name: Trigger Happy
Make: Bombard Aerotec
Length: 3m +
Engine: Tohatsu 20hp
MMSI: 235907196
Join Date: Apr 2012
Posts: 202
So I cleaned up the coils again today and did a bit more research. It appears that the pushrod goes from the choke to the throttle, the pushrod to the neutral indicator is missing, and the flywheel stop has been cut off.

I managed to fire up the motor, but only with the revs up high and the choke fully open, I couldnt get it to idle for more than 20 seconds or so with the choke shut.

I am guessing the idle jet is dirty, and its time I gave the motor a little TLC so going to drop the motor off for a carb clean and service at Pennine Marine or Bill Highams, whoever can get it done soonest.

At least I now know how it works
__________________
Glow is offline   Reply With Quote
Old 04 June 2012, 21:21   #15
Member
 
MKII_CGT's Avatar
 
Country: Australia
Town: Sydney
Make: Zodiac
Length: 3m +
Join Date: May 2012
Posts: 104
Taking the carby off and cleaning it and the jets is Avery simple process, if you wanted to do it yourself you would probably find it quite easy.

If your not into working on it yourself or you don't feel confident then best drop it to the mechanic.
__________________
CURRENT PROJECT // MKII C GT
MKII_CGT is offline   Reply With Quote
Old 04 June 2012, 21:26   #16
Member
 
Glow's Avatar
 
Country: UK - England
Town: Lancashire
Boat name: Trigger Happy
Make: Bombard Aerotec
Length: 3m +
Engine: Tohatsu 20hp
MMSI: 235907196
Join Date: Apr 2012
Posts: 202
Cheers, I am tempted to have a go, I am fairly mechanically competent but have never had a carb off before. I will have a look tomorrow
__________________
Glow is offline   Reply With Quote
Old 04 June 2012, 21:56   #17
Member
 
MKII_CGT's Avatar
 
Country: Australia
Town: Sydney
Make: Zodiac
Length: 3m +
Join Date: May 2012
Posts: 104
I can walk you through it if you like. You'll need a Philips head screw driver, a small flat head screw driver (for your pilot jet) a 6 or 7mm spanner or socket for the main jet and a can of carby cleaner, you can use some petrol to clean but the can of cleaner works best.

Disconnect everything running to the carb, take a pic with your phone before hand so you don't forget where everything goes.

Then take a couple of shots of the carb and I'll walk you through it.
__________________
CURRENT PROJECT // MKII C GT
MKII_CGT is offline   Reply With Quote
Old 05 June 2012, 01:24   #18
Member
 
MKII_CGT's Avatar
 
Country: Australia
Town: Sydney
Make: Zodiac
Length: 3m +
Join Date: May 2012
Posts: 104
Note: Carburettor types vary from different model engines, this is a general guide so you get the idea of the process. Hope it helps.

Once you have removed all of the connecting hoses and rods from the carby locate the 2 bolts that go through the airbox and into the carby, there's one on each side of the air box.


Remove the long bolts, remove the airbox, then remove the carby.


Once the carb is removed locate the 4 philips head screws that hold the fuel bowl to the carby. These screws often get quite burred from silly people using the wrong size philips head screw drivers over the years! Note: If the screws are in bad shape you can use vice grips to get them undone.


Remove the bowl with care not to damage the O-ring gasket, have a rag handy, there's usually fuel in the bowl and it will spill out when you separate the bowl from the carb.

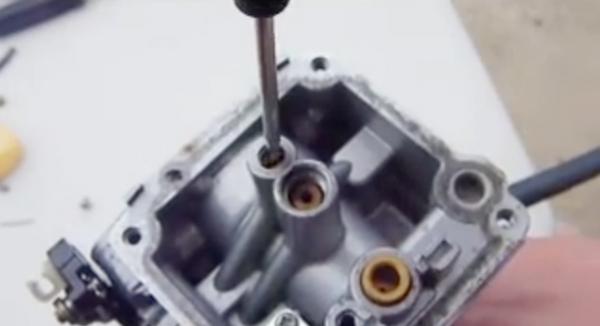
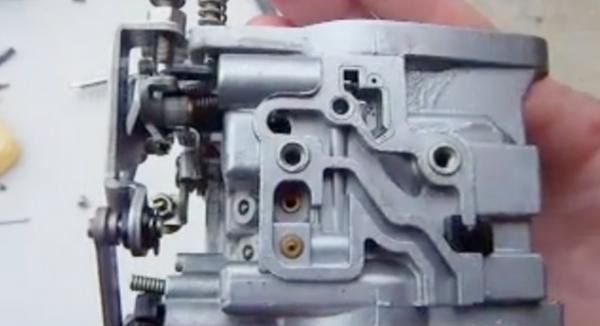
With the bowl now removed undo the 3 screws circled below. The 2 brass ones are plugs that cover your jets, the big one covers your main jet, the smaller one covers your pilot jet.


Remove the silver float pin screw, then remove the float and pin. Be careful, the pin will fall out, don't lose it.

Next step is to remove the pilot jet, you will need a small flat blade screw driver to remove the jet. Make sure it's the right size, the jets are soft and you don't want to damage them.


This is what the pilot jet looks like, in a lot of cases this is the source of the problem. The little holes get clogged effecting the performance of the motor.


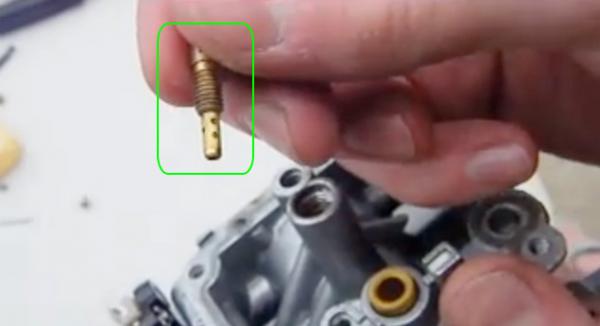
You can remove the main jet but I usually leave it in, there's only one hole in it and it cleans up OK with a straight blow through it with the carby cleaner.

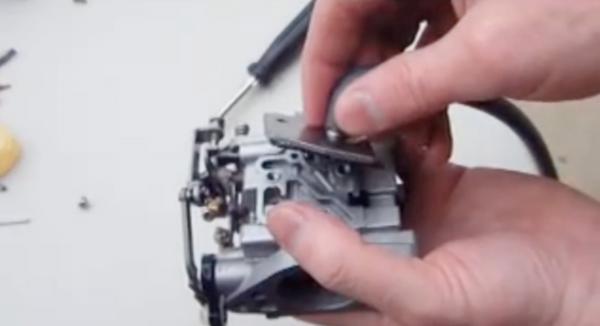
Next step carefully remove the diaphragm cover, be careful here and make sure you don't damage the diaphragm. It sits between the cover and the carb body.


Thats the end of the dis-assembly.

Now clean the carb thoroughly with the carby cleaner, spray it in all orifices and over all parts, spray the float, spray the pilot jet, spray the main jet, spray everything until it's squeeky clean!

Spend a little time on the bowl.... This is where residue sits and sometimes bonds to the surface of the bowl. You may need to agitate this area with a small cleaning brush (old tooth brush works well) or rag, spray, agitate, spray, agitate, spray agitate... until squeeky clean.


So... you have thoroughly cleaned all parts and removed any surface residue, blown out the jets and made sure they are all clear with no blockages. Now re-assemble the carby and re-install on the motor.

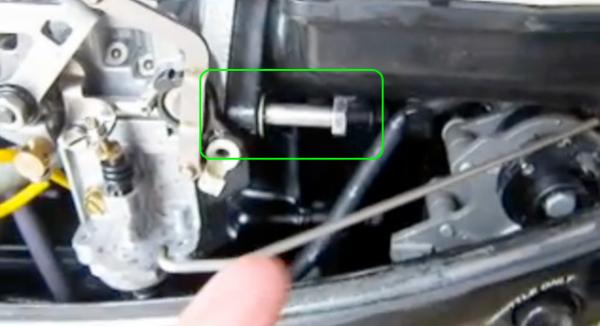
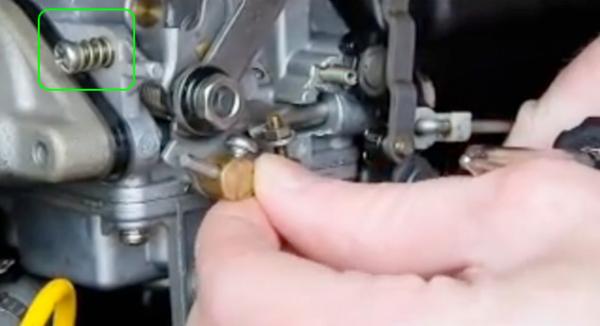
You may need to adjust the position of your throttle or adjust your idle screw (the screw with the spring circled below).


Happy days!

Cheers.
__________________
CURRENT PROJECT // MKII C GT
MKII_CGT is offline   Reply With Quote
Old 05 June 2012, 09:29   #19
Member
 
Glow's Avatar
 
Country: UK - England
Town: Lancashire
Boat name: Trigger Happy
Make: Bombard Aerotec
Length: 3m +
Engine: Tohatsu 20hp
MMSI: 235907196
Join Date: Apr 2012
Posts: 202
Wow, thats amazing, thank you so much! I will have a go today and post back with the results
__________________
Glow is offline   Reply With Quote
Old 05 June 2012, 09:43   #20
Member
 
MKII_CGT's Avatar
 
Country: Australia
Town: Sydney
Make: Zodiac
Length: 3m +
Join Date: May 2012
Posts: 104
Quote:
Originally Posted by Glow View Post
Wow, thats amazing, thank you so much! I will have a go today and post back with the results
No worries mate, took me a little while to pull it together but a visual always helps WAY MORE than a heap of words. Now that you have visualised it you will get the job done a lot quicker.

Remember when tightening the various screws and the pilot jet - you have to go on 'feel', they need to be snug but not overly tight, over tightening can cause headaches like burring the screw head or snapping the jet off leaving the threaded half STUCK in the carby!

No need to be Tarzan with the carby! Have fun!
__________________
CURRENT PROJECT // MKII C GT
MKII_CGT is offline   Reply With Quote
Reply


Posting Rules
You may not post new threads
You may not post replies
You may not post attachments
You may not edit your posts

BB code is On
Smilies are On
[IMG] code is On
HTML code is Off
Trackbacks are Off
Pingbacks are Off
Refbacks are Off


All times are GMT. The time now is 02:29.


Powered by vBulletin® Version 3.8.8 Beta 1
Copyright ©2000 - 2024, vBulletin Solutions, Inc.