Reply
 
Thread Tools Search this Thread
 
Old 30 June 2015, 21:31   #1
Member
 
Country: UK - England
Town: Northam
Boat name: My Boatty Too
Make: Honda
Length: 3m +
Engine: Ymaha 2.5 outboard
Join Date: Aug 2012
Posts: 56
BARRUS FUEL TANK - replacing pick-up tube.

Hi.

My local Sea Cadet unit has a couple of Barrus RDG 062 fuel tanks which I'm checking over. Found one of the pick-up pipes inside the tank was soft and gloopy and - when pulled off and left to dry - crumbled into pieces in my hand! (Yes, I've cleaned the tank out now :-) )

I've seen a thread on here about this issue. What I'd appreciate is any guidance as to how to replace this pipe and what the best type of pipe to use is.

How is the fuel take-off fixing secured on the tank? No way is my hand able top through that opening, so I might have to collar my 13-year old son for that job instead (c'mon - he's in the cadets...)

Many thanks for any advice.
Attached Thumbnails
Click image for larger version

Name:	SDC15385.jpg
Views:	361
Size:	77.9 KB
ID:	106508  
__________________
Devs Ad is offline   Reply With Quote
Old 30 June 2015, 22:23   #2
Member
 
A1an's Avatar
 
Country: UK - Scotland
Town: Fort William
Make: Ribcraft 585
Length: 5m +
Engine: Yamaha F115
Join Date: Mar 2012
Posts: 2,896
RIBase
BARRUS FUEL TANK - replacing pick-up tube.

I did a couple a while back, dead simple to do. The pipe I used was actually off a chlorination plant from a water treatment works, meant to be for transporting neat chlorine, they only lasted a month with petrol.

Ended up using PROPER fuel pipe.

Unscrew the Mercury fuel connector, the black pick up pipe then unscrews from the tank, replace pipe then feed the pipe back through the small hole and screw the pick up back in to the tank


Click image for larger version

Name:	ImageUploadedByRIB Net1435702730.288251.jpg
Views:	406
Size:	81.1 KB
ID:	106520

I put some covers on the outlets too to stop them filling with sea water when not in use.

Click image for larger version

Name:	ImageUploadedByRIB Net1435702959.543067.jpg
Views:	550
Size:	67.0 KB
ID:	106522
Attached Thumbnails
Click image for larger version

Name:	ImageUploadedByRIB Net1435702812.691735.jpg
Views:	342
Size:	83.6 KB
ID:	106521  
__________________
There is a place on this planet for all of Gods creatures.........right next to my tatties and gravy.
A1an is offline   Reply With Quote
Old 01 July 2015, 00:03   #3
Spammer
 
Country: Canada
Town: Southern Ontario
Boat name: -Unknown-
Make: SeaMax
Length: 4m +
Engine: Merc/Minn Kota
Join Date: Mar 2012
Posts: 216
Great advice!
__________________
Nightfisher is offline   Reply With Quote
Old 01 July 2015, 12:52   #4
Member
 
Country: UK - England
Town: Northam
Boat name: My Boatty Too
Make: Honda
Length: 3m +
Engine: Ymaha 2.5 outboard
Join Date: Aug 2012
Posts: 56
Perfect, A1an - thank you!

Ah, so no nut on the inside - that's a big 'phew' :-)

Much obliged.
__________________
Devs Ad is offline   Reply With Quote
Old 01 July 2015, 12:57   #5
Member
 
A1an's Avatar
 
Country: UK - Scotland
Town: Fort William
Make: Ribcraft 585
Length: 5m +
Engine: Yamaha F115
Join Date: Mar 2012
Posts: 2,896
RIBase
No worries, I can't remember the inside/outside diameter of the hose I used, iirc it's quite a unique size though. Its a tight fit threading it back through the hole.

When you replace the pipe make sure its the correct length for using the tank both on its base or when its up ended. Don't ask me how I know.
__________________
There is a place on this planet for all of Gods creatures.........right next to my tatties and gravy.
A1an is offline   Reply With Quote
Old 01 July 2015, 13:05   #6
Member
 
Country: UK - England
Town: Northam
Boat name: My Boatty Too
Make: Honda
Length: 3m +
Engine: Ymaha 2.5 outboard
Join Date: Aug 2012
Posts: 56
Hee-hee!

I've looked at various fuel hoses, but what I can't tell - and one supplier wasn't able to answer - was whether the pipe is suitable for immersion in petrol, or is it just the internal layer that's fully 'petrol proof'.

Any good sources for a pipe that will cope with permanent soaking?

Thanks again.
__________________
Devs Ad is offline   Reply With Quote
Old 01 July 2015, 13:26   #7
Member
 
Country: UK - England
Town: Bristol
Make: Ribcraft
Length: 5m +
Engine: Yamaha
Join Date: May 2006
Posts: 4,299
You need to use the quicksilver silver fuel pipe. And to help it go down the thread you also need to shave it down a bit. I used a bench mounted grinding wheel.
__________________
Member of S.A.B.S. West Country Division
matt h is offline   Reply With Quote
Old 01 July 2015, 13:47   #8
Member
 
Country: UK - England
Town: Northam
Boat name: My Boatty Too
Make: Honda
Length: 3m +
Engine: Ymaha 2.5 outboard
Join Date: Aug 2012
Posts: 56
Fab :-)

Thanks so much - really makes my life a lot easier!
__________________
Devs Ad is offline   Reply With Quote
Old 01 July 2015, 22:17   #9
Member
 
Country: UK - England
Town: Northam
Boat name: My Boatty Too
Make: Honda
Length: 3m +
Engine: Ymaha 2.5 outboard
Join Date: Aug 2012
Posts: 56
Cool - fitting unscrewed (darn it was tight) and replacement pipe on the way.

Phew - pleased it was a simple unscrew job.

Fab - thanks :-)
__________________
Devs Ad is offline   Reply With Quote
Old 08 July 2015, 13:18   #10
Member
 
Country: UK - England
Town: Royal Wootton Bassett
Length: 8m +
Engine: 250
Join Date: Jul 2008
Posts: 8,041
I do a special fitting to convert these into a robust pickup pipe.

You can use the old mariner fitting or I can supply new smaller ones like these Honda ones...

I've done it now, looks like I'm gonna have to get a trade membership

Click image for larger version

Name:	ImageUploadedByRIB Net1436361422.810097.jpg
Views:	404
Size:	54.3 KB
ID:	106777

Click image for larger version

Name:	ImageUploadedByRIB Net1436361439.957510.jpg
Views:	293
Size:	44.7 KB
ID:	106778

Click image for larger version

Name:	ImageUploadedByRIB Net1436361456.174595.jpg
Views:	327
Size:	37.4 KB
ID:	106779
__________________
whisper is offline   Reply With Quote
Old 09 July 2015, 07:38   #11
Member
 
Country: UK - England
Town: Leicester
Length: 5m +
Engine: 135hp Mercury
Join Date: Sep 2013
Posts: 1,408
Are you using a length of the quicksilver fuel pipe - as in the stuff that connects the tank to the engine - inside the tank or is the pipe like the thin walled stuff you find inside the quicksilver tanks?
If it's the latter where do you get it from as I could do with enough to replace the pipe inside a couple of 25 litre tanks.
__________________
paintman is offline   Reply With Quote
Old 13 July 2015, 11:42   #12
Member
 
Country: UK - England
Town: Northam
Boat name: My Boatty Too
Make: Honda
Length: 3m +
Engine: Ymaha 2.5 outboard
Join Date: Aug 2012
Posts: 56
Hi Whisper - that's a very neat mod .

Matt H - just as you said - a real tight fit, but very careful shaving did the job!

Hi Paintman. I used Quicksilver fuel line, the same stuff that's used for the main fuel line betwixt t'tank and t'engine. I chose this as it was recommended in this thread, but also after I checked it was a homogeneous material; one solid 'plastic' throughout its wall. Obviously if the inside can cope with petrol flowing through it, so can the outside with being immersed!

( Mercury/Mariner Quicksilver Outboard Petrol Fuel Line 8mm ID 5/16" Sold by M | eBay )

It was 8mm I/D and fitted nicely tight on the ~8.5mm fitting spigot (I warmed the pipe gently first). Ok, the threaded hole in the Barrus tank was ~15mm I/D, so with the considerable wall thickness of the pipe once fitted over the spigot it just wasn't going to go back through! It almost did, and I managed to get half-way through by 'screwing' it all back in, so that the fuel pipe had a thread grooved in to it. But that only got me part way, even with using silicone grease!

So, very careful whittling with a sharp craft knife got the diameter down to a snug fit, and I then successfully managed to screw the fitting + pipe back in to the tank.

There was plenty of wall thickness left - the vast majority - so I have no concerns about weakness there. I only pared off a half mm or so all around.

Job done - tanks with a new lease of life!

(In case if it's of interest, I also refurbished the two Barrus caps as the air vent inserts had rusted and seized - one had completely broken away. I also found that one of the rubber seal rings on the cap was completely perished, and the other was missing. Guess what fixed all this? A fab adhesive product called 'StixAll' by Everbuild.

This is amazing stuff, which sets to a very tough rubbery compound. It'll stick almost anything to almost anything! It is also incredibly inert, and a test dollop had no reaction to being immersed in petrol even though the stuff was straight out of the tube and hadn't even set. Ok, I need a long-term test on it being petrol resistant, but so far so very good.

Ok, two repairs here: the first was the air vent screw. I removed the brass vent screw and the steel sleeve it sat in. Clamped in vice, and managed to unscrew them apart. Cleaned up both with taps and dies, and gave it a smear of copper-ease. All very free and easy to use. I then refitted the parts, the sleeve from the inside and the brass screw from outside, and did them up so the sleeve was held firmly in the correct place. (I had removed all the badly rusted bits of the sleeve which were inside the cap - fortunately the actual sleeve part was intact.)

I then simply injected (it comes in a large cartridge which you use with a 'skeleton gun') the StixAll all around the sleeve and completely filled that central recessed area of the cap. Smoothed it off, left it out in the sun for a couple of days (quite a depth of StixAll!) and the air-vent fixing is now fully air tight in the cap and also fully secure.

I then cleaned up the groove where the O ring used to sit, injected a bead of StixAll all around this, and then ran a little metal former I'd trimmed out of thin sheet all around the stuff. Did this a few times, removing excess StixAll each time, until I was left with a raised, flat-topped 'O' ring literally moulded in place. (The former I used was simply a thin piece of scrap metal sheet (less than half-mill thick) cut with shears to an easy-to-hold size (around 50mm x 10mm) with the required 'O' ring shape cut out from one corner. This was approx 6mm wide x 1mm high. When I ran that shape around the cap insides, it left that raised 6mm wide x 1mm high 'rubber' StixAll band. (The actual formed 'band' is deeper than 1mm as there was also a ~3mm deep recess for it to sit in. So the whole formed StixAll band is approx 6mm wide and 4mm deep in total - and it's adhered to the cap, so shouldn't go anywhere!)

Allowed to fully set (it's really tough stuff) and then a goodly smear of silicone grease (completely inert lubricant) all over everything to protect it further, and to make actual use that much smoother and easier.

The cap has never been easier to use, and the tank is completely air tight when it's on.

A lot of work? Not at all. What possessed me to even try? Simple - new replacement caps are nearly £40 each... )
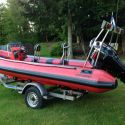
__________________
Devs Ad is offline   Reply With Quote
Old 13 July 2015, 20:22   #13
Member
 
Country: UK - England
Town: Leicester
Length: 5m +
Engine: 135hp Mercury
Join Date: Sep 2013
Posts: 1,408
Thank you Time to get the stanley knife out!
__________________
paintman is offline   Reply With Quote
Old 08 June 2022, 08:34   #14
mwp
Member
 
Country: UK - Scotland
Town: uk
Length: 6m +
Join Date: Mar 2017
Posts: 5
Help

I have a couple of complete Barrus RDG062 fuel cells. Can anyone please let me know what type of connection / part number I need to connect onto the fitting on the tank. IE how do I plug into the fuel cell? I read about a mercury fitting but am not sure which one to get. Thanks Martin
__________________
mwp is offline   Reply With Quote
Old 08 June 2022, 13:28   #15
Member
 
Country: UK - England
Town: Northam
Boat name: My Boatty Too
Make: Honda
Length: 3m +
Engine: Ymaha 2.5 outboard
Join Date: Aug 2012
Posts: 56
Hi mwp.


Any chance of a photo? Is it like mine above?
__________________
Devs Ad is offline   Reply With Quote
Old 10 June 2022, 14:12   #16
mwp
Member
 
Country: UK - Scotland
Town: uk
Length: 6m +
Join Date: Mar 2017
Posts: 5
Yes Devs, its exactly the same as yours.

Martin
__________________
mwp is offline   Reply With Quote
Old 10 June 2022, 17:56   #17
Member
 
Country: UK - England
Town: Northam
Boat name: My Boatty Too
Make: Honda
Length: 3m +
Engine: Ymaha 2.5 outboard
Join Date: Aug 2012
Posts: 56
I 'think' it's this, but you may wish to check some dimensions with the seller: https://www.ebay.co.uk/itm/181459810807


Often referred to as the 'old style Mercury Marine' fitting.

(I don't have my tanks any more, so can't check - sorry.)
__________________
Devs Ad is offline   Reply With Quote
Old 10 June 2022, 17:59   #18
mwp
Member
 
Country: UK - Scotland
Town: uk
Length: 6m +
Join Date: Mar 2017
Posts: 5
Exclelent, many thanks for that. Martin
__________________
mwp is offline   Reply With Quote
Reply

Thread Tools Search this Thread
Search this Thread:

Advanced Search

Posting Rules
You may not post new threads
You may not post replies
You may not post attachments
You may not edit your posts

BB code is On
Smilies are On
[IMG] code is On
HTML code is Off
Trackbacks are Off
Pingbacks are Off
Refbacks are Off


All times are GMT. The time now is 01:39.


Powered by vBulletin® Version 3.8.8 Beta 1
Copyright ©2000 - 2024, vBulletin Solutions, Inc.